
Payments
Add and Edit Payment Methods
To add a new or edit an existing Payment Method within the Customer Care Portal, navigate to the Account > Overview > Payment Methods sub-tab > select the Add New Payment Method button. See Payment Methods for more details.

Select Custom Fields from the dialog shown above and press the Add New Field button to add an account field. More information on Account Fields is here.
Making Payments from Transactions > Payments
To make a payment, search for the Account you want to make a payment to and open the Transactions > Payments page from the side navigation menu. This page allows you to view payments that have been made to the current Account, make new payments, and void payments.
Select the Make Payment button from the upper right side of the Payments page.

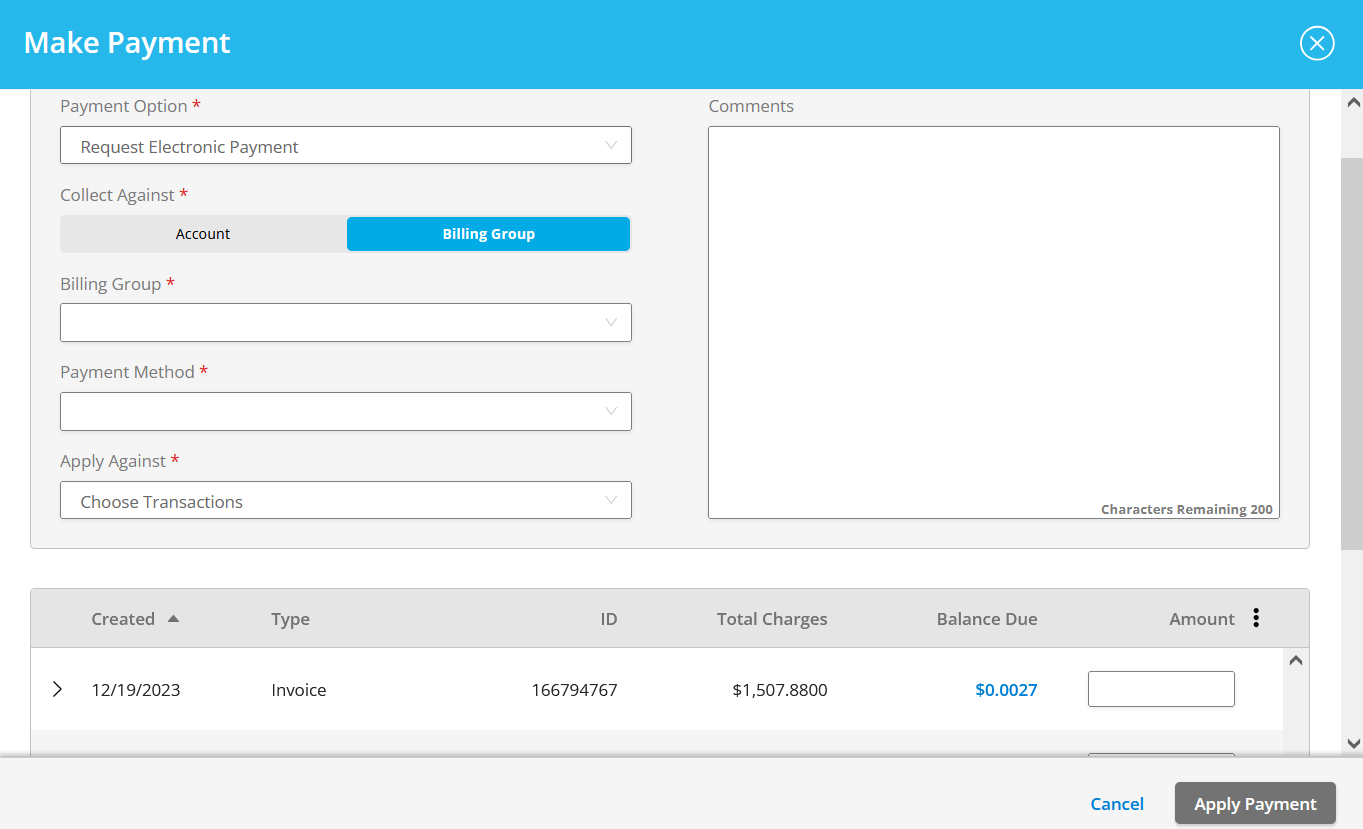
After you click the Make Payment button, a pop-out drawer will open where you can create and apply payments. Select from one of the following payment options:
- Request Electronic Payment
- Post External Payment
- Apply Existing Payment
- One-Time Payment
Request Electronic Payment
Collect Against Account (default)
Enter the following payment information:
- Payment Method—Select an available payment method for the account (e.g., Credit Card or ACH)
- Apply Against—Select from one of the following:
- Choose Transactions: Entered manually to apply specific amounts for invoices listed at the Amount field (grid is shown below)
- FIFO: Automatically to the oldest invoices for the Account (FIFO) - default
- FDFO: Automatically applied to the first invoice due (FDFO)
- Defer Until Later: Deferred to be applied at a later time

For the FIFO, FDFO, and Defer Until Later Apply Against selections, select one of the following Amount types:
- Current Balance Due—Select the Charge Due for the account (default).
- Other Amount—Select this option and enter a value at the Other Amount field.
Collect Against Billing Group
Enter the following payment information:
- Billing Group—Select an existing Billing Group against the account for payment, if available.
- Payment Method—Select an available payment method for the account (e.g., Credit Card or ACH)
- Apply Against—Select from one of the following:
- Choose Transactions: Entered manually to apply specific amounts for invoices listed at the Amount field (grid is shown below)
- FIFO: Automatically to the oldest invoices for the Account (FIFO) - default
- FDFO: Automatically applied to the first invoice due (FDFO)
- Defer Until Later: Deferred to be applied at a later time
For the FIFO, FDFO, and Defer Until Later Apply Against selections, select one of the following Amount types:
- Current Balance Due—Select the Charge Due for the account (default).
- Other Amount—Select this option and enter a value at the Other Amount field.
Post External Payment
Enter the following payment information:
- Payment Received—Select the date between the last billed date and the current date.
- Reference Code—Enter a code for reference purposes (e.g., the institution check number).
- Apply Against—Select from one of the following:
- Choose Transactions: Entered manually to apply specific amounts for invoices listed at the Amount field (grid is shown below). Select an Apply Against value at the Apply Remaining Amount field.
- FIFO: Automatically to the oldest invoices for the Account (FIFO) - default
- FDFO: Automatically applied to the first invoice due (FDFO)
- Defer Until Later: Deferred to be applied at a later time

For the FIFO, FDFO, and Defer Until Later Apply Against selections, select one of the following Amount types:
- Current Balance Due—Select the Charge Due for the account (default).
- Other Amount—Select this option and enter a value at the Other Amount field.
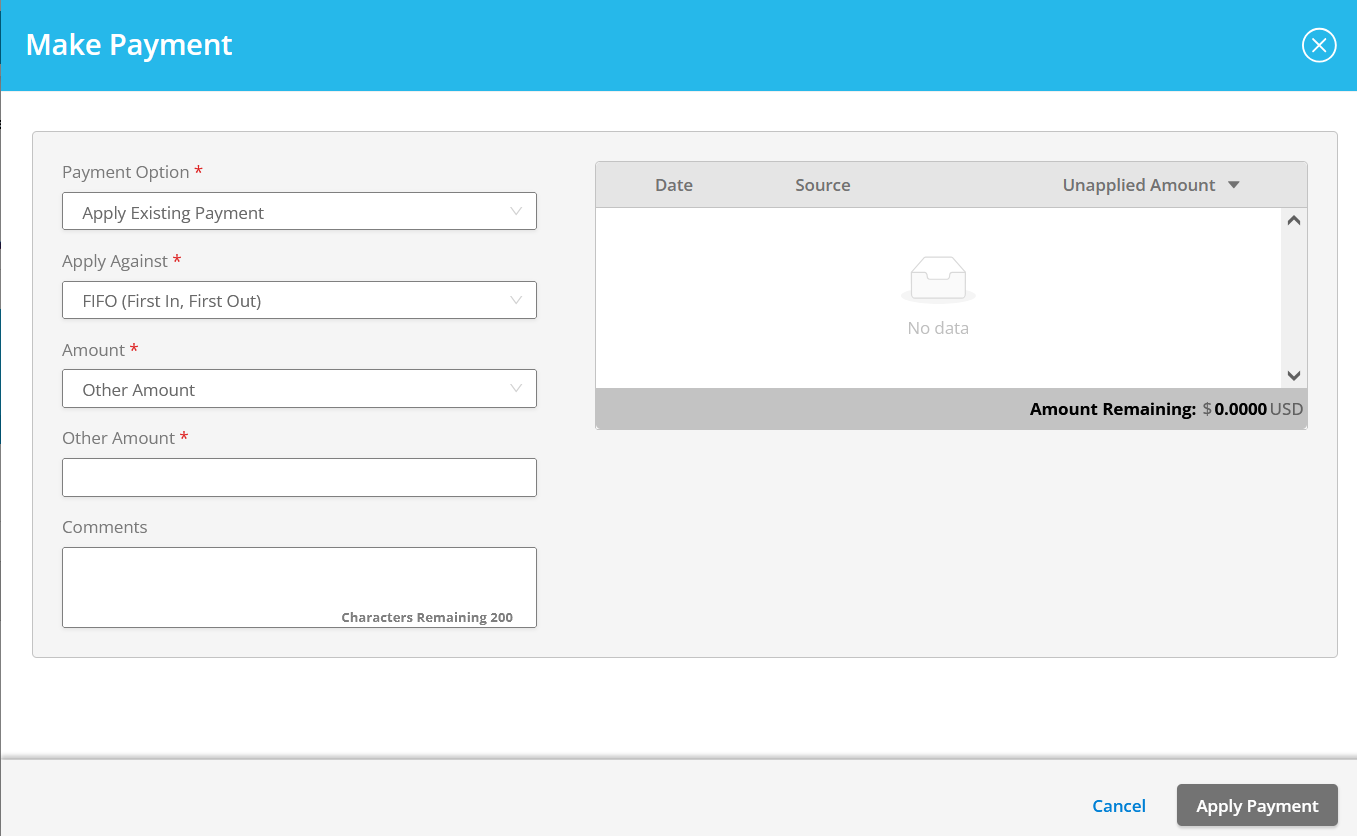
Apply Existing Payment
Choose this option to call up a grid of unapplied payments by date, source, and unapplied payment amount; make a selection from the unapplied list to apply a payment.
- Apply Against—Select from one of the following:
- Choose Transactions: Entered manually to apply specific amounts for invoices listed at the Amount field (grid is shown below). Select an Apply Against value at the Apply Remaining Amount field.
- FIFO: Automatically to the oldest invoices for the Account (FIFO); enter a value at the Other Amount field.
- FDFO: Automatically applied to the first invoice due (FDFO); enter a value at the Other Amount field.
- Defer Until Later: Deferred to be applied at a later time; enter a value at the Other Amount field.
One Time Payment
Click here for more information on completing a one time payment within the Customer Care Portal.
Enter Comments as needed at any point within the Make Payment dialog while selecting field values in order to complete your payment.
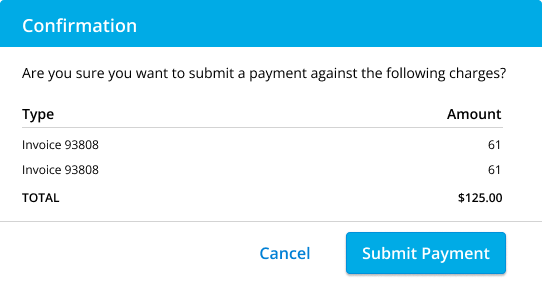
Once the payment has been distributed to your liking, click the Apply Payment button located at the bottom right corner of the Make Payment dialog box.
A confirmation pop-up will display for you to review the payment. If everything looks satisfactory, press Submit Payment.
Voiding Payments from Transactions > Payments
To void a payment, select the row actions ⋯ to the right of the payment and click Void.

A confirmation pop-up will appear prompting you to enter a reason for voiding the payment as well as a comment. Fill in these fields and then press Void Payment to finish the void.

Making Payments from Account > Overview
Payments can also be made from the Account Overview page. Search for the Account you want to make a payment to and open the Account > Overview page. In the upper right side of the Overview screen is the Total Account Balance. Next to this total is the Make Payment button.

Click the Make Payment button to open a pop-out drawer where you can create and apply payments. Follow the same procedure as above to create your new Payment.