
This article provides the steps necessary to create a new contract and modify an existing contract.
Create a Contract
Overview
Creating a Contract
Getting Here: Click Accounts > search for an account > Plans > Contracts > Create a New Contract
- Select the type of contract that you want to create.
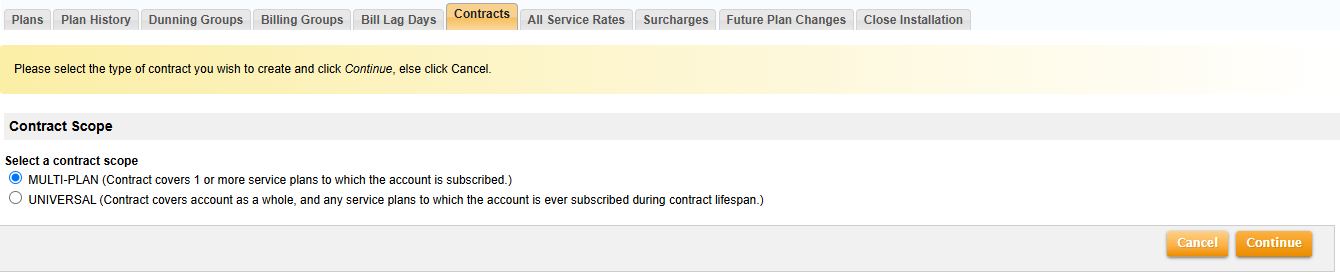
Note: You cannot assign an alternate recurring fee or early cancellation fee to a multi-plan contract or universal contract. A universal contract overrides any other contracts assigned to an account.
- Click Continue. If more than one plan is associated with the account, select the plan you want to create the new contract within. The New Contract Details page displays.

- Fill in the Client Contract ID.
- Select one of the following Contract Completion options:
- Select Date Range: Allows you to define a start and end date for the contract.
- Select Duration: Allows you to define a start date and the duration of the contract.
- Select a date on which the contract goes into effect using the Contract Start Date field.
- If you selected Select Date Range, select a Contract End Date on which the contract concludes.
If you selected Select Duration, specify a number in the text field, then select a time unit from among Days, Weeks, or Months.

- Select an action from the Contract End Action field to specify what happens after completion of the contract:
- Terminate service and billing: If the contract is assigned to a master plan instance, the account's status is changed to "Terminated" and all service and billing are terminated for all plans assigned to the account. If the contract is assigned to a supplemental plan instance, then all service and billing are terminated for the supplemental plan instance.
- Terminate service and billing prorate final invoice: Creates a prorated charge for the plan’s recurring fees for the final period using the contract’s end date as the billing end date.
- Continue existing service without contract: Service remains in effect and continues to be billed per normal terms. This is the standard behavior for most service plan contracts.
- Renew existing contract automatically: A new contract with identical terms goes into effect once the original contract terms are met.
- Rollover to a Plan and/or a Rate Schedule: The contract rolls over into an existing plan and/or rate schedule. This option is only available if MULTI-PLAN is selected as the Contract Scope.
- Renew existing contract automatically with different duration: On completion of contract terms, a new contract of identical terms but with different duration will take effect. When selected, Contract Renewal Completion options appear. Follow the procedure described in Step 7 above.

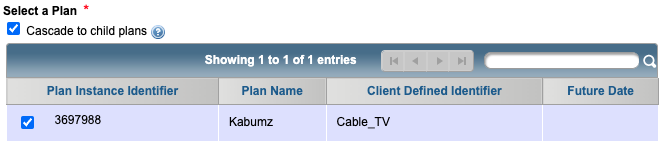
- In the Select a Plan section of the screen, select each plan to which the new contract should apply.
Note: Selecting the Cascade to child plans option applies the contract to any child plans that are attached to the selected plan instance.
- If Rollover to a Plan and/or a Rate Schedule is selected, click Add Selection.
- If Rollover to a Plan and/or a Rate Schedule is selected, choose from the following:
- Rollover to a New Plan
- Click Add for Rollover to a new Plan.
- Select a new plan.
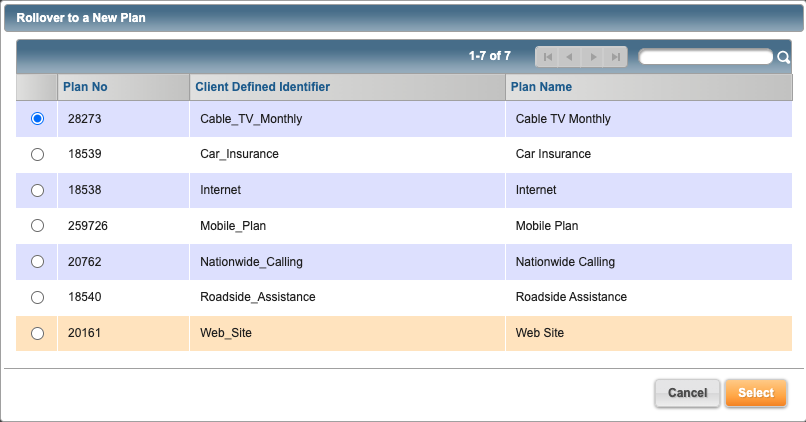
- Click Select.
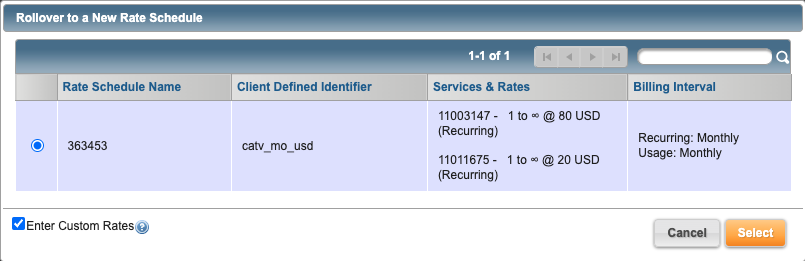
- Rollover to a New Rate Schedule
- Click Add under Rollover to a New Rate Schedule.
- Select a new rate.
- Click Select.
-- or --
- Click Add under Rollover to a New Rate Schedule.
- Select a rate to use as a template for a custom rate.
- Check Enter Custom Rates.
- Rollover to a New Plan
- Enter the custom rate value (e.g., 60 or 69.99) in Rate field to represent the service cost in current currency type (e.g., USD).

- (Optional) Click Add to add another Rate Tier and enter time periods (e.g., months) into "To" and "From" fields as desired. When entering, for example, a "12" in the second tier's From field, the To field in the first Tier will auto-populate from the previous time period (i.e., 11 in this example).
- Click Select.Your custom rate is applied.
- If you wish to edit the custom rates or plans on your new rate schedule, click the Edit link. Clicking the Remove link will clear any plan or custom rate selections and return the Configured Rollover instance to its prior state.

- In the Early Cancellation Fee field, enter the amount that the customer is charged for canceling the plan before the contract is completed (optional). This option is only available if MULTI-PLAN is selected as the Contract Scope.
- Enter any applicable comments about the contract in the CSR Comments field.
- Check the box next to Automatically discard open contracts on this account for the same service plan? if you do not want multiple contracts associated with the plan(s) you selected. The instance-level Contract parameter "Prevent multiple active contracts on same plan instance" (set to "True" by default) disallows multiple contracts for a Plan Instance and, if you try to create an additional contract for a plan associated with a contract, Aria will return an error.
- Click Save Contract. The contract is assigned to the account under the specified terms.
Modifying a Contract
You can modify an existing contract, starting the process from either the Contracts screen or the Plans screen.
From the Contracts Screen
Getting Here: Account Overview > Plans > Contracts > Modify a Contract (Modifying Contract screen) | Create a Contract (New Contract Details screen)
- Click on Contract No link in the All Plans list table

- Click Modify Contract in the Contract Details screen.

This returns you to the Contract form screen detailed in Creating a Contract above. You can modify the contract following that same procedure.
From the Plans Screen
Getting Here: Account Overview > Plans > Plans tab
- In the Plans tab, select the Plan Instance ID link associated with the contract you wish to edit.

- Click the Contract link from the plans information section.

- The Contracts screen loads. Follow the procedure listed above.
Note: When selecting multiple MPIs, the Save action handles and processes the complete list of selected MPIs including selected MPIs that are not displayed on the current page.