Aria Knowledge Central

Add Rates to a Plan

Overview

This article provides steps for adding rates to a plan when creating a new plan in the product catalog. To add rates to an existing plan refer to Update a Plan's Rate Schedule. To define custom rates that are only applicable to a specific plan instance, refer to Update a Plan Instance's Rate Schedule.

Note: You can add multiple rate schedules for the same currency and for different currencies.

Adding Rates

Getting Here:  (search for an account) > Products > Plans > New > Rates

  1. Select a currency from the Default Currency dropdown to specify which currency you want associated with the specific rate schedule you are creating. This is the currency in which customers subscribed to this plan are charged.
  • You can add multiple rate schedules for the same currency and for different currencies.
  • When you create a new account, customers subscribed to this plan are assigned the default rate schedule for the default currency that you selected.
  • When you create an account using the create_acct_complete_m API call, and do not specify a currency code or a rate schedule for the account. The account is assigned to the default rate schedule for the default currency unless you specify a currency for the account, then the default rate schedule for the chosen currency is assigned to the account, even if it is different from the default currency for the selected plan.

Note: The “Default Currency” field is pre-populated with your client instance’s default currency. See Add a Currency.

  1. In the Rate Schedule Name field, enter a short, descriptive name for the rate schedule.

Note: The Translations link enables defining a translation for the field for an associated locale. Refer to Multi-language Translation for Product Elements for more information.  

clipboard_eb232f1f2ec02358dfe636365600c55ab.png

  1. In the Client Defined Identifier field, keep the auto-populated value, or enter another unique value.

Note: The Client Defined Identifier of an existing rate schedule can be edited by setting the Enable Client Rate Schedule ID Edit in Product Catalog client parameter (Configuration > Client Settings > Miscellaneous Settings) to Yes.

  1. Enter the Available Start Date and Available End Date field. If no end date is specified, the rate schedule does not expire. 
  2. To specify the rate change to begin at a future date, check Schedule Future Rate Change. Enter the future date in the field that displays. 
  3. Select a Recurring Billing Interval and a Usage Billing Interval. The Usage Billing Interval must be less than or equal to the Recurring Billing Interval.
    1. You can select from among Daily, Weekly, Monthly, Quarterly (every 3 months), Semi-Annually (every 6 months), or Annually (once per year).
    2. When you select Daily, Weekly, or Monthly, you can fine-tune the recurring billing interval for typing a numeric value in the text box next to the Recurring Billing Interval select box. As with the Recurring Billing Interval, the Usage Billing Interval value in this text box must be less than or equal to the Recurring Billing Interval value.
      dev-9787_02.png
    3. When selecting a Daily or Weekly Recurring Billing Interval, follow Daily-Weekly Billing best practices for ensuring you achieve your desired billing results.
  4. Configure the rates for each service associated with the plan. Each service type has a different set of configurable parameters.

    You can enter prices with up to ten decimal places by default. If you need to enter prices with more than ten decimal places, please contact Aria Customer Support.

Note: If Future Rate Change Start Date is checked, then an additional field displays for each service type to define the Future Rate. This Future Rate goes into effect on the future date specified. 

  • Activation Services and Minimum Fee Services: Enter the rate, and if applicable, the future rate. 
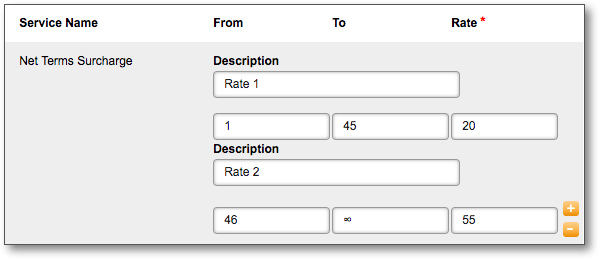
  • Usage Services and Recurring Services: By default, the From and To fields display 1 - infinity. After you enter the first rate Description and Rate, you can click the plus symbol to add a new rate tier. You can edit the From field for each additional tier and the To field for each tier before the final tier.

Note: If the Description field does not display, you can set the Use Rate Tier Descriptions parameter to True (Configuration > Client Settings > Miscellaneous Settings).

Service Rate Configuration 6.51.png

  1. Click the Add Rate Schedule button to create multiple rate schedules and follow steps 2-6 above.
  2. Click Next: Rollovers.
  • Was this article helpful?