Aria Knowledge Central

Create a Role

Overview

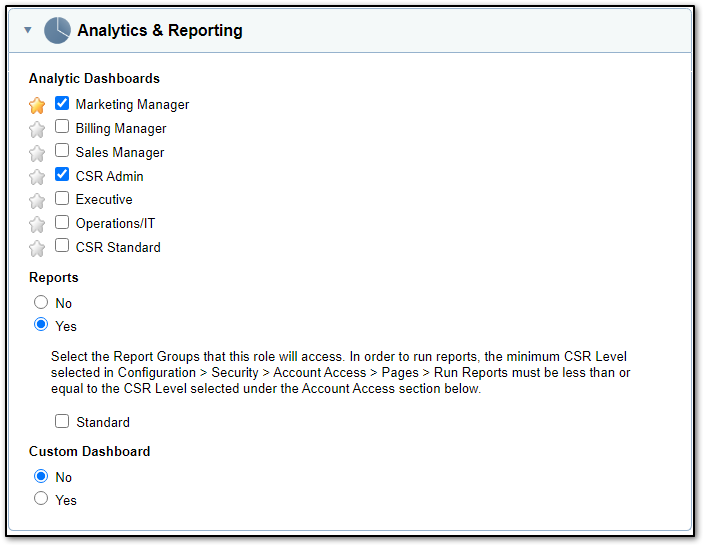
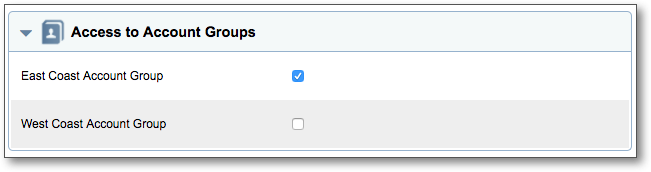
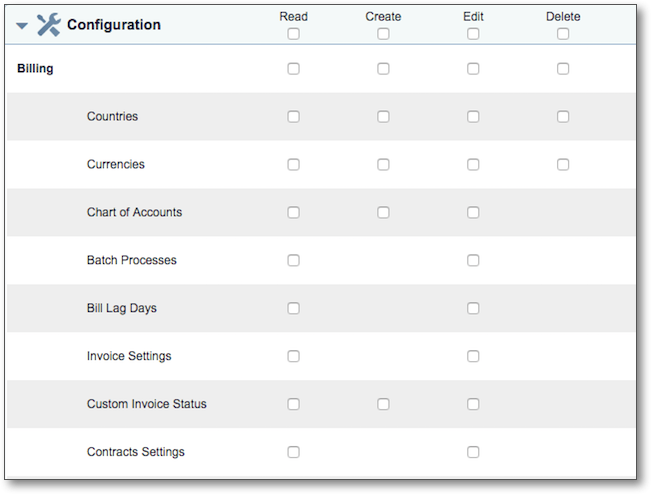
Access and control of Aria's functions and modules are set by a user's role. The role is defined first, and then assigned to a user. A role defines the level of access for a user within Aria, including ability to create plans, edit services, view dashboards and etc.

Note that role access to a certain module may include the ability to interact with other modules to which the role has not been granted explicit access. For example, a role with only "Create Plan" access can also create new services within the Plans module when creating a new plan. However, this same role does not have access to the Services module in the navigation pane, and thus cannot create services within the Services module.

Creating a Role

Getting Here: Click Configuration > Security > Roles > New

Note: Depending on the functions configured within your Aria instance, the modules that appear in the Create a Role screen may differ. If you have questions regarding one of these modules, refer to User Documentation for that module

clipboard_e58efa68f35451aaf5cf06a32f6f1b7a8.png

  1. Enter a Role Name. Be specific as this name allows you to easily identify the role. For example, Business Analyst with API Live Access.
  2. Enter a Client Defined Identifier, which is a unique ID for reference within your organization. The Client Defined Identifier is an Aria-generated ID that can be updated to meet your needs.
  3. Set the access for the Manage Authorization Keys setting.
  • Yes: Automatically selects Read for the Configuration > Integrations > Web Service API page. The Configuration > Integrations > Web Service API page is enabled in the navigation bar and includes the ability to generate, enable or delete authorization keys.
  • No: The user does not have access to enable or delete authorization keys within the Web Service API page.

Note: If Read access for Configuration > Integrations > Web Service API page is deselected, then the Manage Authorization Keys setting automatically reverts to No.

  1. Set the access for the rest of the listed modules. The options displayed depend on the configuration of your Aria instance and may include Manage Copy Config, Enable API Live, Enable Bulk Usage, and Enable Customer Care Portal Access.
  • Yes: The module appears in the navigation pane for users with this role. All functions within the module are available for the user.
  • No: The module is not displayed in the navigation pane, and the user cannot access any of the functions.
  1. Modules included in your Aria instance are listed in expandable menus. Click the drop-down arrow to view and configure the module's access options.


Analytics & Reporting

For example, Analytics & Reporting presents options to grant access to various dashboards and reports.

customdash_createrolexx.png

  • Marking a star in the Analytic Dashboards section designates that dashboard as the default.
  • Selecting Yes for Reports grants access to reports. However, the CSR level access takes precedence over this selection. Ensure that the minimum CSR level selected in Configuration > Security > Account Access > Pages > Run Reports is less than or equal to the CSR Level selection in the Account Access section. The Account Access section displays below this Analytics and Reporting module in the user interface.
  • Selecting Yes for Custom Dashboard grants access to the Custom Analytics Dashboard, if configured in your Company Profile. The Custom Dashboard will not show if not configured in your Company Profile.


Access to Account Groups

The Access to Account Groups section displays each available Functional Account Group with a check box. Selecting a checkbox enables the role access to that Functional Account Group. If you do not have Account Groups configured, this section does not display.
Account Group Role Access 6.50.png


Configuration

For some modules, such as Configuration, specific access can be granted to individual sub-pages for the module. If no checkboxes for a sub-page are checked, the sub-page or features (for example, a create New button) of the sub-page do not display for a user with the role.

Conf 2.png

  • To grant access to all of Configuration, use the top-level checkboxes for Read, Create, Edit or Delete (i.e. there is no need to expand the menu.)
  • To deny access to all of Configuration, do not select any checkboxes. Once the role is saved and assigned to a user, Configuration does not display in the navigation pane for the user.

Note: In some cases, higher-level access includes lower-level access. This is denoted automatically as you select the checkboxes. For example, a user with Create, Edit or Delete access automatically has Read access. 

  1. Click Save. The role can now be assigned to a user.
 
  • Was this article helpful?