Refresh Aria Transaction – Click to pull transaction records (transactions, statements, comments, payments, refunds, invoices, etc.) on-demand. This sync is also included in the "AriaBatchAccountDetailsUpdaterScheduler" job. Additionally, these transaction records are pulled in real-time when an account is created in Salesforce and is pushed to Aria via the Commit button.
Account Management Using Aria for Salesforce
Overview
Once Aria accounts are created within Salesforce or imported into Salesforce from Aria, you can manage those accounts to perform actions such as updating account information, adding/replacing/or deleting plans, ordering one-time products, collecting payments, offering credits, and producing refunds to name a few. The following provides information and instructions for performing these tasks using the Aria for Salesforce application.
Account Views
Once an account has been created in Aria for Salesforce or imported from Aria into Aria for Salesforce, you can view the account information by using the various actions and screens as described below.
Note: The location of fields on the screen may vary based on how your Aria for Salesforce System Administrator set up your page layouts.
Account Screen
The main Account screen, as shown below, provides a number of account action hyperlinks to refresh, review, and/or edit information, in addition to general account demographics such as the type of customer, Industry, billing address, etc. A description/use of these account action hyperlinks is detailed below:

| 1. | Refresh from Aria – Click to refresh all account data, including account details, account plans, account supplemental fields, contracts, coupons, orders, and payment method. |
| 2. |
Note: This sync must first be configured by turning on the Sync Aria Transactions to SFDC Objects setting. |
| 3. | Aria Payments – Click to make a one-time payment, post a non-electronic payments, or view payment history. From here, you can also create and manage cash credits, service credits, refunds, and credit memos. |
| 4. | Aria Transactions – Click to display Aria transactions for 30 Days, 60 Days, 90 Days, 180 Days, 1 Year, or 2 Years. You can also view transactions at the individual subscription level. |
| 5. | Edit - Click to view/edit account information, or view Account Plan information including Active Plans, Previous Master Plans, Future Plan Changes, Supplemental Plan History, and Contracts. You can also edit Billing Groups, and view Next Statements for Active Plans. |
| 6. | "Down Arrow" - Click/Select to perform such actions as viewing Aria Comments, Account Hierarchy, and Aria Usage. |
Account "Related" Screen View
The Account "Related" screen view is the default account view after accessing an account as displayed below:


The major sections of this screen view include:
- Contacts
- Aria Contact Details
- Opportunities
- Account Plans
- Aria Billing Groups
- Aria Payment Methods
- Aria Payments
- Aria Orders
- Aria Transactions
- Aria Contracts
- Aria Coupon Histories
- Aria Dunning Groups
- Click on a sections' New button to add a new element to that section. For example, to add a new Contact, Opportunity, or Quote.
- Click on any of the various sections individual elements' down-arrow to edit or delete that individual element.
Account "Aria Overview" Screen View
The Account "Aria Overview" screen view provides easy access to the most important functionality related to the account as displayed below:

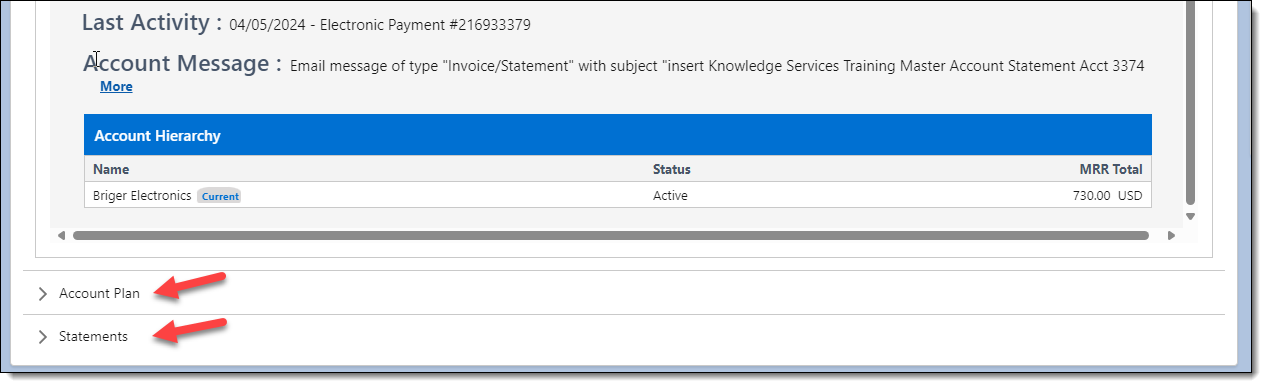
The major sections of this screen view include:
- Quick View (opens by default)
- Account Plan
- Statements
The "Quick View" account dashboard as shown above provides a snapshot of the Accounts' most important information.
Note: The various components displayed on this dashboard are configurable via Aria Configurations > Quick View.

- In the Account Plan section, click on the various tabs at the top of this section to review Active Plans (default view), Queued Plans, Contracts, Inactive Plans, Plan Changes or Account Status.
- Click on the Billing Group(s)' Edit link, to review, add, or edit applicable information, specific to the Accounts' associated billing group(s) as displayed below and Commit your changes:

Note: A down arrow will display to enable the selection of a different Billing Group for viewing/editing when the account has more than one (1) assigned Billing Group.
-
Click on a Plan Name to expand this view to show the selected Plans' Services (Type, Pricing Rule, Pricing), assigned Rate Schedule, and Default Currency as displayed below: Click on the expanded views' red X to return to the original view.

- Click on a Plans' Eye icon to open a popup view of the Plans next statement as displayed below. Click on the X in the upper right to close the next statement popup screen.
![]()
- Click on the Manage Plans button to access the Accounts' Plan Wizard screen as displayed below to add/modify account plans inclusive of Billing Groups, One Time Products, Promotions, and/or Contracts and click the Save and Commit buttons to save your changes and commit updates to Aria.

Note: See the Plan Actions section of this document for instructions to add, update, or delete plans for an existing account.

- By default, the statement table for (View All) subscriptions is displayed with the following headers along with their respective data:
- Statement No Due Date Balance Forward Charges Credits Closing Balance
- Pagination is in chunks of 15 records.
- Account currency is displayed in ISO format (for example DKK, USD, CAD, SGD, AUD, EUR, etc.)
Use the 'Statement Nos' search field to enter the statement number. The statement table will dynamically display a refined subset of statements after each number is entered.
- A 'Subscription' filter displays a static value of 'View All'. The dropdown arrow provides for the selection and viewing of statements that are specific to an individual subscription.
- Click on a unique 'Statement Nos' up arrow:
- A table showing the various transactions for the selected statement with the following headers and their respective data is displayed.
- Transaction No Date Description Amount
- When the user clicks on a "Statement No's" statement icon, a statement will be displayed using the statement template associated with the Plan' Billing Group as displayed below.

Note: An error message, "statement could not be found" will be displayed when a statement template was not assigned to the Plan's Billing Group.
- Click on the 'X' in the upper right corner to close the Statement view.
Plan Actions
Aria for Salesforce provides users the functionality to add, update, or delete plans for existing accounts.
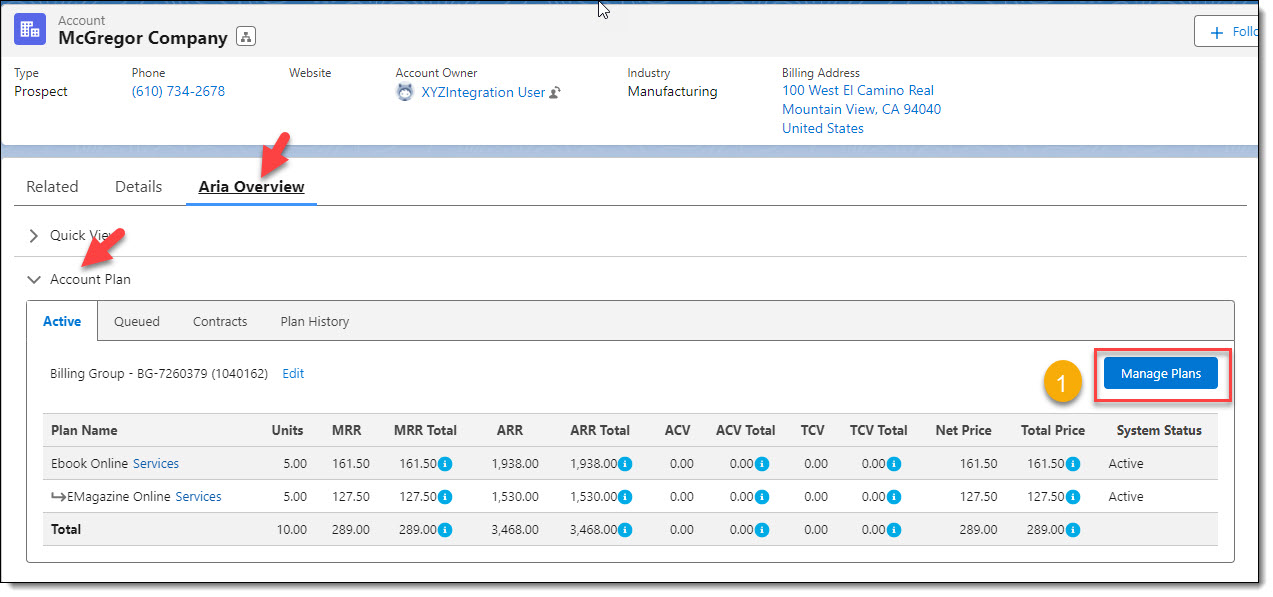
Adding a Plan(s) to an Existing Account Via the Account > Aria Overview Screen

- From the Account screen, click on the Aria Overview link.

- Via the Account Plan drop-down, click on the Manage Plans button.
The Plan Wizard screen displays:

- Click on the Plans link.

- Click on the Plan Start & Billing Options Setting Icon.

- Click on the When Plan Changes Take Effect drop-down arrow and select from Immediately or In the Future for new Plan assignments.
- If applicable, use the Calendar icon to select a date when the new plans will take effect.
- Click on the Save button.

- Click on the Add Plans drop-down arrow and click/select from Product Catalog.
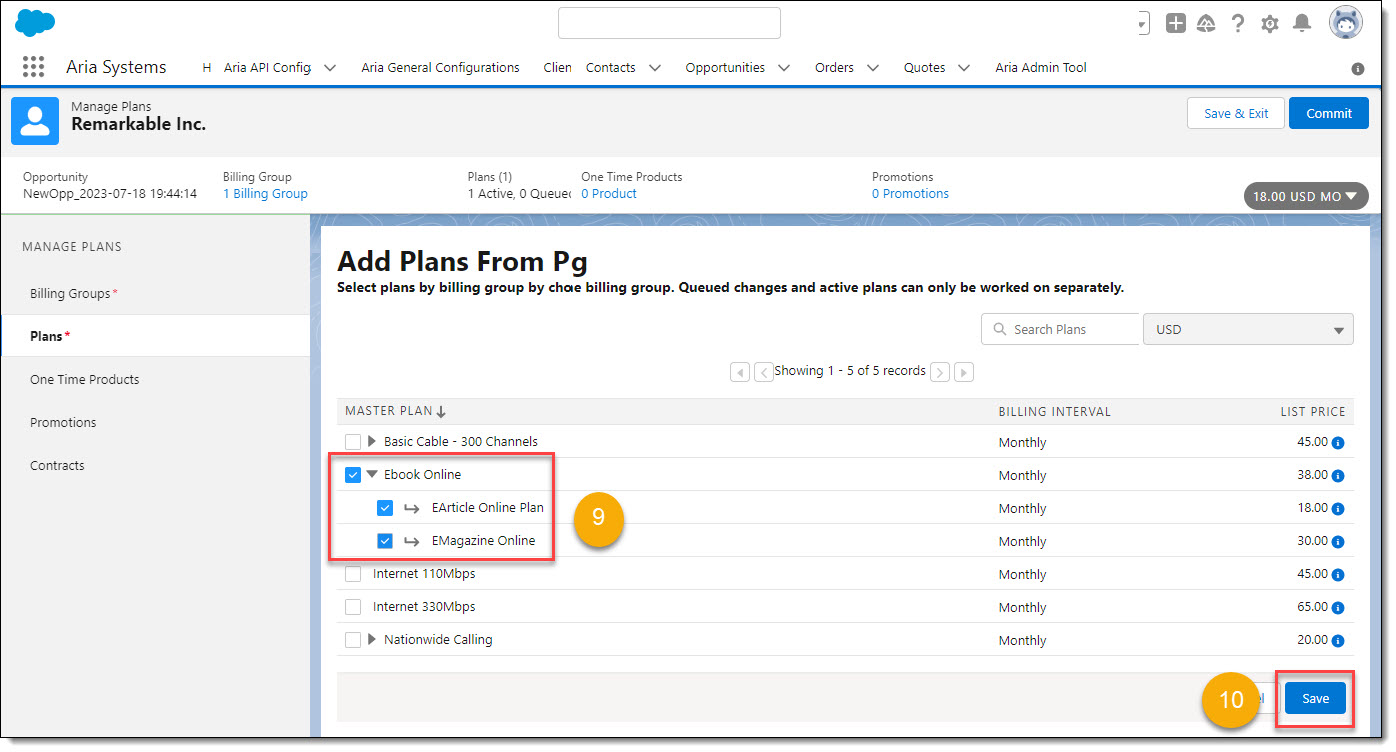
- Select a Plan(s) by clicking on the check box next to the Plan(s).
- Click on the Save button.
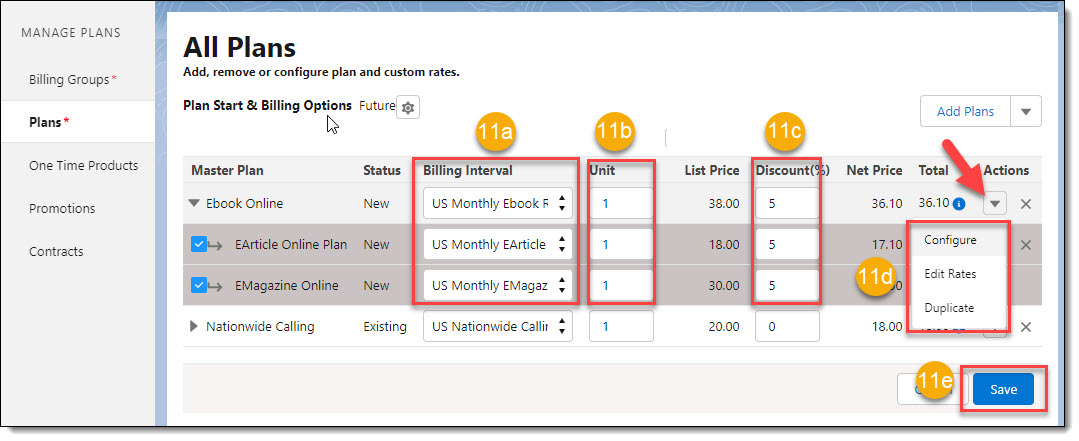
11a. Use the Billing Interval drop-down to select a rate schedule for the new Plan(s) offering.
11b. Use the Unit field to adjust the number of units of the Plan(s) to be purchased.
11c. Use the Discount field to enter a discount percentage for each plan offering, if desired.
11d. Use the Actions drop down arrow to further Configure the Plan(s) including fields such as Plan Name, Dunning Group Assignment, Plan Instance fields, etc)., Edit Rates, or Duplicate the Plan to facilitate the purchase of an additional plan instance.
11e. When finished, click on the Save button.

- Add and Save any One Time Products, Promotions (Coupons), Or Contracts for the new Plan Offering(s).
- Click on the Commit button to save the new Plans for the account.
The Aria Overview screen is updated to show the New Plan(s) assigned to the account as shown below. Since these Plans were assigned with a future date, their System Status indicates Pending Activation.

Note: The preceding steps to add a new Plan(s) also automatically generates a new Opportunity for the account in the format of NewOpp_YYYY-DD-MM HH:MM:SS. The Plan(s) may also be committed from the accounts' Opportunity screen. See Creating Accounts Using Aria for Salesforce Opportunity and Quote Management.
Adding a Plan(s) to an Existing Account Via a New Opportunity
- From the Account' screen, click on the Opportunities New button.

- Fill-in/select the desired Opportunity fields and click on the Save button.
Note: Fields having a red asteric are required fields.

- Click on the Opportunities' Name link.

- From the Opportunities' screen, click on the Manage Plans button.

- Use the Billing Group up/down arrows to select the billing group this new Plan(s) will be assigned. Click on the Next button.
The Plan Wizard screen is displayed:

- Complete steps 3 through 13 as detailed above in "Adding a Plan(s) to an Existing Account Via the Account > Aria Overview Screen".
Replacing an Existing Plan
- From the Accounts' Aria Overview > Account Plan screen, click on the Manage Plans button.
The Plan Wizard screen displays:

- Click on the Plans link.

- Click on the desired Plan to be replaced Action down-arrow, and click on Swap Plans from the dropdown options.

- Click on the Plan(s) replacement radio button.
- Click on the Save button.

- Click the Undo Change link on the existing Plan to cancel the Plan replacement.
- Click on the Today Settings icon to configure when Plan change will take effect (for exp. Immediately, In the Future).
- Type in the desired number of Units for the replacement Plan.
- Type in any desired Discount percentage.
- Use the replacement Plans' Action drop-down arrow to Configure the Plan(s) including fields such as Plan Name, Dunning Group Assignment, Plan Instance fields, etc)., Edit Rates, or Duplicate the Plan to facilitate the purchase of an additional plan instance.
- When finished, click on the Save button.
Note: You can also add any One Time Products, Promotions, and/or Contracts for the replacement Plan(s).

- When finished, click on the Commit button to save the replacement Plan to the account.
Below we see the new replacement Plan queued in the account' Account Overview screen:

Note: The Plan is "Queued" to replace the existing Plan since its effective date was configured to begin on a future date.
Cancel a Plan

- From the Accounts' Aria Overview > Account Plan screen, click on the Manage Plans button.
The Plan Wizard screen displays:

- Click on the Plans link.

- Click on the desired Plan to be canceled Action down-arrow, and click on Cancel from the dropdown options.
A Confirmation pop-up screen is displayed to confirm or cancel the Plan cancelation:
Note: Note that all associated Supplemental Plans of a Master Plan being canceled will also cancel.

- Click on the OK button.
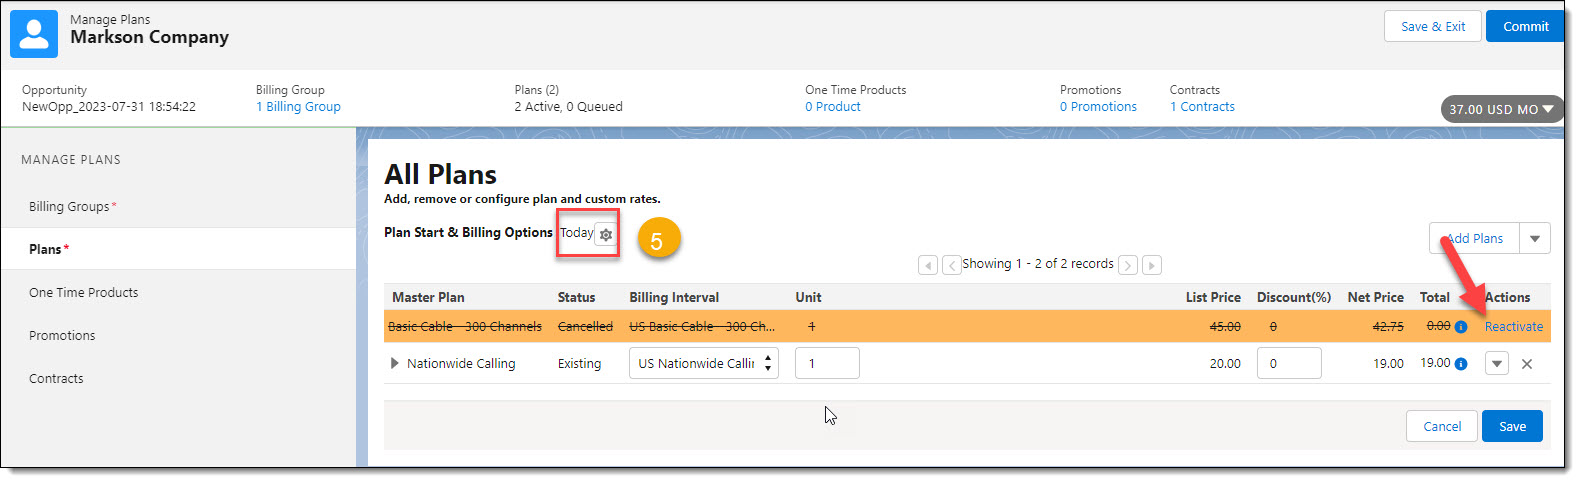
- Click on the Plan Start & Billing Options Today Icon.
Note: You can abort the Plan cancellation process by clicking on the Plans' Reactivate link under the Actions column.

- In this example, we want to cancel the Plan on the accounts' next bill day using the When Plan Changes Take Effect drop-down, and then click on the Save button.

- Click on the Save button to effect this Plan cancellation.

- Click on the Commit button.

9. A screen pop-up displays. Click on the Commit button to effect this Plan cancelation in Aria.
Below we see the pending Plan cancelation in the account' Account Overview screen:

Credits
You can create credits to reduce a customer's current or future account balance as a good will gesture or for other business reasons. If you issue a refund and choose not to void the corresponding invoice or if you missed the refund deadline, you may choose to issue a credit to a customer in the amount of the invoice. This will settle the customer's outstanding balance on the invoice.
There are two types of credits that you may issue:
- Cash Credits: A cash credit is applied immediately and reduces a customer's current outstanding balance.
- Service Credits: A service credit is applied against future invoices and does not affect a customer's current outstanding balance.
Viewing Credit History

- From the Account screen, click on the Aria Payments tab.

- Click on the Credits menu option.
The Credit History screen is then displayed.
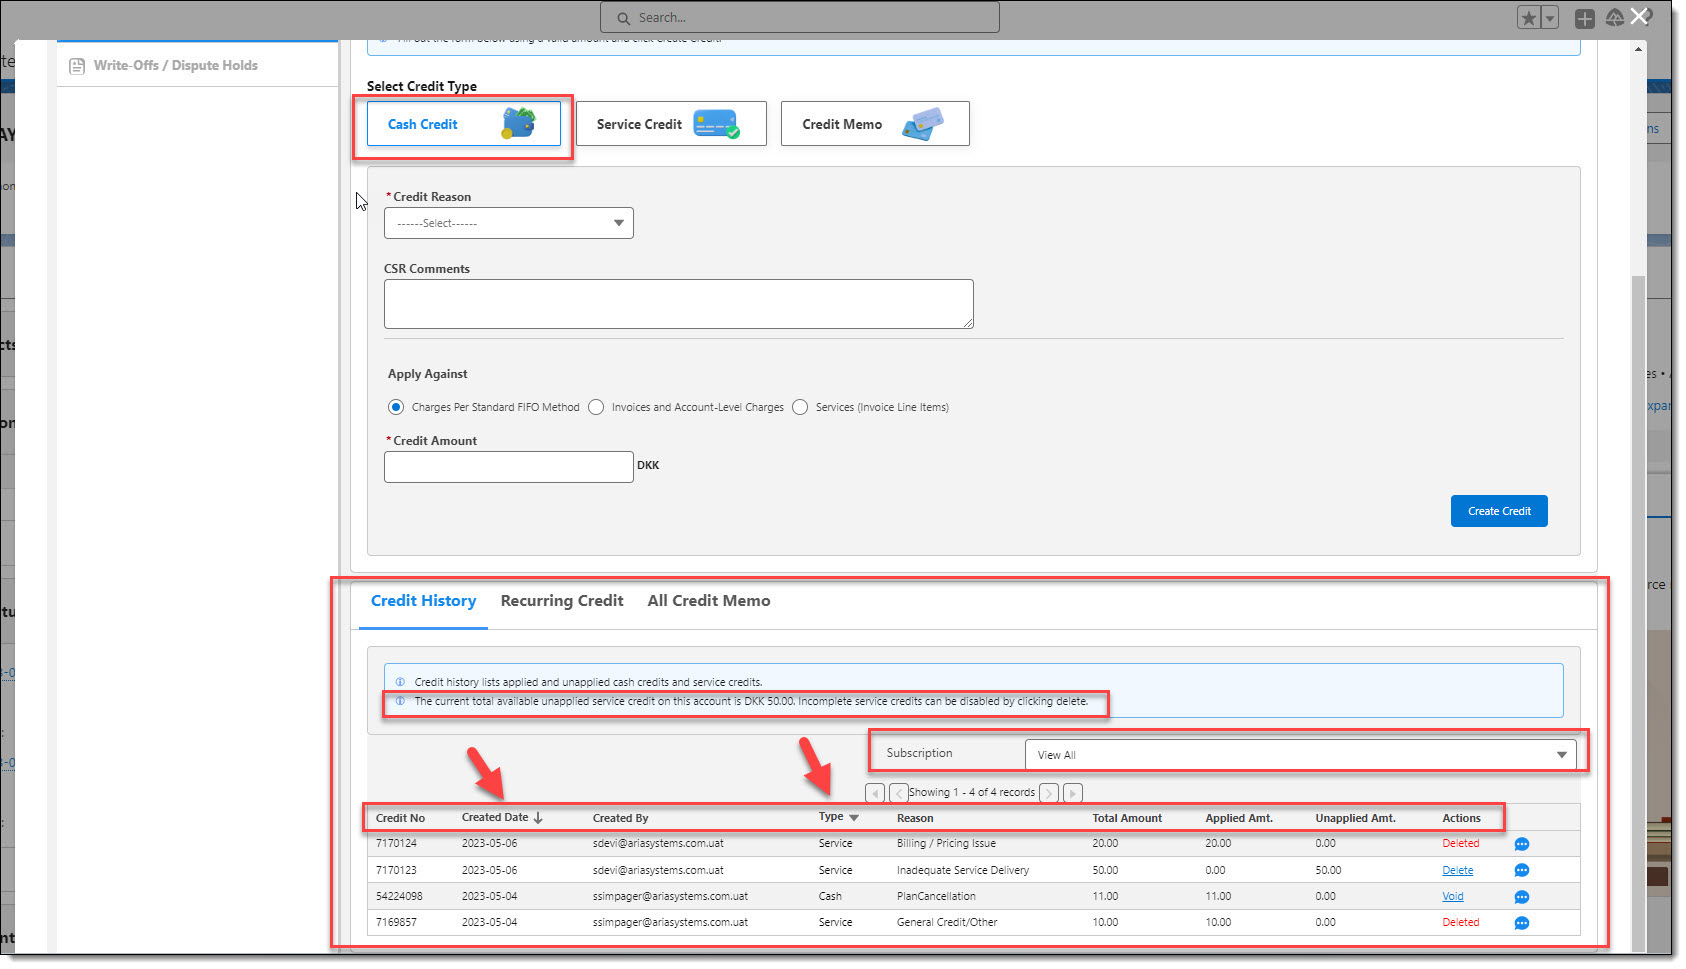
- Credit History lists applied and unapplied Cash Credits, and Service Credits.
- Credits can be filtered via use of the Subscription dropdown arrow. Selecting a Subscription from the dropdown will filter and display credit history for the selected subscription. All Credits (View All) are displayed by default.
- Column Headers include the following:
"Credit No" "Created Date" (sortable) "Created By" "Type" (default is All) "Reason" "Total Amount" "Applied Amt" "Unapplied Amt." "Actions"
- In the Actions column, actionable credit history lines (example: Delete, Void) are "underlined".
- Click the Comments icon to see any comments associated with the credit.
- The Type column by default (All) displays both Cash Credits and Service Credits in the credit history. Use the "Type" headers' drop down arrow to filter for Cash Credits (Cash) only, or Service Credits (Service) only.
- The Credit History table is the same for both Cash Credits and Service Credits and displays when the user selects either the Cash Credit or Service Credit buttons. Only the column headers will be displayed if the account has no credit history.
- The Unapplied Service Credit Amount in the Credit History tab header is automatically updated when a new Cash Credit or Service Credit is added.
- Pagination has been set to display up to 10 credits per page on this screen.
Create a Cash Credit

- Click on the Credit Reason (required field) dropdown, and select a credit reason.
- Type in any desired CSR Comments.
- Click on the desired Apply Against options' radio button
Note: "Charges Per Standard FIFO Method" is the Apply Against' fields' standard default selection.

- Click on the Apply Against', Invoices and Account-Level Charges radio button to apply a cash credit to a specific invoice(s) or account-level charge(s).
- Use the "Subscription" filter dropdown arrow to view charges specific to an individual subscription.
- Invoices are sorted in ascending order based on Created Date and Invoice Number.
- A scroll bar is displayed if there are more than five(5) rows.
- Type in a desired Amount(s) for the credit.

- Click on the Apply Against', Service (Invoice Line Items) radio button to apply a cash credit to a specific service(s) invoice line item.
- Services are sorted in ascending order based on Invoice Number and Subscription Name.
- Type in a desired Amount(s) for the credit.
- Type in the Credit Amount.
Note: The Credit Amount (required field) is applicable and only displayed when Apply Against', Charges Per Standard FIFO Method is used.
- Click on the Create Credit button.
A Cash Credit Confirmation screen is displayed as shown below.
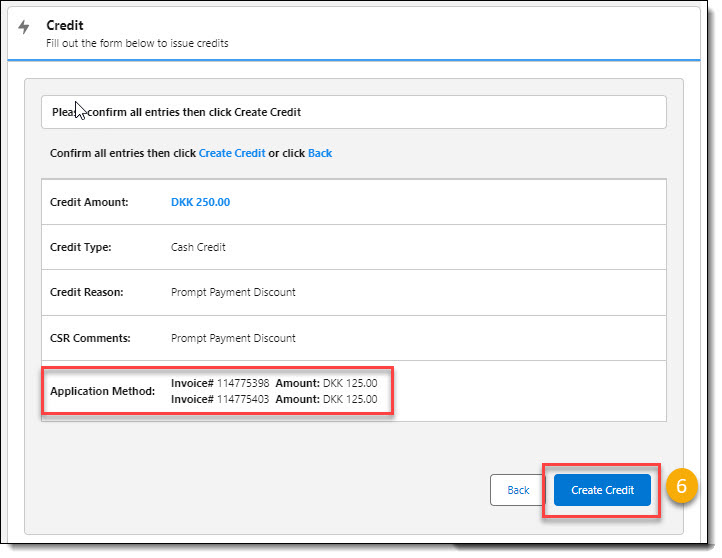
Note: The "Application Method:" fields' confirmation detail will vary based on the Cash Credits' "Apply Against" selection as follows:
- If Charges Per Standard FIFO Method was used, the "Application Method" confirmation detail will display as "FIFO Method".
- If Invoices and Other Account-Level Charges was used, the "Application Method" confirmation detail will display as "Invoice# XXXXXX" "Amount: Currency Code XXX.XX"
- If Services (Invoice Line Items) was used, the "Application Method" confirmation detail will display as "Invoice#XXXXX" "Service Name: XXXXX" "Amount: Currency Code XXX.XX"
- Click on the "Create Credit" button to confirm creation of the cash credit, or the "Back " button to edit and/or cancel its creation.
Note: A successful posting of the cash credit in Aria will display the message; "Success: Cash Credit in the amount of XXXX.XX applied to account." An unsuccessful posting of the cash credit in Aria will display the message; "Error: Message displayed from Aria API".
Void a Cash Credit

- From the Credit History screen, click on the cash credit items' actionable Void link.
- An expanded display shows the credits':
1st Row: "Credit Type" Credit No." "Amount"
2nd Row: "Reason" (Required Field) "CSR Comments" (Required Field)
- Click on the Reason dropdown arrow and select a reason for cash credit void.
- Type in comments in the CSR Comments field.
- Click the Void Credit button" to confirm the voiding of the credit. Click the Cancel button to cancel the void process.
Create a Service Credit
Service Credits allow you to apply a credit to a selection of plans and services, and to expire after a specific period of time to limit their liability. If applied to multiple plans (both master plans and supplemental plans) and services, the credit may be allocated proportionately. When the credit is allocated proportionally, it is applied based on the percentage that each applicable line item total contributes to the total of all eligible charges.
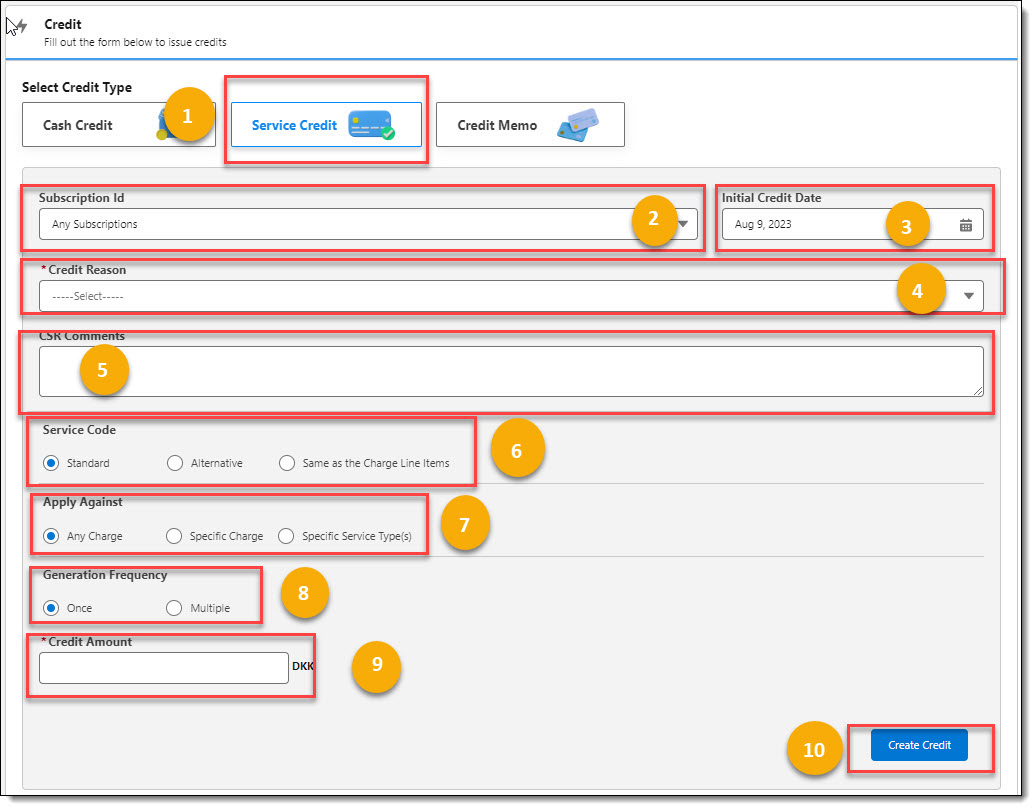
- Click on the Service Credit button.
- If desired, click on the Subscription filter dropdown arrow, and select a subscription to view charges specific to an individual subscription.
- Click on the Initial Credit Date calendar icon and select a date for the initial credit.
- Click on the Credit Reason dropdown arrow and select a reason for the service credit.
- Type in any CSR Comments.
- Click on the desired Service Codes' radio button to assign the service credit. "Standard" is the Service Code fields' standard default.
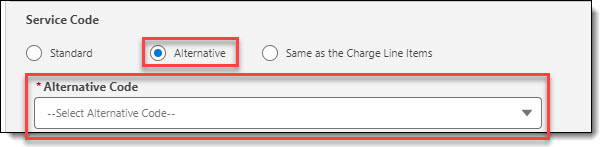
- Click on the Service Code fields', "Alternative", Service Code" radio button and use the dropdown to apply a service credit to a specific code. The "Alternative Code" field (required) only displays when the "Alternative" Service Code radio button is selected.

- Click on the "Same as the Charge Line Items" radio button to apply the service credit to the charges' service code.
- Click on the desired Apply Against' radio button to apply the service credit.

- "Any Charge" is the Apply Against fields' standard default selection.

- Click on the "Specific Charge" radio button to specify a service credit associated to a specific Subscription and Service (if desired). In this scenario, the "Subscription" field is a required field.

- Click on the "Specific Service Type(s)" radio button to specify the application of a service credit to one or more service types by clicking on its associated check box. In this scenario, at least one(1) "Service Type" must be selected.
- Click on the desired Generation Frequency' radio button to specify the frequency of the service credit. "Once" is the "Generation Frequency" fields' standard default selection.

- Click on "Multiple" Generation Frequency in order to create multiple credits and months between credits using the associated field dropdowns.
- Type in a Credit Amount.
- Click on the Create Credit button.

- A Service Credit confirmation screen is displayed.
Note: The "Apply Against" confirmation detail will vary based on the service credits' "Apply Against" selection as follows:
- If Apply Against' "Any Charge" was used, the "Apply Against" confirmation detail will display "Against any charge".
- If Apply Against' "Specific Charge" > "Service Plan" was used, the "Apply Against" confirmation detail will display "Against charges from service plan XXXXX (plan no XXXX), for any service(s) under this plan".
- If Apply Against' "Specific Charge" > "Service Plan" and "Service Type" was used, the "Apply Against" confirmation detail will display "Against charges from service plan XXXXX (plan no XXXX), service code XXXX).
- If Apply Against' "Specific Service Type(s)" was used, the "Apply Against" confirmation detail will display "Service Type(s): XXXX, XXXX, etc.".
The "Service Code" confirmation detail will vary based on the service credits' "Service Code" selection as follows:
- If Service Code "Standard" was used, the "Service Code" confirmation detail will display as "Standard".
- If Service Code "Alternative" was used, the "Service Code" confirmation detail will display as "Service Code (service_no XXXXXX)".
- If Service Code "Same as the Charge Line Item" was used, the "Service Code" confirmation detail will display as "Same as the charge line item".
The "Generation Frequency" confirmation detail will vary based on the service credits' "Generation Frequency" selection as follows:
- If Generation Frequency “Once” is selected, the "Generation Frequency" confirmation detail will display as "Once".
- If Generation Frequency “Multiple” is selected, the "Generation Frequency" confirmation detail will display as "Multiple: X credits, X months between each credit".
- Click on the Create Credit button to confirm creation of the service credit, or the Back button to edit and/or cancel its creation.
Delete a Service Credit

- From the Credit History screen, click on the service credit items' actionable Delete link.
- An "Action Confirmation" popup displays. Click on the OK button to confirm the service credits' deletion. Click the Cancel button to cancel the delete process.

- The Service Credit is marked "Deleted". And the "Unapplied Service Credit" amount is automatically adjusted.
Credit Memos
Credit Memos settle disputes between a buyer and a seller, such as services not received. The credits resulting from a credit memo application have an immediate impact on the account’s balance; and the account holder receives an email notification in the format of a credit memo.
Note: To send credit memo notification emails to customers, you must work through your Aria Implementation team. After you agree on the content of the credit memo notifications with the Aria Implementation team, the Aria Support team develops the template and makes it available to you. You can have one or more credit memo templates to support various use cases such as the branding of multiple products or localization.
Create a Credit Memo

- From the Aria Payments screen, click on Credits.

- From the Credits screen, click on Credit Memo.

- Click on the Subscription down arrow, and select a Plan from the expanded window. Invoices for all Plans (View All) is displayed by default.
- Click on the desired Invoice Numbers' up arrow to select an invoice to create and apply a credit memo against.

- Click on the Reason drop down arrow and select a reason from those within the expanded drop down. Available selections General, Price Change, Cancellation, or Invoice-based.
- Type in CSR Comments.
- Type in a Amount(s) for the desired invoice component(s). Amounts cannot exceed the allowable maximum credit per each invoice component.
- Click on the X Comments' symbol and type in any additional comments per each selected invoice component.
- Click on the Create Credit button.
A Credit Memo confirmation screen is displayed as shown below:

- Click on the Create Credit button to create the credit memo.

The Credit Memo and Amount is displayed under the All Credit Memo menu tab on the Credits screen.
Void a Credit Memo
- To void a credit memo, click on the Void hyperlink under the credit memos' Actions column.
A Void Credit Memo confirmation screen is displayed as shown below:

- Click on the OK button to void the credit memo.

The All Credit Memo screen is updated to show that the credit memo has been Voided.
Refunds
A refund is the return of money that was previously paid by a customer. Refunds are issued to the original payment method used by a customer. To issue a refund, you need to complete the following steps:
- Refund a payment - This will increase the customer's balance by the amount of the reversed payment.
- Reverse (void) one or more invoice line items. - This will decrease the customer's balance by the amount of the reversed line item(s). If you do not void invoice line items after issuing a refund, then the customer will still have an outstanding balance equal to the refund amount.
If the payment being refunded was collected by Aria electronically via a payment gateway, then the same payment gateway used to process the original payment is sent a request by Aria to refund the original payment method. The amount of the refund cannot exceed the original payment amount minus any amounts previously refunded for that payment.
Issue a Refund

- From the Account's Payments screen, click on Refunds.

- Click on the Subscription down arrow, and select a Plan from the expanded window. Financial Transaction ID' for all Plans (View All) is displayed by default.
- Click on the desired Transaction Id' up arrow to create and apply a refund against.

- Click on the Reason down arrow and select a reason from the expanded dropdown.
- Type in an Amount to Refund.
- Type in any desired CSR Comments.
- Type in Amount' to Reverse for each line item in the Amount to Reverse field. The total amount for the refund is calculated, including tax, by the invoice line item.
- Click on the Generate Refund button.
A Refund confirmation screen is displayed as shown below:

- Confirm all entries and click on the Generate Refund button to create the refund.
Write-Offs
A write-off is an uncollectible debt from your accounts receivable that is performed upon the realization that payment likely will not be received on an account for tendered goods or services.
For instance, if a customer fails to make a payment on an invoice and you believe that the payment will not be received, you can create a write-off which reduces the previously recorded amount of the asset. Write-offs are often performed in conjunction with or after dunning as part of the collections process, and only the full unpaid balance may be written off.
Create a Write-Off

- From the Account' Payments screen, click on Write-Offs.

- Click on the Subscription down arrow, and select a Plan from the expanded window. Invoice No' for all Plans (View All) is displayed by default.
- Click on the desired Invoice No' up arrow to create a write-off against.

- Click on the Write-Off Reason down arrow and select a reason from the expanded dropdown.
- Type in Comments.
- Click on the Create a Write-Off button.
A Write-Off confirmation screen is displayed as shown below:

- Confirm all entries and click on the Create a Write-Off button to create the write-off.
The Write-Off is then displayed in the Write-off/Dispute History section of the screen as shown below:

- Click on the W/O No.' up arrow.

The Write-Off's Invoice Details are displayed.
- Click on the W/O No.' down arrow to close the Invoice Details screen.
Dispute Holds
A Dispute Hold is a temporary write-off booked against an account with the same effect on an account's balance as a standard write-off. Dispute Holds are subsequently either removed from the account or booked as permanent write-offs, either by explicit CSR action or by system action if the expiration date on the Dispute Hold is reached prior to any explicit CSR-action being taken upon it.
Create a Dispute Hold

- From the Account' Payments screen, click on Write-Offs.

- Click on the Create a Dispute button.
- Click on the Subscription down arrow, and select a Plan from the expanded window. Invoice No' for all Plans (View All) is displayed by default.
- Click on the desired Invoice No' up arrow to create a dispute hold-off against.

- Click on the Dispute Reason down arrow and select a reason from the expanded dropdown.
- Type in Comments.
- Click on the Create a Dispute button.

- Confirm all entries and click on the Create a Dispute button to create the dispute.
The Dispute Hold is then displayed in the Write-off/Dispute History section of the screen as shown below:
![]()
- The invoice dispute hold is added to the history as a Type 'Unsettled Dispute'. Click on the disputes' Invoice No' 'Comment' icon. A popover screen displays user comments specific to the dispute hold.
- Click on the Dispute Hold' W/O No up arrow.
The 'Dispute Hold' history for the invoice is expanded as displayed below:

- By default the "Invoice Details" button is selected, and displays invoice information with the following headers and their respective data:
- Description Subscription Units Price per Unit Amount
Settle a Dispute Hold
- Click on the Settlement Action button for actions to settle the dispute hold.
The Dispute Hold 'Settlement Action' screen is expanded and displays as below:

- Click on the desired Settlement Action radio button. '
- Type in any Additional Comments.
- Click on the Settle Dispute button.
A 'Dispute Hold Settlement Action' confirmation screen is displayed:

- Click the Settle Dispute to confirm settlement of the dispute hold.

- The dispute hold in 'Write-Off/Dispute Hold History' is changed to a Type based on the Settlement action selected. (Write-Off or Settled Dispute)
Payments
From Aria for Salesforce, you can collect payments electronically using the accounts' current payment method, a one-time payment method, or post payments received for non-electronic payment types. You can also view an account's payment history and perform actions such as voiding payments.
Collect a Payment Using the Account's Current Payment Method(s)

- Click on the Payment Method dropdown and select a Payment Method from the expanded view.
- Click the radio button for the desired Payment Amount option (Full Balance Due, Specify Amount per Charge, or Other amount USD).
Note: "Full Balance Due" is the Payment Amount fields default option.

- Click on the Specify Amount per Charge radio button to apply a payment amount to a specific invoice(s).
- Use the "Subscription" filter dropdown arrow to view charges specific to an individual subscription.
- Invoices are sorted in ascending order based on Invoice Date.
- A scroll bar is displayed if there are more than five(5) rows.
- Type in a desired Amount(s) for the payment.

- Click on the Other amount USD radio button to apply a payment amount to a specific invoice(s).
- Type in a desired Amount for the payment.
- Click on the Collect button.
A Payment confirmation screen is displayed as shown below:
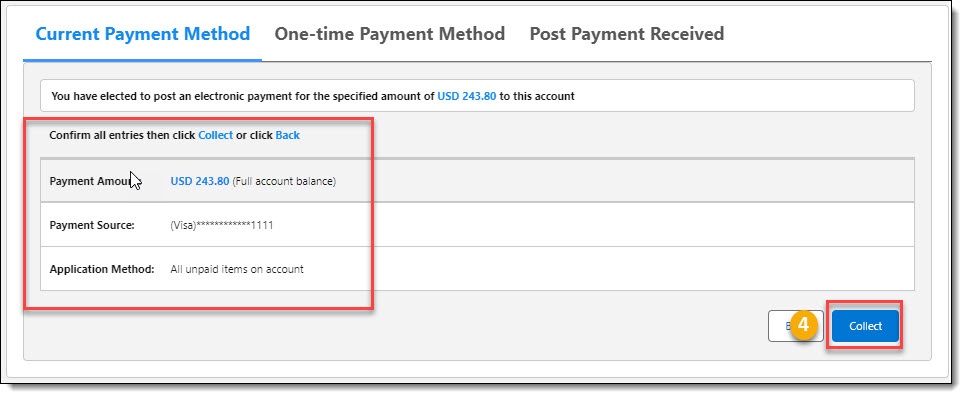
- Confirm all entries and click on the Collect button to collect the payment, or the Back button to cancel the payment collection process.
Note: the "Application Method" description will vary based on the Payment Method option selected.
Collect a Payment Using an Account's One-time Payment Method

- From the Accounts' Aria Payments' screen, click on One-time Payment Method.

- Click on the Credit Card or Checking Account tabs.
Note: Screen detail for Credit Card is displayed by default.
If Credit Card,
- Type in Credit Card Number.
- Use the dropdown arrows to select Valid Through month and year.
- Type in the credit card CVV number.
- Click the Enter Billing Contact check box and type/save billing contact information for the one-time payment.
- Click the radio button for the desired Payment Amount method, and type in amount.
- Click on the Collect Button.
If Checking Account,

- Type in the Routing Number.
- Type in the Checking Account Number.
- Click the Enter Billing Contact check box and type/save billing contact information for the one-time payment.
- Click the radio button for the desired Payment Amount method, and type in the amount.
- Click on the Collect Button.
A Payment confirmation screen is displayed as shown below:

Confirm entries and click on the Collect button to collect the payment, or the Back button to cancel the payment collection process.
Post Non-Electronic Payment Received from an Account

- From the Account' Aria Payments' screen, click on Post Payment Received.

- Type in a Reference Code for the payment.
- Type in any desired CSR Comments.
- Click the radio button for the desired Payment Amount method, and type in an amount.
- Click on the Post Payment button.
A Payment confirmation screen is displayed as shown below:

- Confirm entries and click on the Post Payment button to post the non-electronic payment, or the Back button to cancel the payment posting process.
Void a Payment

- From the Accounts' Aria Payments screen's Payment History section, click on the desired Transaction ID's Void hyperlink under the Actions column.

- An expanded display shows the credits':
1st Row: "Transaction ID" "Date" "Source" "Status" "Amount"
2nd Row: "Reason" (Required Field) "CSR Comments" (Required Field)
- Click on the Subscription down arrow, and select a Plan from the expanded window. Transaction ID's for all Plans (View All) is displayed by default.
- Click on the Reason dropdown arrow, and select a reason from the expanded dropdown view.
- Type in CSR Comments.
- Click on Void Payment.
The Payment History screen is updated to show the payment transaction has been voided as displayed below:

Billing Groups
Master Plans along with their associated child Supplemental Plans are mapped to payment methods using billing groups, allowing the use of multiple payment methods on a given account. These payment methods are stored on the account, making them available for future use.
Create a New Billing Group via a New Opportunity for an Existing Account

- Via the Opportunity screen, click on the Manage Plans button.

- From the Opportunities Select Plans' screen, click on the Next button.

- From the Opportunities Create or Edit Billing Groups' screen, click on the Create New Billing Group hyperlink.

- Type in a Billing Group name. If this field is left blank, Aria for Salesforce will assign a Billing Group Name in the form BG-XXXX.
- Use the dropdown arrows to select the Notification Method, Statement Template, and Credit Note Template for this new Billing Group.
- Click on the desired radio button to select a Primary Payment Option.
- Use the dropdown arrow to select a Primary Payment Type. The field name and choices will vary based on your selection of a Primary Payment Option of Method (electronic) or Term (net term days).
- Use the search feature to select a Billing and Statement Contact for the new Billing Group.
- Click on the Save button.
Note: This New Billing Group along with its associated payment method(s) will be saved and used as the Billing Group for any Plans and One-Time Orders selected and Committed as part of this new opportunity.
Aria Usage
Usage history allows you to check how many units an account has used at any time for just one or multiple Master Plan Instances (MPIs). You can also use Aria for Salesforce' Rated/Unbilled Usage functionality to view an account's unbilled usage balances, which can be used to set unbilled balance thresholds and also trigger email notifications when unbilled balances are above or below unbilled balance thresholds.
Usage History

- Click on the Account' More dropdown arrow, and then click on Aria Usage.

- Two tab buttons, History, and Rated/Unbilled are displayed. The History tab is selected by default along with it's associated input fields.
- Click on the blue dates under the From and To Date' to populate these fields, or use the calendar icons to select desired dates.
- Use the Usage Type dropdown arrow, to select the desired usage type. All Usage Types is selected by default.
- Click on the Subscription ID dropdown arrow to select an individual Plan subscription. The Subscription filter displays a default static value of View All.
- Click on the Retrieve Usage button.
![]()
-
A blue banner is displayed with the following dynamic texts:
-
"Displaying XXX usage records for dates between XX/XX/XXXX and XX/XX/XXXX, for usage type {ALL USAGE TYPES}".
Note: If users select a specific subscription then, the text will display: - Displaying XXX usage records for dates between XX/XX/XXXX and XX/XX/XXXX, for usage type {ALL USAGE TYPES}, and for subscription (XXXX - XXXXX).
-
- A table is displayed with the following headers and their respective data:
- Date/Time Billed User ID Client Plan ID Usage Type From/To Unit Qty Unit Rate Charge
- Pagination is in chunks of 15 records.
- A CSV icon has been added to the top of the table when the search result is greater than 0.
- When the user hovers their cursor over the CSV icon, a message is displayed informing the user to ‘Click icon to export usage’
- When the user clicks on the CSV icon, a CSV report is initiated to be downloaded. The downloadable report includes the following additional columns:
- Account Usage Description Comment
Rated/Unbilled Usage
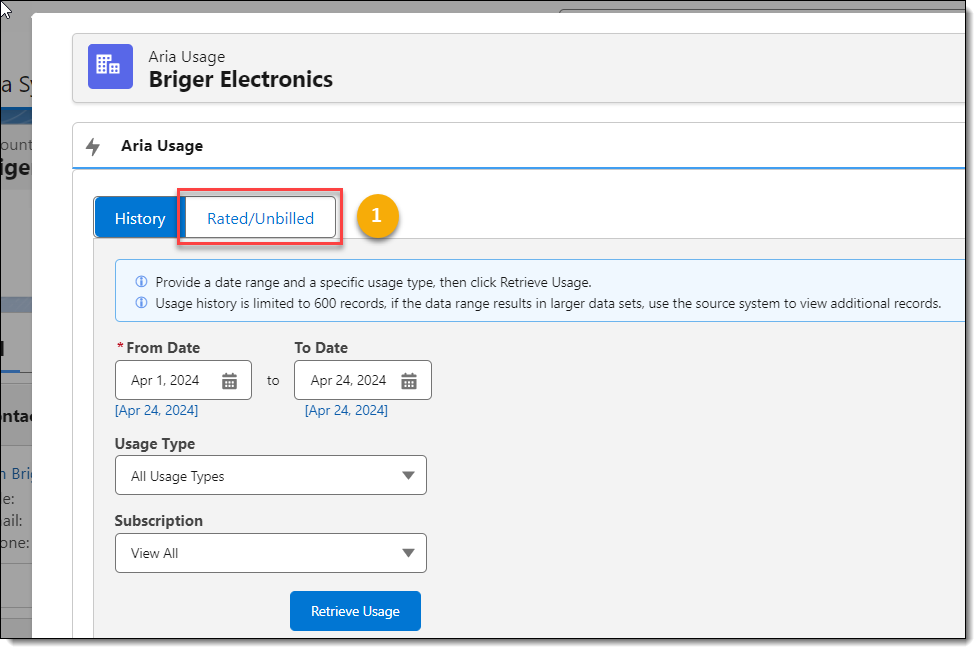
- Click on the Rated/Unbilled tab.

- Click on the Subscription dropdown arrow to select a specific account subscription.
- The screen is expanded to display Month-to-date (MTD) and Period-to-date (PTD) rated/unbilled usage balances for the selected subscription. When a user having the necessary system permissions clicks the MTD and/or PTD Reset buttons to change the respective usage balances to $0.00, an 'Action Confirmation' window is displayed allowing the user to click 'OK' or 'Cancel' the action. Once the user clicks 'OK', the action cannot be undone.
- Click on the Show More hyperlink.

- The screen is expanded to include a table that displays columnar data for MTD' and PTD' balances inclusive of the following column headers and their respective data:
- Balance Threshold Threshold Delta Client Threshold Client Threshold Delta
- The table contains tooltip and edit icons. Users can hover their cursor over the tooltip icons for information on editing 'Threshold' and 'Client Threshold' settings.
- & 6. When the user clicks the edit (pencil) icon, a pop-up modal (edit threshold) is displayed enabling the user to change the 'Threshold' and/or 'Client Threshold' amounts.
- Threshold and Client Threshold Deltas' are dynamically updated to reflect deltas between the MTD and/or PTD balances and edited threshold amounts.
Aria Comments
Allows a user to view an Aria accounts' comment history in AFS.

- Click on the Accounts' More dropdown arrow, and then click on Aria Comments.

- The page header 'Aria Comments', and 'Account Name' are displayed.
- Pagination is in chunks of 50 records.
- A scroll bar displays when there are more than 15 records.
- Click the 'X' in the right upper corner to close the Aria Comments screen at any time.