Aria Knowledge Central

Create Account Fields

Overview

Account fields allow you to capture additional information about your customers based on your business needs and are available as text input fields, radio buttons, and selection drop-downs.

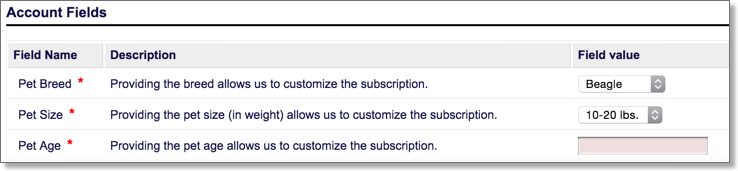
For instance, a company selling subscriptions for the delivery of dog treats and toys may want to capture information about the account holder's dog, such as the breed, age, or size. Capturing this information allows the company to better tailor its offerings.

Based on this information, the company may want to capture this additional information using a combination of text selection drop-downs and text input fields, as shown in the image below:
Account-Fields.png

Creating Account Fields

Getting Here: Click Configuration > Client Settings > Account Fields

  1. Click New.

The Create New Account Field screen displays.

Note: The Translations link enables defining a translation for the field for an associated locale. Refer to Multi-language Translation for Product Elements for more information.
Account Field names.png

Note: Fields marked with a red asterisk are required.

  1. Enter the name of the account field in the Field Name field.

For instance, if you offer a rewards club card to your account holders, you may want to create an account field titled "Rewards Card Number" to attach the rewards club membership to their account.

  1. Enter a description of the account field in the Description field.
  2. Select the order in which you want this account field to display from the Field Order drop-down.
    Account Fileds Addtl Paramters.png

If you are creating multiple custom account fields, the value selected from this drop-down controls the order in which these fields display within the Account Fields section of the Create New Account screen.

  1. Select whether this field is required from the Required drop-down.

If you select Yes, the field is required to complete the account creation process.

  1. Select whether the field displays during the account creation process from the Hidden drop-down.

Hiding an account field prevents it from displaying on specific account templates when not needed, allowing you to streamline the account creation process for your users.

  1. Select the format of the account field from the Presentation Mode drop-down.

Available options include:

  • Text Input: A text field for entering a small amount of text.
  • Text Area: A text field for entering a large amount of text.
  • Select Box: A drop-down menu that allows you to define multiple options for the user to select.
  • Radio Buttons: Provides a set of options, only one of which may be selected.
  • Check Boxes: Provides a set of options, one or more of which may be selected.

Note: If you select Select Box, Radio Buttons, or Check Boxes, proceed to step 8 to define the values for these options. Otherwise, proceed to step 11.

  1. To define the values for Select Box, Radio Buttons, or Check Boxes, select the Allowed Values tab.
    AllowedValues_tab.png

Note: This tab only displays if one of these options is selected from the Presentation Mode drop-down.

  1. To add an option, click Add Value.
  2. Enter the name of the value in the Display Text field.

This text entered for each value is what displays as available options for the user to select during the account creation process.

  1. Enter the minimum amount of choices the user must make in the Minimum Selection field.

Note: This field is not available if you selected Text Area or Radio Buttons as the Presentation Mode.

  1. Enter the maximum amount of choices the user can make in the Maximum Selection field.

Note: This field is not available if you selected Text Area or Radio Buttons as the Presentation Mode.

  1. Click Save.

The account field is now available during the account creation process.

  • Was this article helpful?