Overview
Once you complete the pre-installation tasks and install the Aria for Salesforce application, you are ready to configure Aria for Salesforce. The following details the various configuration elements and necessary steps for configuring your Aria for Salesforce application.
- Overview
- Set Up the Aria for Salesforce Loader
- Configuring an Aria for Salesforce Integration User Profile to Support the Aria for Salesforce Loader Integration.
- Creating an Aria for Salesforce Integration User to Support the Aria for Salesforce Loader Integration.
- Assigning the Aria to Salesforce Integration User
- Aria for Salesforce External Services Configuration to Support the Aria for Salesforce Loader Integration
- Setting Up Your Aria API Configuration in Salesforce
- Importing Your Product Catalog Elements from Aria into Aria for Salesforce
- Enabling and Using Plan Instance Product Fields in Aria for Salesforce
- Batch Synchronization of Aria's Product Catalog to Salesforce
- Turn On Sync Aria Transactions to SFDC Objects
- Account Re-Synchronization
- Assign or Customize Your Page Layouts
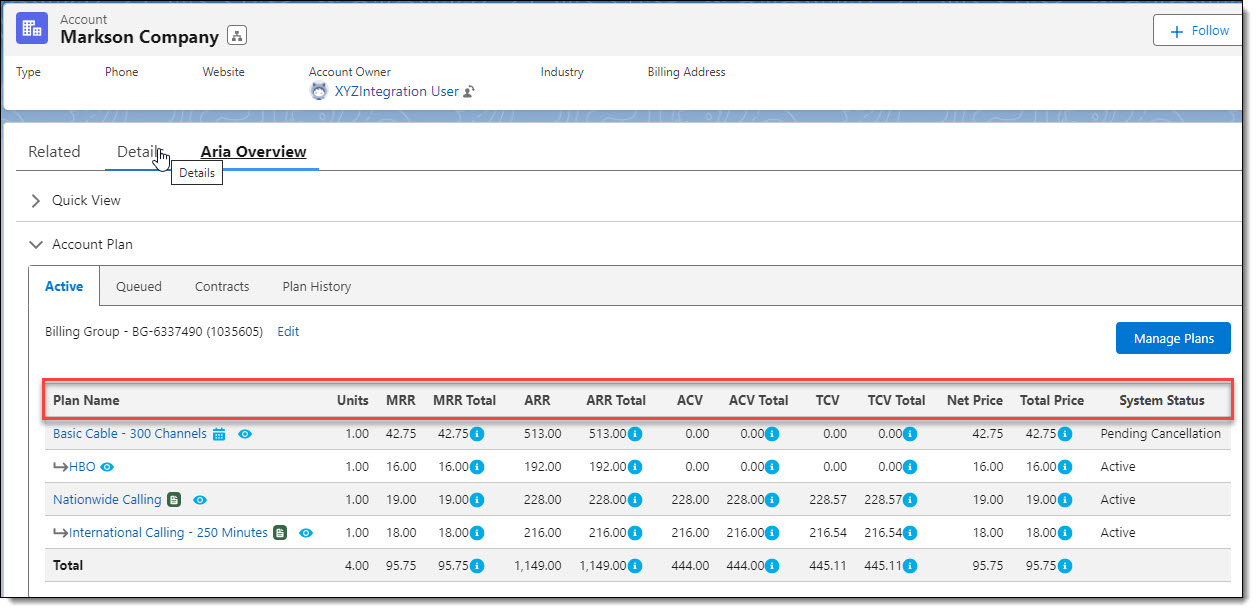
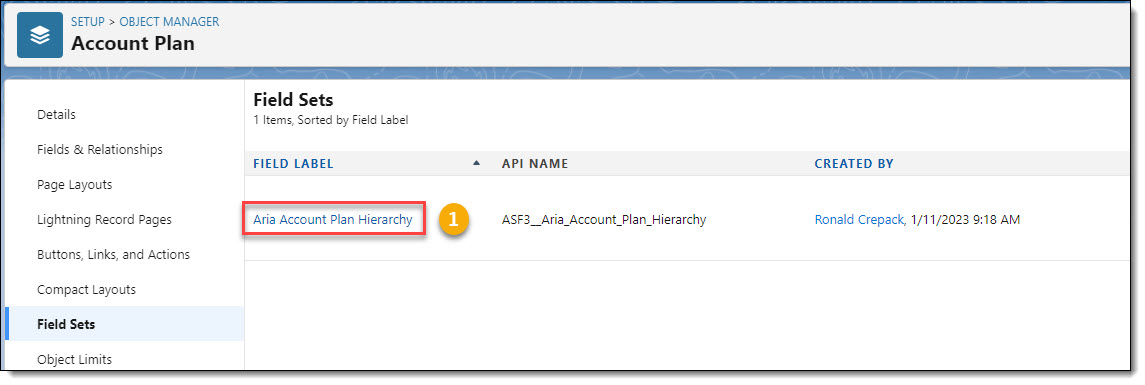
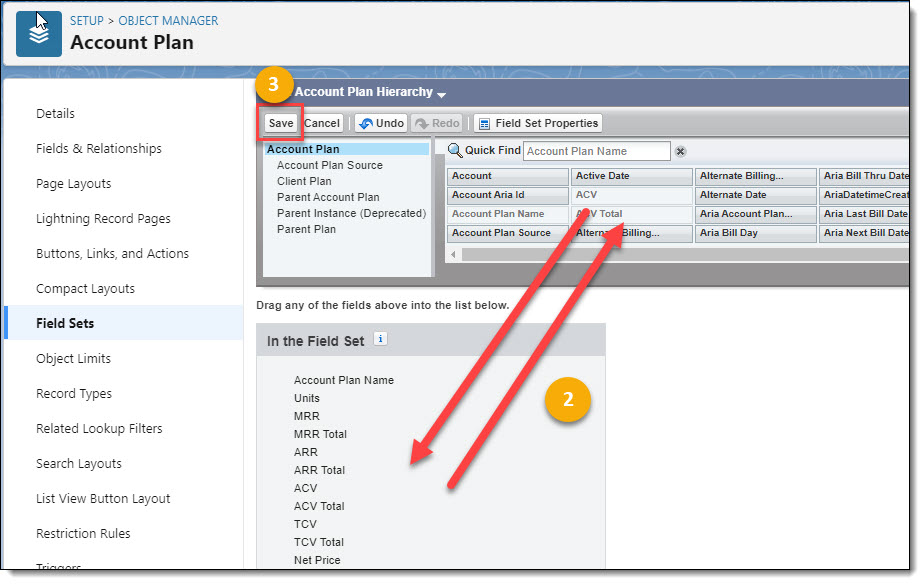
- Account Plan Columns Configuration
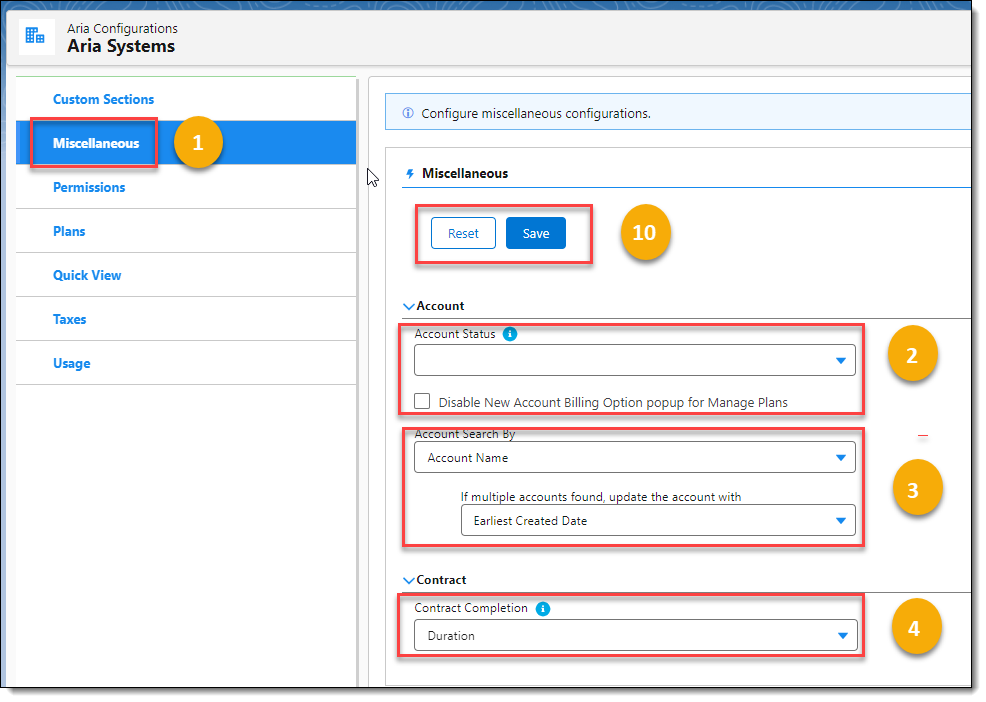
- Aria Configurations
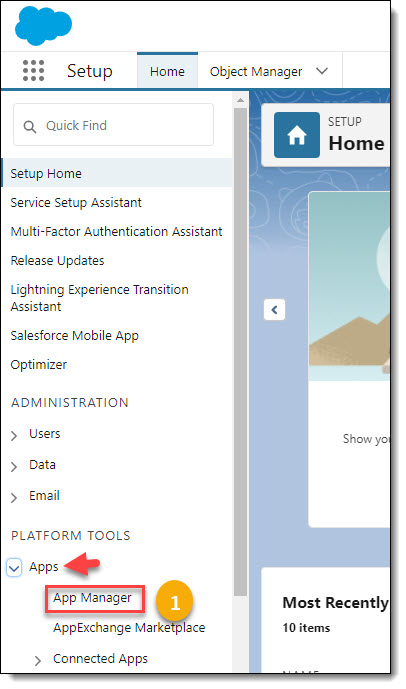
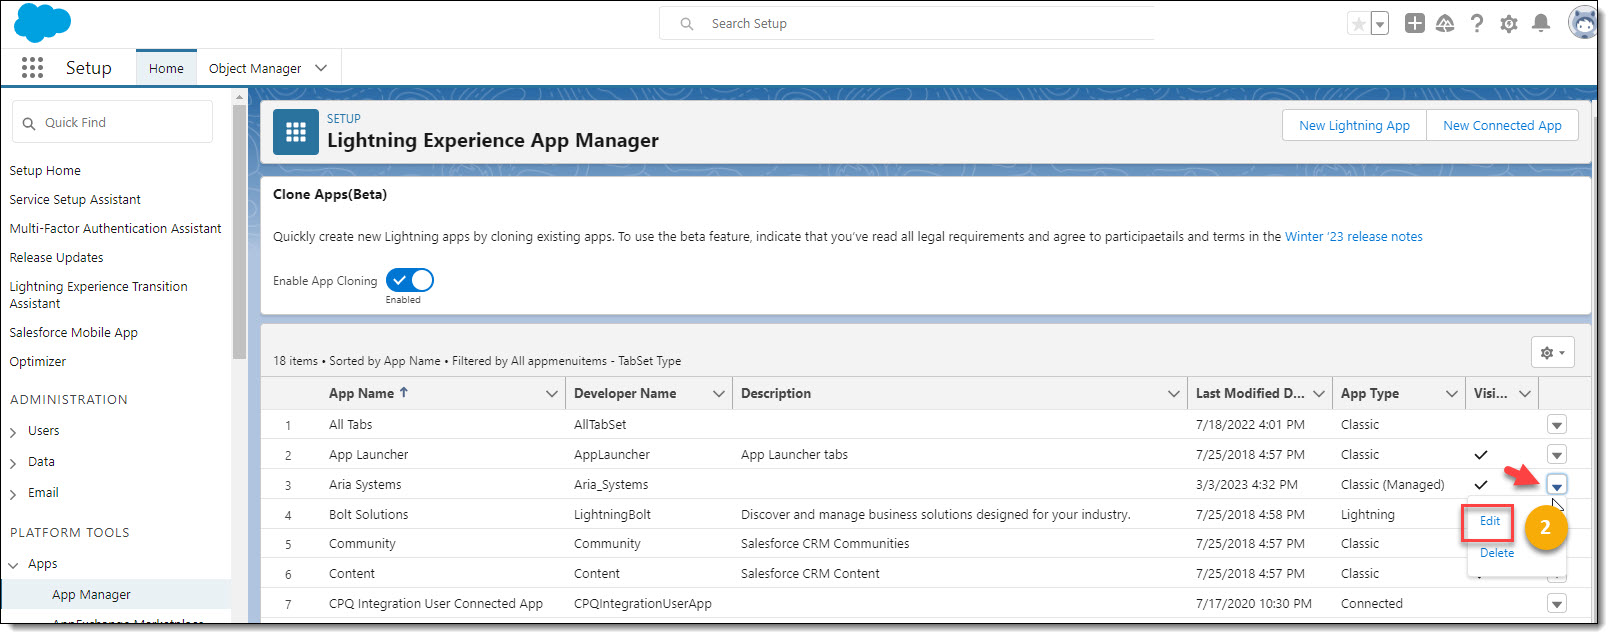
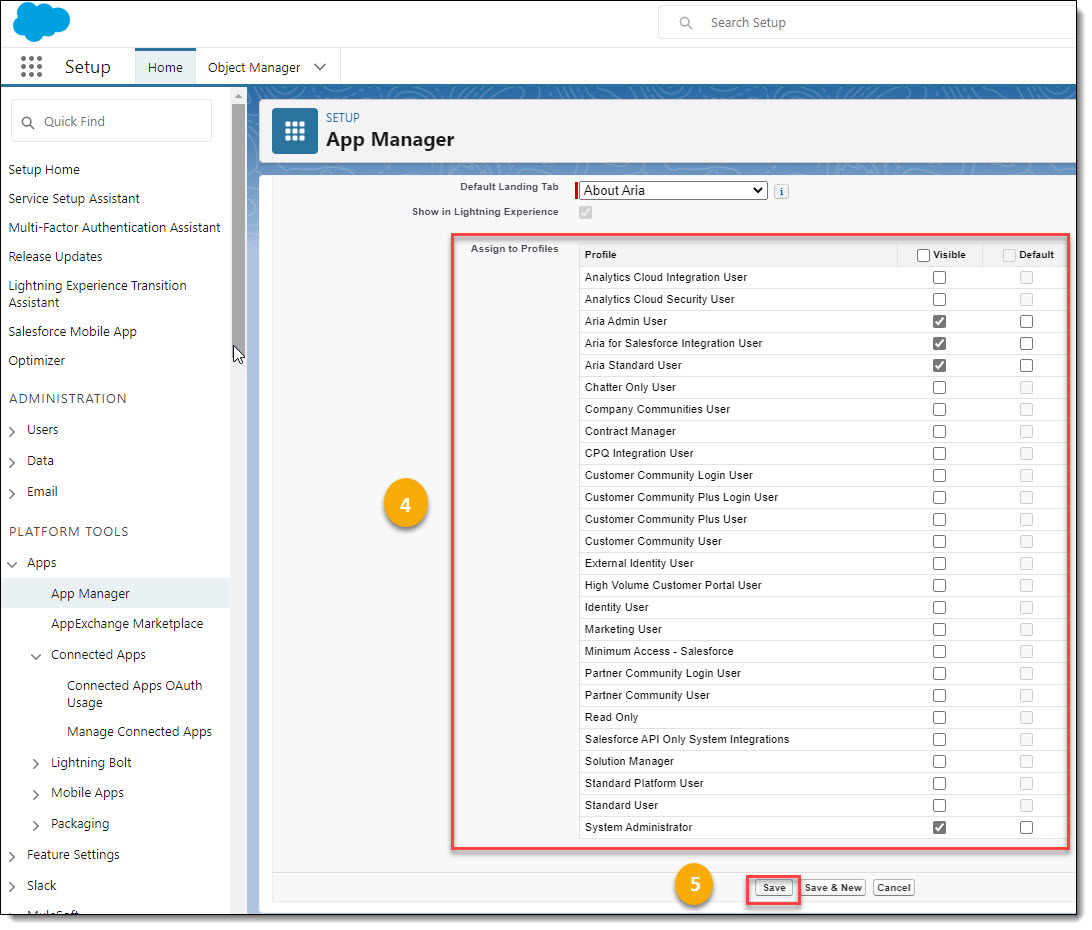
- Using the App Manager to Configure Menu Options for your Aria for Salesforce Users
Set Up the Aria for Salesforce Loader
Note: Aria's current "Unmanaged Package" uses event notifications in Aria to synchronize changes in the AFS application. This differs, and is not compatible out of the box, with the previous "Managed Package" version that used the AFS "Loader" to synchronize data between the two systems. For instructions on setting up event notifications in both Aria and Salesforce, see Pre-Installation Tasks
When account related data changes in Aria, it’s synced to Salesforce via the Loader. When an Aria-related account data is updated in Salesforce, the Aria For Salesforce.com Connector sends out an Aria API call to update the account in Aria. This method optimizes account data synchronization of accounts and transactions.
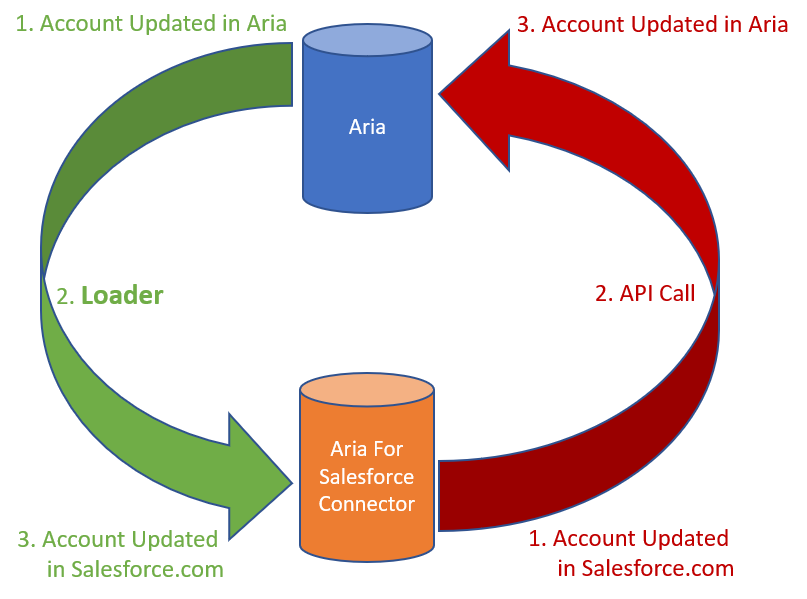
The Aria for Salesforce Loader does not depend on call backs from Aria to Salesforce to do the syncing. When an account is updated in Aria, a micro service generates additional account data from Aria, then processes the data via low latency REST APIs or bulk API calls to Salesforce.
Tuning the balance between low latency and high-volume throughput happens automatically. This method of syncing eliminates the overhead of Aria call backs to Salesforce and API call outs from Salesforce. It improves overall integration efficiency and provides higher volume throughput capability for accounts and transactions.
Note: You must submit a request to Aria Customer Support to enable this synchronization process.
Configuring an Aria for Salesforce Integration User Profile to Support the Aria for Salesforce Loader Integration.
You must first create and configure a custom profile in Salesforce that will be assigned to an Aria for Salesforce Integration User that has the necessary Administrative, Standard, and Custom object permissions.
Log Into Salesforce
![]()
- Click on the Setup icon and click Setup.
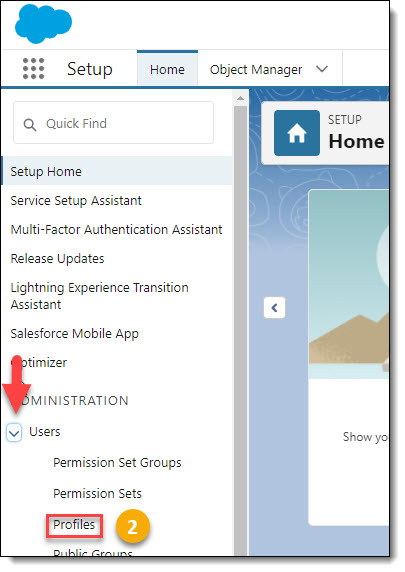
- Click on the Users drop-down arrow, and then click Profiles.
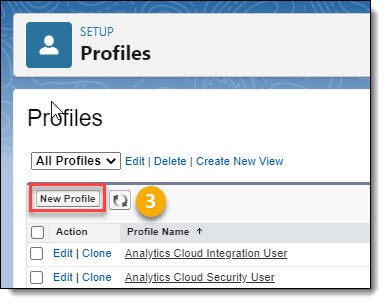
- Click on the New Profile button.
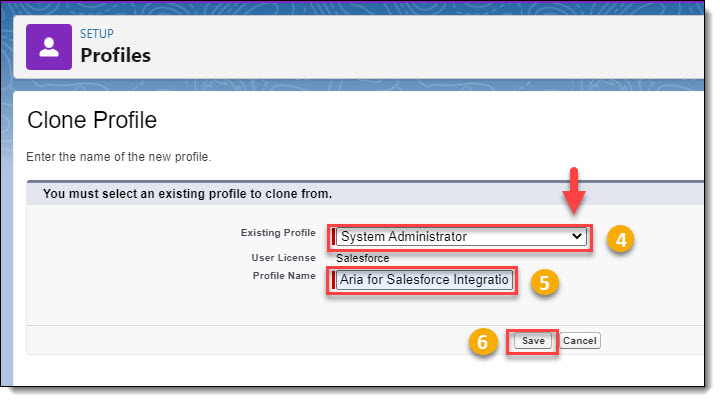
- Click on the Existing Profile field's drop down arrow, and select System Administrator, as the profile you want to clone.
- Type in a new Profile Name. In this example, we are naming the new profile, "Aria for Salesforce Integration Profile".
- Click on the Save button to save this new profile.
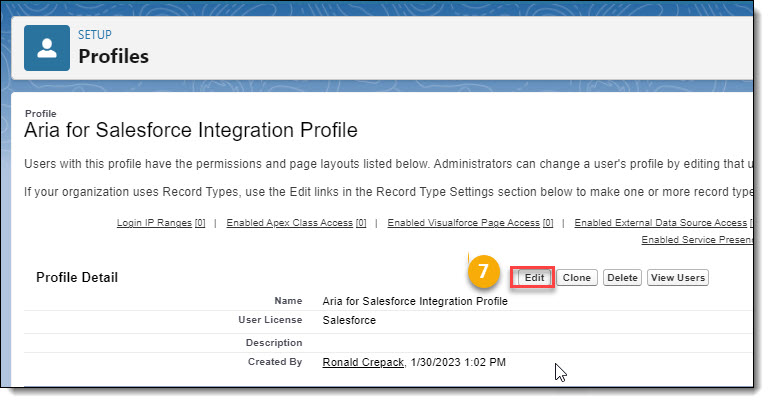
- Click on Edit to configure Administrative, Standard and Custom Object settings for this profile, which are required for the Loader, that will be assigned to the Aria for Salesforce Integration User.
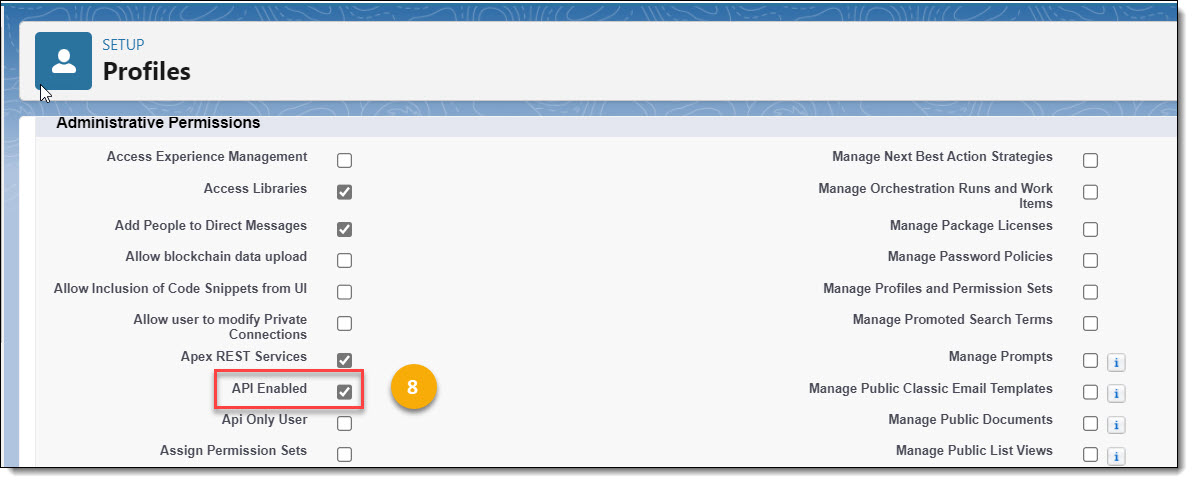
- Scroll down the page to the Administrative Permissions section, and check to ensure that "API Enabled" is selected (checked)
Note: This profile requires that "API Enabled" be activated . You can select any other Administrative Permissions you require.
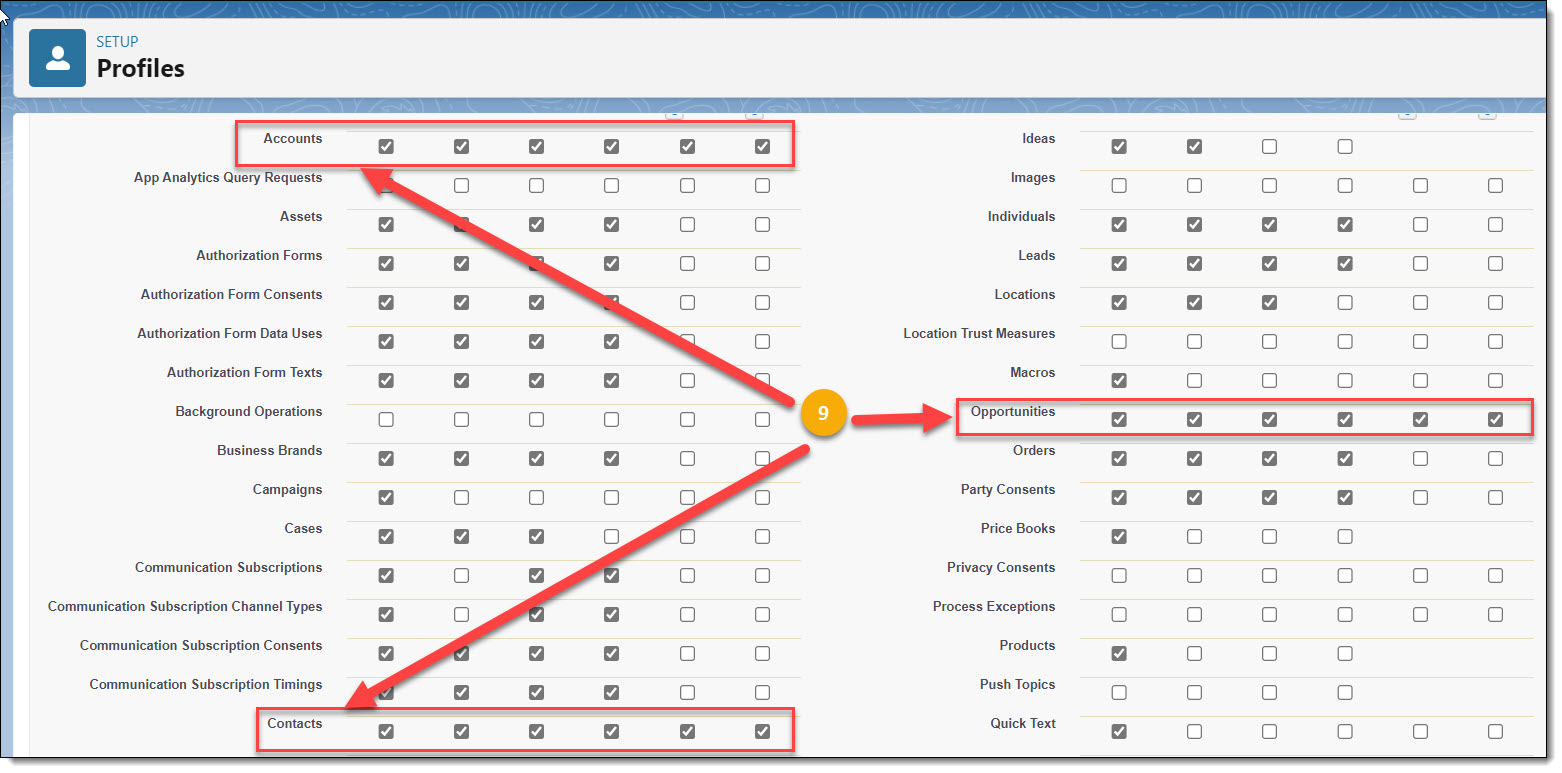
- Scroll down the page to the Standard Object Permissions section, and check that the (Read, Create, Edit, Delete, View All, and Modify All) boxes are selected (checked) for Accounts, Contacts, and Opportunities.
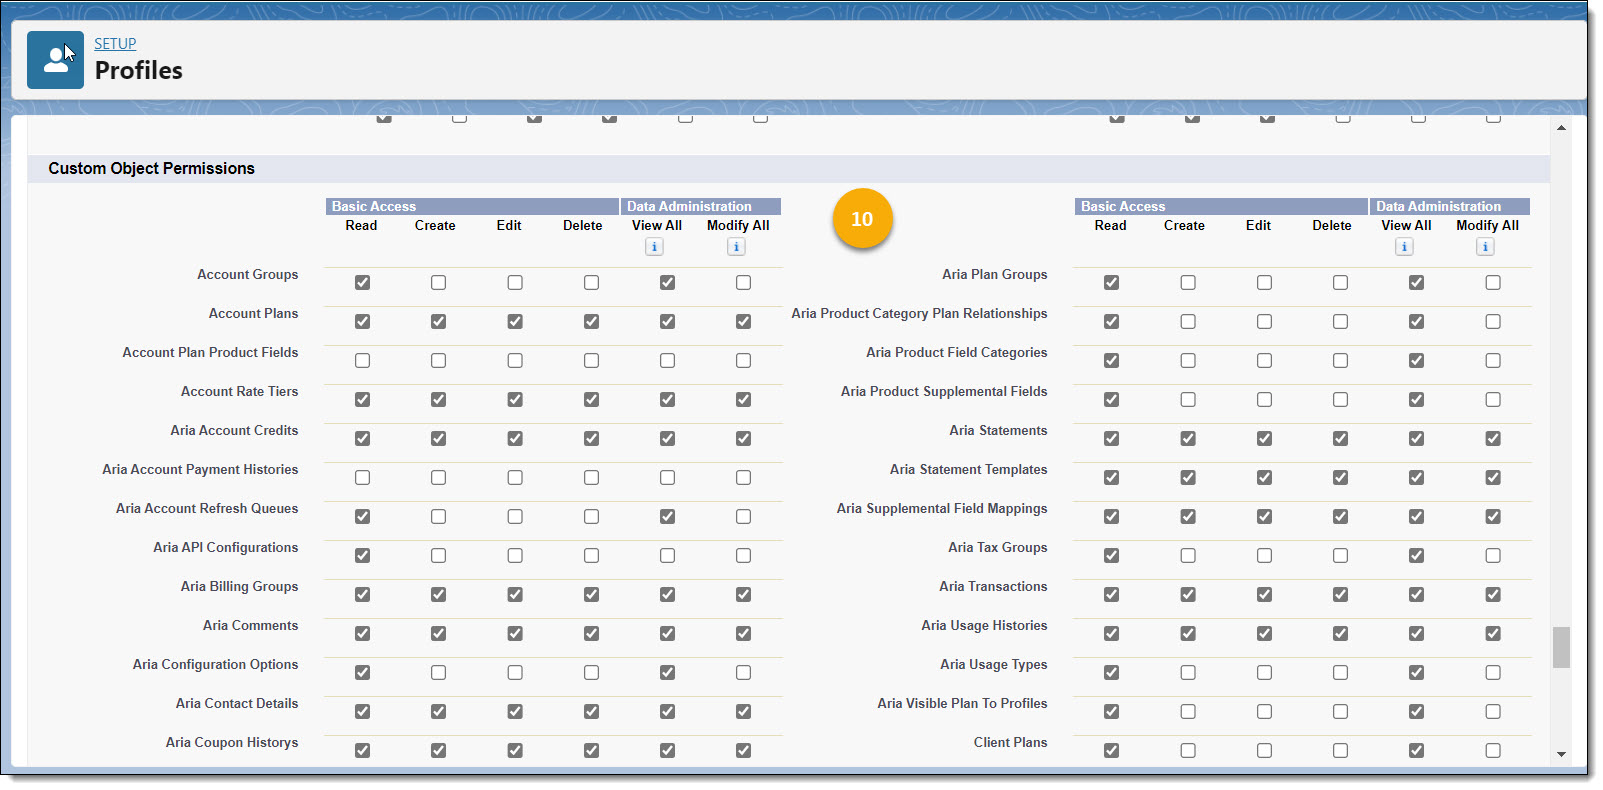
- Scroll down the page to the Custom Object's section. And select (check) permission settings for the Aria Custom Objects as referenced in Custom Object Field Settings.
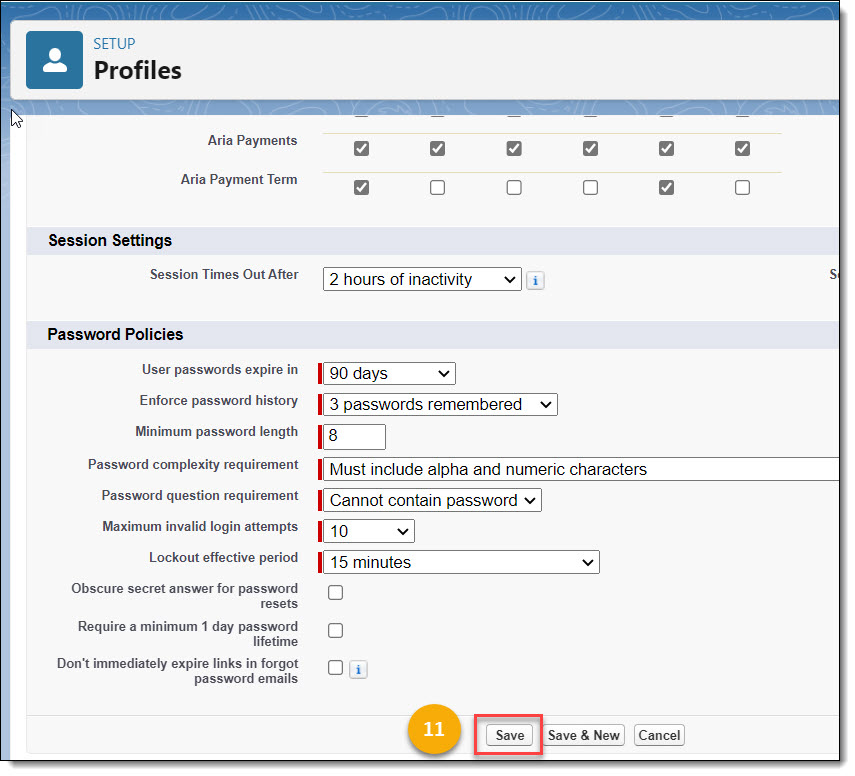
- Scroll down to the bottom of the page and click on the Save button to save this new profile.
Creating an Aria for Salesforce Integration User to Support the Aria for Salesforce Loader Integration.
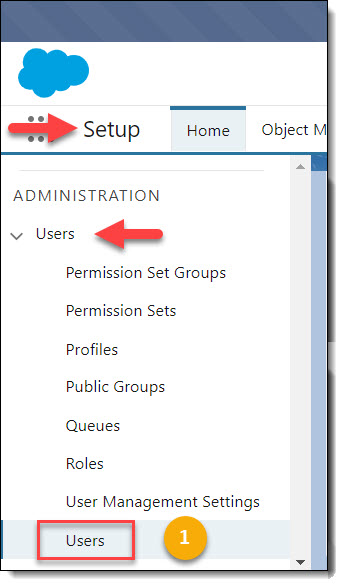
- From the Salesforce Setup Home menu, click on the Users down-arrow key, and then click on Users.
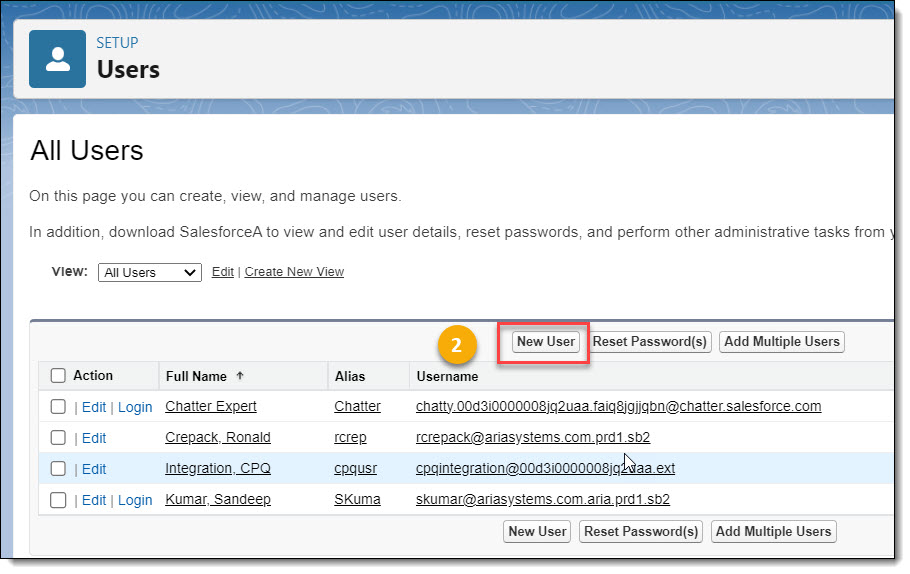
- Click on the New User button.
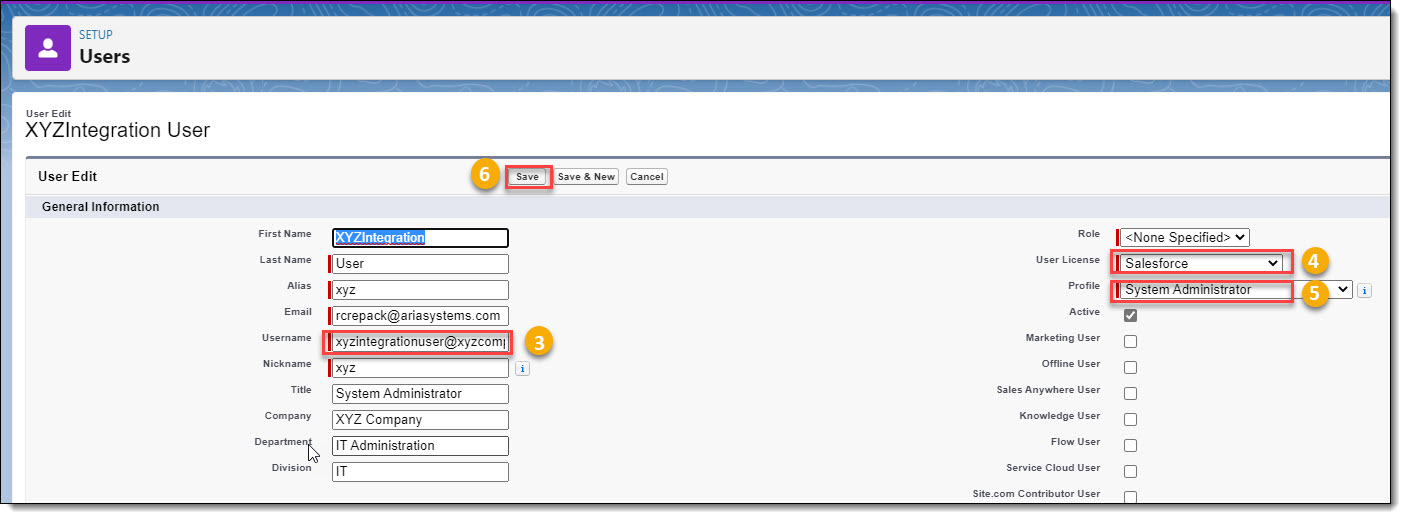
Note: The above screen provides an example of a Salesforce user created to facilitate the Aria for Salesforce Loader integration. In this example, we are creating a user with a Username of "xyzintegrationuser@xyzcompany.com".
- Create a Username.
- Click on the User License field's drop-down arrow, and select Salesforce from the available options.
- Click on the Profile field's drop-down arrow, and select the Aria for Salesforce Integration User profile you created in the previous section.
- Click on the Save button.
Note: Salesforce fields "piped" in red are required.
Assigning the Aria to Salesforce Integration User
- From the Salesforce Setup Home menu, click on the Custom Code down-arrow key, and then click on Custom Settings.

- Click on Manage next to Aria Custom Settings.
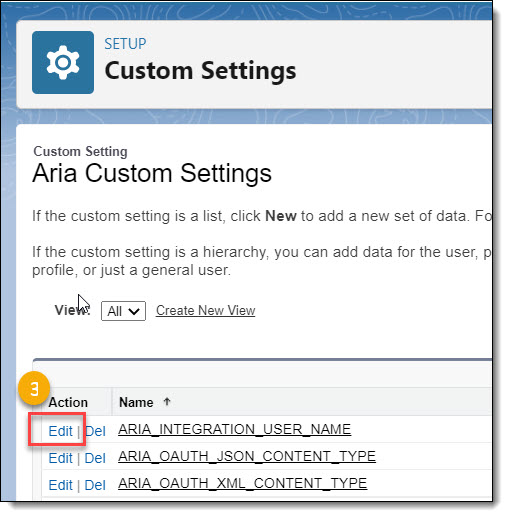
- Click on Edit next to ARIA_INTEGRATION_USER_NAME.
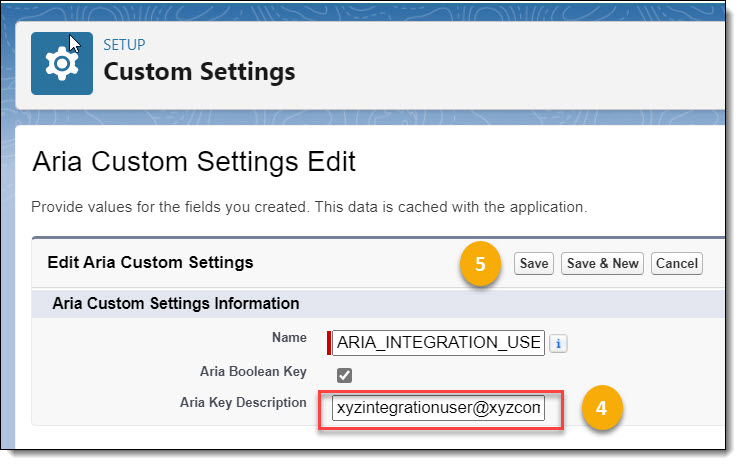
- Type in the Username of the Aria to Salesforce integration user you created in the previous section.
- Click on the Save button to save this user as the Aria Integration User.
Aria for Salesforce External Services Configuration to Support the Aria for Salesforce Loader Integration
The Aria for Salesforce Loader requires an external services configuration be enabled within your Aria instance to support the syncing of account information to your Salesforce instance.
Login to Aria
Getting Here: Configuration > Integrations > External Services
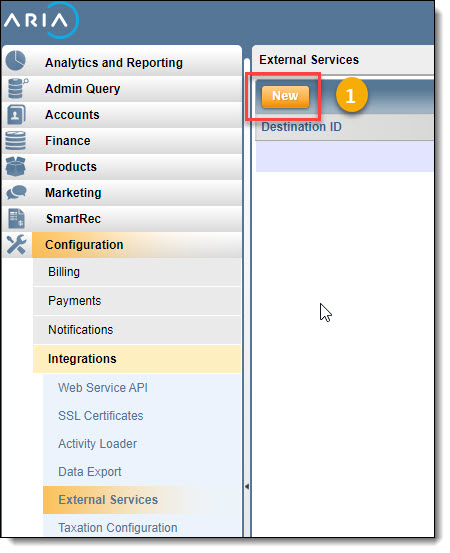
- Click on the New button to create a new Salesforce external service integration.
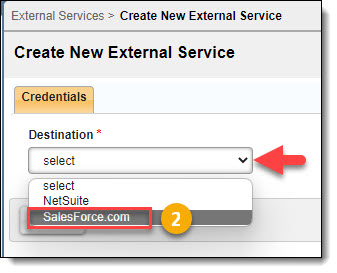
- Click on the Destination drop down arrow and select SalesForce.com.
Note: The settings on this page are typically configured by the Aria for Salesforce Administrator at your company, who is responsible for setting up, and monitoring your Aria for Salesforce integration.

- Type in "true" in the Enable Connection field to automatically transfer data from Aria to your Aria for Salesforce application in Salesforce.
Note: The default value for this field is "false". When set to false or left blank the Aria for Salesforce Loader will not sync any data to Salesforce.
- Type in the "Salesforce" Username of the user you created and configured in your Salesforce instance to facilitate the system-to-system integration between Aria and Salesforce in support of the Aria to Salesforce Loader.
Note: This user is NOT required to be actively logged into your Salesforce instance for the Loader integration to work.
- Type in the "Salesforce" Login Password of the above referenced Salesforce User.
- Type in the "Salesforce" Security Token of the above referenced Salesforce User.
Note: A user can obtain their security token by changing their password, or resetting their security token via the Salesforce user interface. When a user changes a password, or resets the security token, Salesforce sends a new security token to the email address on the user's Salesforce record. The security token is valid until the user resets the security token, changes a password, or has a password reset.
- Leave the API Version field blank unless otherwise directed.
Note: When left blank, The API Version field defaults to the most recent Salesforce REST API version supporting the Aria for Salesforce application. Newer API versions own/provide new functionality and thus the option exists to update this field to a new API version.
- Type in "true" in Map Company Name to map the account's Company Name field in Aria to the account's Name field in Salesforce.
Note: The default setting for this field is "false". False will map the Aria account number to the account's Name field in Salesforce in the form of "Aria Account XXXXXX". This field setting does not apply to consumer/person accounts.
- Type in the desired Objects to Transfer (NON case_sensitive) to Salesforce, separated by a comma, per the list shown below:
- Account_Coupon_Assignment
- Plan_Instance_Coupon_Assignment
- Account
- Contact
- Comment
- Billing_Group
- Payment_Method
- Dunning_Group
- Contract
- Invoice
- Plan_Instance
- Order
- Statement
- Transaction
Note: By default (field left blank), Aria will transfer all objects to Salesforce.
- The Disabled Object Fields should currently be left blank.
- The current default value for BULK API Min Threshold is 15, if left blank. Jobs smaller than this threshold will use the standard SFDC REST API instead of the Bulk API Loader
Note: Clients should contact Aria's Customer Support, or Professional Services team before changing this default.
- The default value for Allow Company Default Name is "false".
Note: If set to "true", the account name will be generated automatically in Salesforce.
- Click on the Save button to add this external Salesforce destination.
Setting Up Your Aria API Configuration in Salesforce
In your Salesforce - Aria for Salesforce API configuration, you provide your login credentials for accessing your Aria client, the promotion code that will be used to display plans in Salesforce, the Aria environment that your Salesforce account should point to, and the email address(es) at which you want to receive error notifications. Salesforce will point to your most recently created API configuration.
Note:
If you have a Salesforce account for testing and a different account that you use in production, it is recommended that you:
- Set up an Aria API configuration under your Salesforce test account that points to the Aria stage environment.
- Set up an Aria API configuration under your Salesforce production account that points to the Aria production environment.
If you do not have separate Salesforce test and production accounts, it is recommended that you:
- Create an API configuration that points to the Aria stage environment.
- Complete your testing.
- Create an API configuration that points to the Aria production environment.
To set up your Aria API Configuration in Salesforce, perform the following steps:
Log into Salesforce

- Click Aria Systems from the Salesforce drop-down menu.
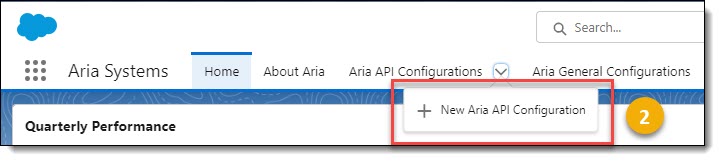
- Click on the New button.
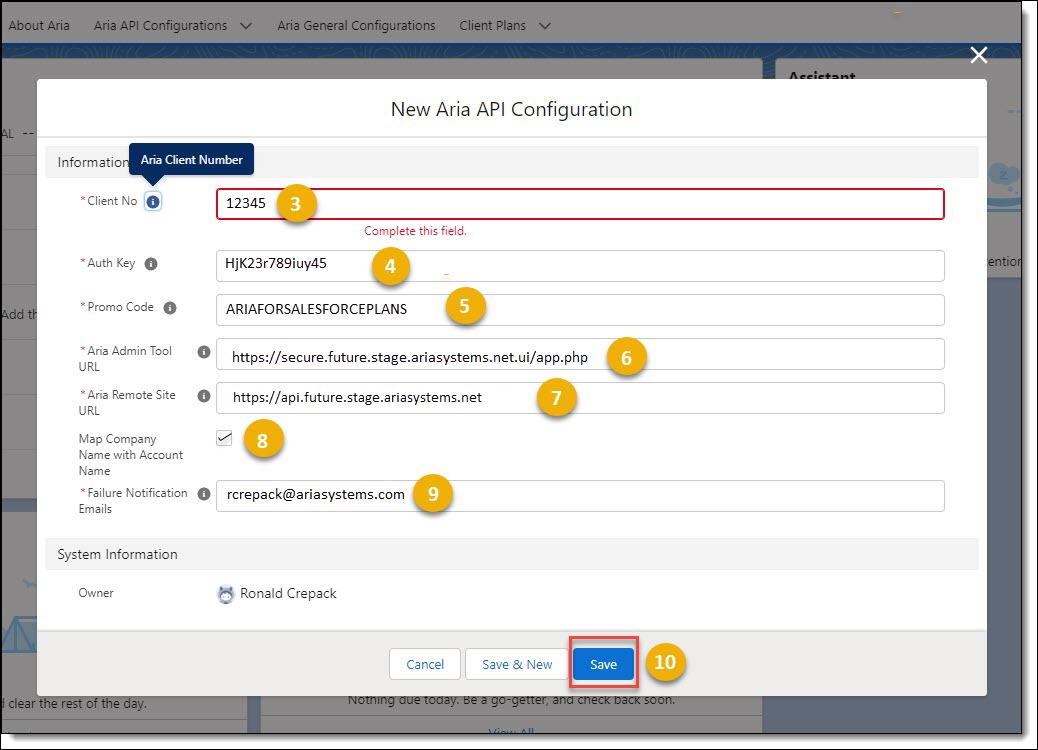
Complete the fields as described below:
- Client No: Enter your Aria-assigned client identification number.
- Auth Key: Enter your Aria-assigned authorization key.
Note: Your Client No, and Auth Key can be found in your Aria instance via the > Configuration > Integrations > Web Service API tabs
- Promo Code: Type in the promotion code that will be used to retrieve/sync the Aria plans that you want to make available to select within your Salesforce instance.
Note: You must first create a Promotional Plan Set in Aria that includes the Aria Plans you want to make available in Salesforce via the > Marketing > Promotional Plan Sets tabs in Aria. You then create a Promotion (Promo Code) that includes the Promotional Plan Set you created via the > Marketing > Promotions tabs.
- Type/Copy the Aria Admin Tool URL to be used for accessing AdminTools from within Salesforce:
- For the stage current environment, type in: https://secure.current.stage.ariasystems.net/ui/app.php
- For the stage future environment, type in: https://secure.future.stage.ariasystems.net/ui/app.php
- For the production environment, type in: https://secure.ariasystems.net/ui/app.php/
- Type/Copy the Aria Remote Site URL to be used for accessing the Aria Web Services API.
- US Aria Remote Site URL
- For the Stage Current environment, type in: https://api.current.stage.ariasystems.net
- For the Stage Future environment, type in: https://api.future.stage.ariasystems.net
- For the Production environment, type in: https://api.ariasystems.net
- EUR Aria Remote Site URL
- For the Stage Current environment, type in: https://api.current.stage.cph.ariasystems.net
- For the Stage Future environment, type in: https://api.future.stage.cph.ariasystems.net
- For the Production environment, type in: https://api.prod.cph.ariasystems.net
- AUS Aria Remote Site URL
- For the Stage Current environment, type in: https://api.current.stage.aus.ariasystems.net
- For the Stage Future environment, type in: https://api.future.stage.aus.ariasystems.net
- For the Production environment, type in: https://api.prod.aus.ariasystems.net
- Click/Check Map Company Name with Account Name.
- Type in the Failure Notification Email address(es) at which you want to receive error notifications. You can enter up to 5 email addresses separated by commas.
- Click on the Save button to save the Aria for Salesforce API Configuration.
- s) at which you want to receive error notifications. You can enter up to 5 email addresses separated by commas.
Note: Clients, who are using Aria Remote Site URL's outside of the US environment, also need to add this URL to Salesforce's Remote Site Settings configuration. This configuration setting enables call outs to the Aria URL's from within Salesforce. Access this configuration via the Setup > Administer > Security Controls > Remote Site Settings tabs, and click on the "New Remote Site" button. Name, and Add this URL to your Remote Site Settings configuration. As an example, if your Aria client instance in Production is based in Europe, you would use https://secure.prod.cph.ariasystems.net
Importing Your Product Catalog Elements from Aria into Aria for Salesforce
After setting up your Aria API configuration in Salesforce, and having previously whitelisted the Salesforce IP addresses in your Aria instance, you can now import Product Catalog elements from Aria into Aria Salesforce. Only those Aria plans associated to the Promotional Plan Set/Promotion Code that you set up in Aria, which is associated with your Aria API Configuration in Salesforce will be imported into Aria for Salesforce.
Log into Salesforce

- From the Aria Systems main menu, click on Aria Product Catalog.
Import/Refresh Client Plans/Supplemental Fields from Aria

- Click on the Refresh Plans or Refresh Supplemental Fields button to facilitate the on-demand syncing of Aria Plans or Aria Plan Supplemental Fields from your Aria client instance to your Salesforce.com/Aria for Salesforce application.
Note: When either button is clicked, a small spinner and progress-ring appears next to the 'Refresh' button indicating that a sync is in progress. The 'Refresh' buttons are disabled while the sync is in progress. It may take more than 15 minutes to import your plans from Aria depending on the number of plans associated with your specified promotional plan set/promotion code. To check the status of the import from the Salesforce Setup menu, click Environments > Jobs > Apex Jobs .
- Use the Master Plan Name search field to type search information for the search and display of a specific Plan or set of Plans in line with your search text.
- Click on a Plan's right arrow symbol to display any Supplemental Plans associated with a Master Plan.
- To view a Master or Supplemental Plan's service and rate schedule details, click on the Plan Name's blue hyperlink. A drawer window opens displaying the Plan Name, Services and Rate Schedules associated with the Plan. When there are multiple rate schedules with multiple defaults, the rate schedules are sorted alphabetically by currency. Use the scroll bar in this section of the window to see additional services and rate schedules associated with the Plan.
- Click on a Rate Schedules right arrow to open the services and rates specific to that rate schedule.
- To view more details regarding the Plan, click on the View More Details button.
The "Client Plan" Details screen is displayed as shown below.
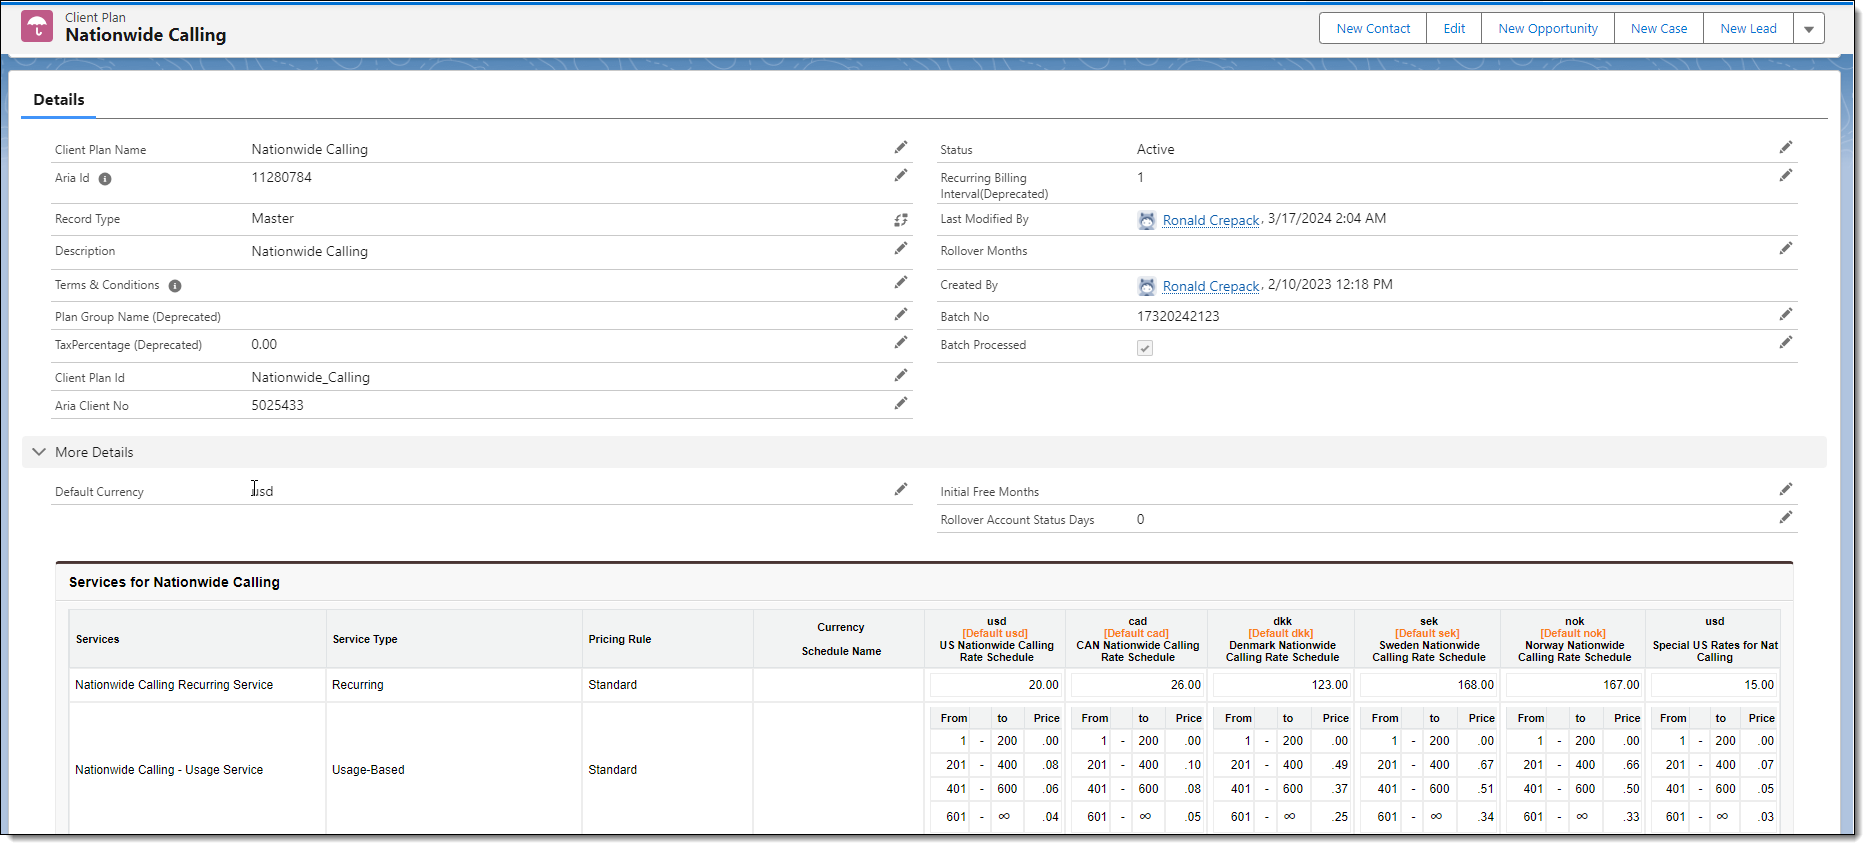
Note: Aria for Salesforce does NOT currently support the bi-directional syncing of Product Catalog (Plan) elements. Thus, this screen is provided for viewing and informational purposes ONLY. Any edits made to field elements shown here will not be synced back to Aria.
- Click on the 'X' in the upper right to close the drawer window.
One-Time Products

- Use the One Time Product Name search field to type search information for the search and display of a specific One Time Product(s) per your search text.
- To view a One-Time Product's service and rate schedule details, click on the One-Time Product's blue hyperlink. A drawer window opens displaying the One-Time Product's service and rate schedule(s). When there are multiple rate schedules with multiple defaults, the rate schedules are sorted alphabetically by currency. Use the scroll bar in this section of the window to see additional services and rate schedules associated with the Plan.Click on a 'One Time Products Name'.
- Click on a Rate Schedules right arrow to open the service and rates specific to that rate schedule.
- To view more details regarding the One-Time Product, click on the View More Details button.
A One Time Product's "Drawer Window" opens as shown below.

Note: Aria for Salesforce does NOT currently support the bi-directional syncing of Product Catalog (One-Time Product) elements. Thus, this screen is provided for viewing and informational purposes ONLY. Any edits made to field elements shown here will not be synced back to Aria.
- Click on the 'X' in the upper right to close the drawer window.
Coupons

- Click on the Refresh Coupons button to facilitate the on-demand syncing of Coupons from your Aria client instance to your Salesforce.com/Aria for Salesforce application. When clicked, a small spinner and progress-ring appear next to the Refresh Coupons button indicating that a sync is in progress.
- Use the Coupon Code search field to type search information for the search and display of a specific Coupon(s) per your search text.
Templates

- Use the Template Name search field to type search information for the search and display of a specific Template(s) per your search text.
Enabling and Using Plan Instance Product Fields in Aria for Salesforce
Users can access and enter plan instance product fields from within Aria for Salesforce. To do this, you need to create and configure plan instance product fields in your Aria instance, and then sync those fields via on-demand sync within Aria for Salesforce. Users can then see and assign these fields from within Aria for Salesforce.
Note: See Create Product Fields for instructions on creating and configuring plan instance product fields in Aria.
Below is an example of the Product Fields screen in Aria:
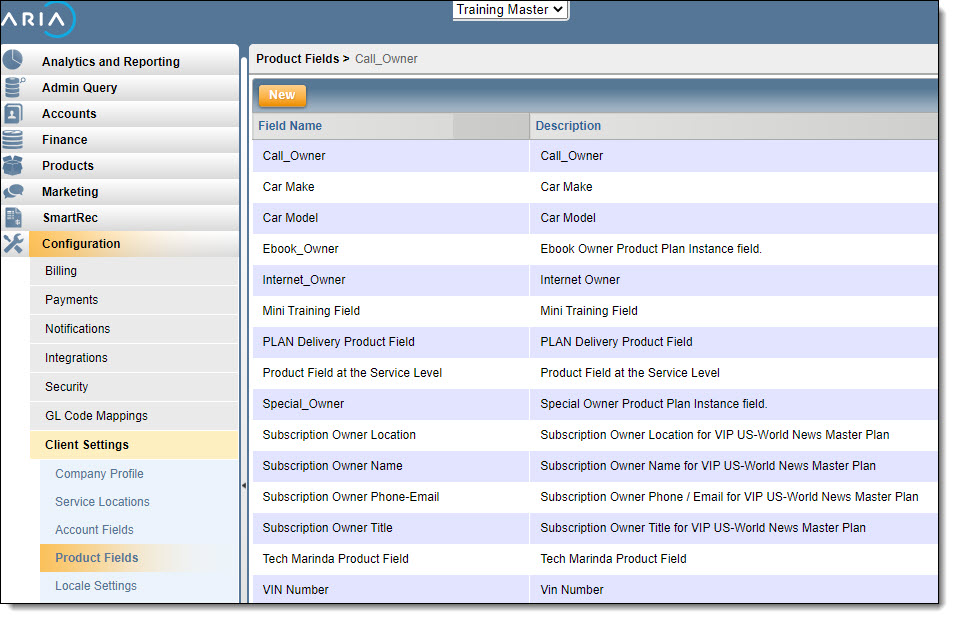
You can assign a plan instance product field to a Plan in Aria as shown below:
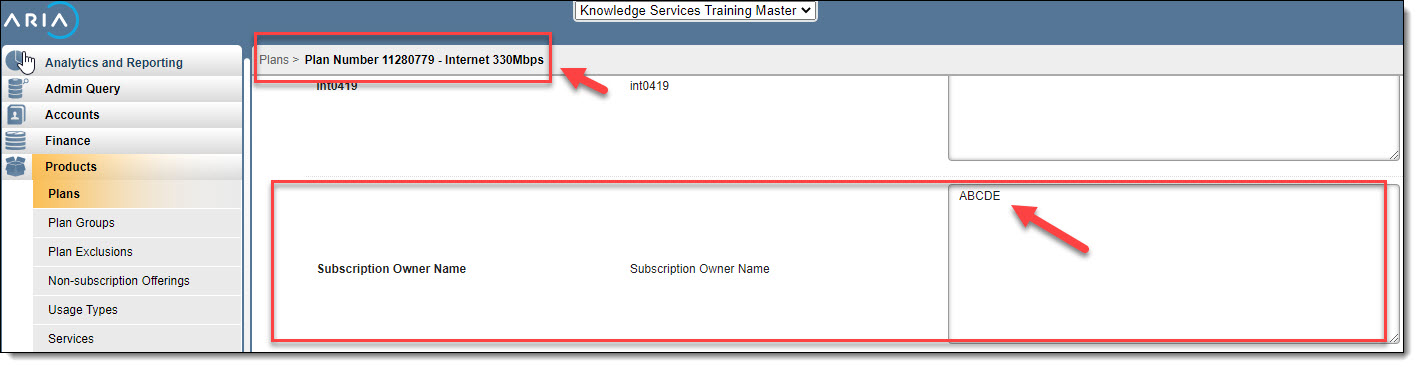
Note: A Plan Instance Product Field with an associated field value can be assigned to a Plan at the Product Catalog level. The Plan Instance Product field and field value will then be automatically saved to all plan instances for accounts purchasing the plan.
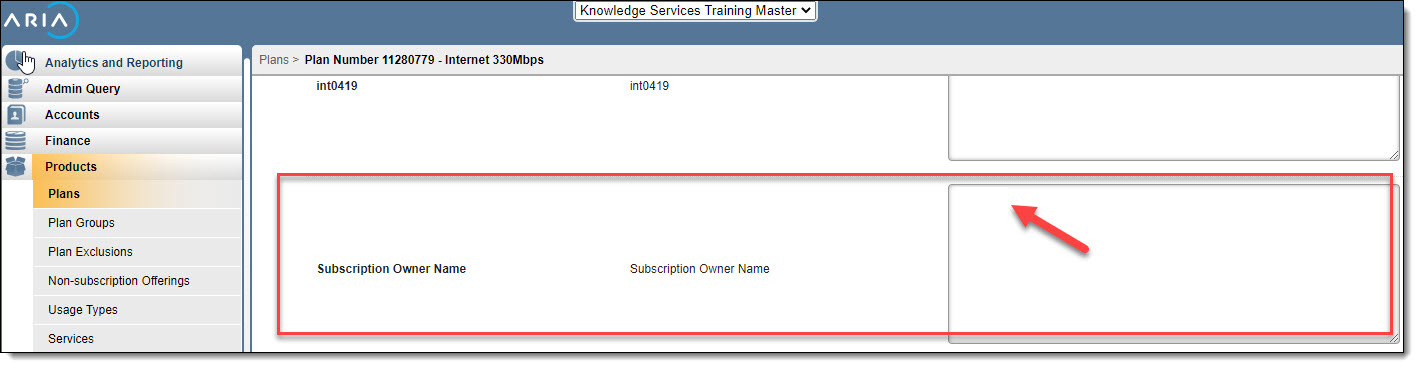
Note: A Plan Instance Product Field with a null field value supports the assignment of a unique value for any accounts purchasing an instance of the Plan.
Enabling Plan Instance Product Fields in Aria for Salesforce
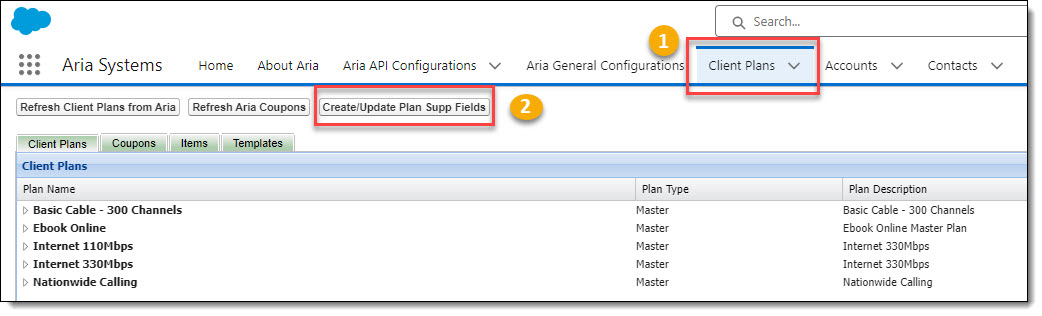
- From the Aria Systems' main menu, click on Client Plans.
- Click on Create/Update Plan Supp Fields to refresh Aria Plan Instance Product Fields into Aria for Salesforce.
Note: Repeat this process to update new/updated Plan Instance Product Fields from Aria into Aria for Salesforce.
Using Plan Instance Product Fields in Aria for Salesforce
![]()
- From the Accounts' Plan Wizard screen, click on the Plans' Actions down arrow, and then click Configure.
Note: See Creating Accounts Using Aria for Salesforce Opportunity and Quote Management for instructions on creating accounts and assigning plans.
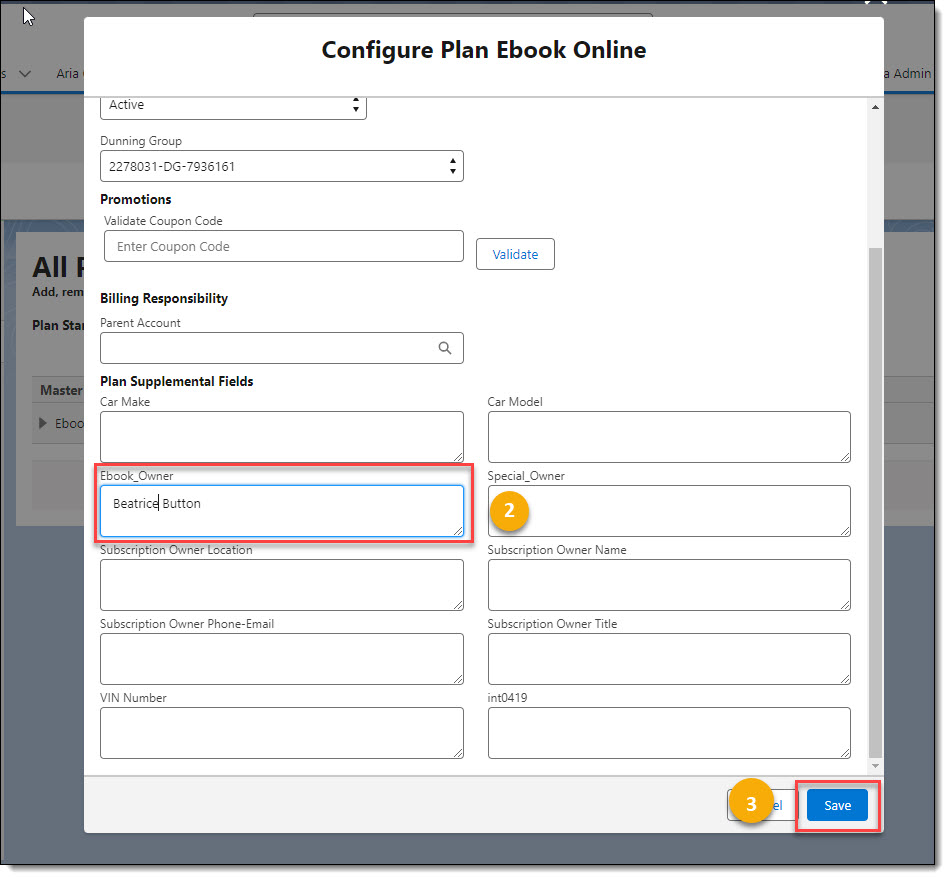
- Type in a field value for the desired Plan Instance Product Field.
- Click on the Save Button.
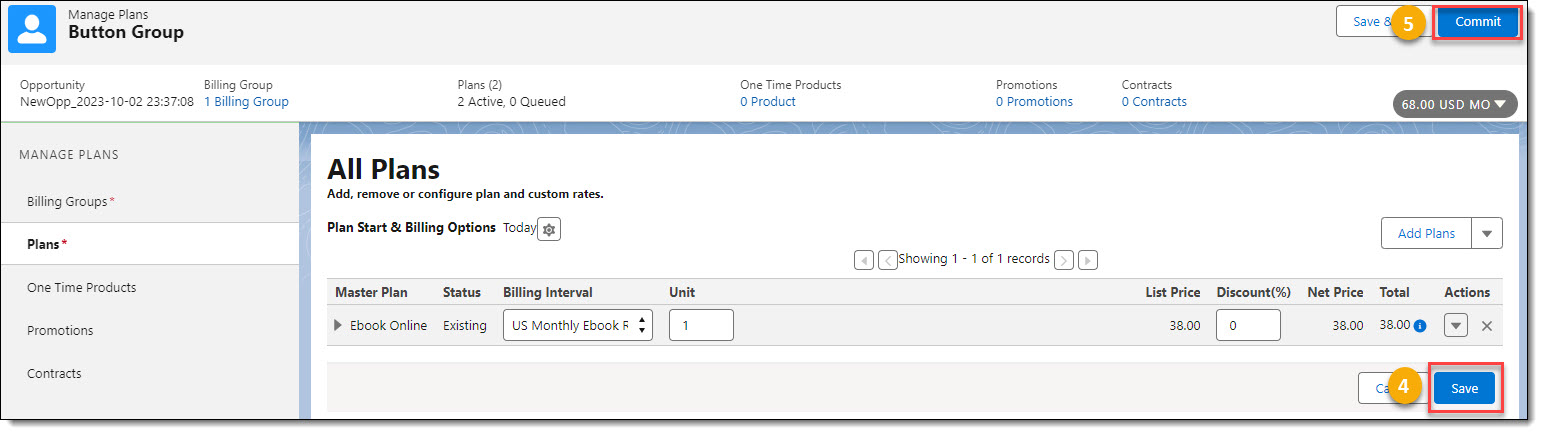
- Click on the Save button to save this Plan Instance Product Field and field value for the associated plan.
- Click on the Commit button to save the new plan/plan changes to Aria.
Note: A Plan Instance Product Field value entered and committed to Aria in this fashion will have primacy and override any field value saved with the Plan at the Product Catalog level.
Batch Synchronization of Aria's Product Catalog to Salesforce
You need to schedule one Apex job, AriaBatchProductFieldSyncScheduler, to refresh new/changed Aria plan data into Salesforce.
Note: The AriaBatchProductFieldSyncScheduler job takes approximately one hour to run.
Login into Salesforce
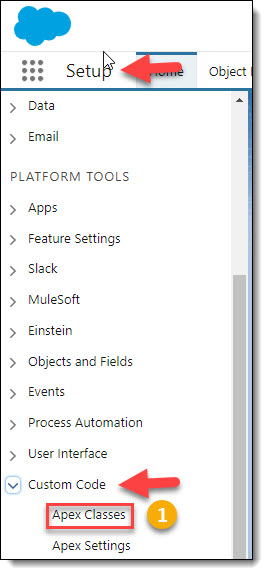
- From the Salesforce Setup Home menu, click on the Custom Code drop down arrow and then click Apex Classes.
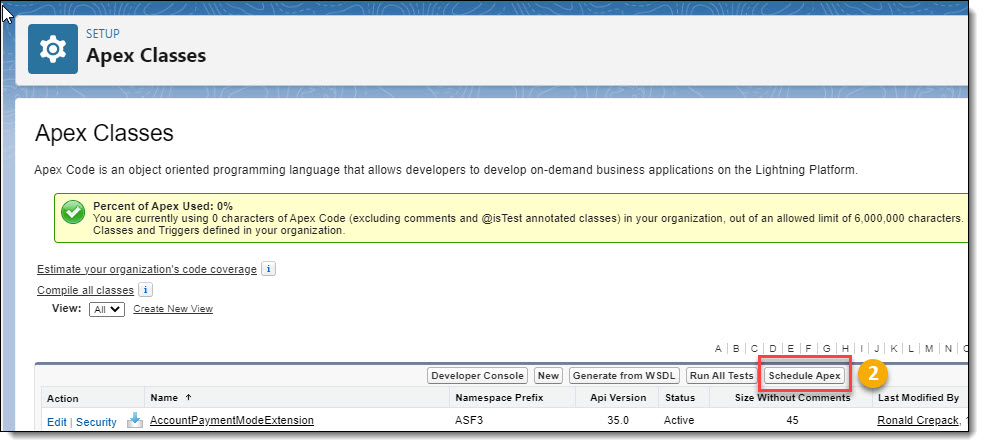
- Click on Schedule Apex.

- Type in a meaningful Job Name.
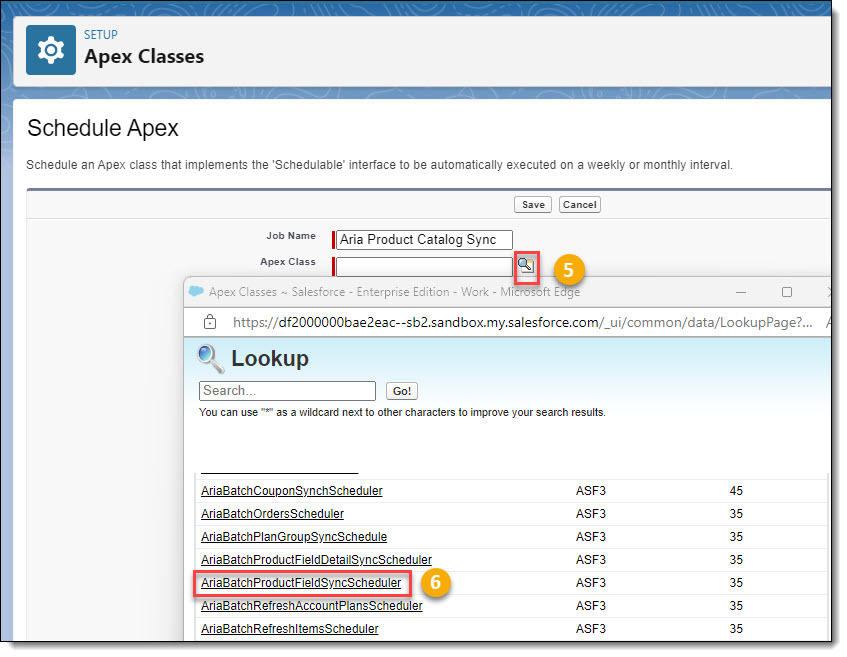
- Click the Apex Classes' search symbol.
- Click AriaBatchProductFieldSyncScheduler from the available options.
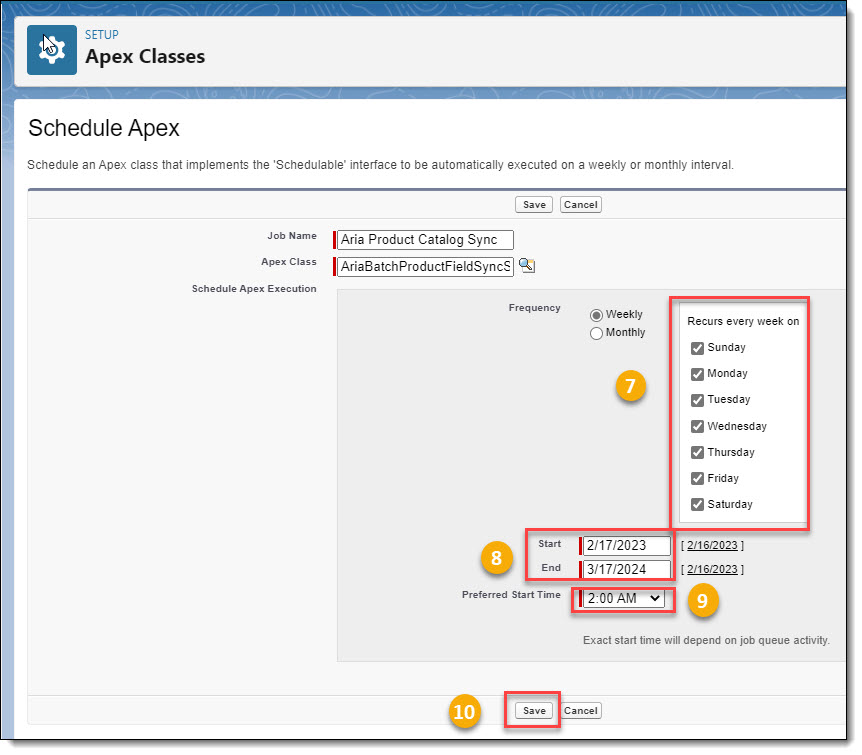
- Click on all days for Frequency.
- Type in or select the Start, and End dates for the job to run.
- Click on the Preferred Start Time at which this job should run every day.
Note: You should select a Preferred Start Time that falls within off-peak hours.
- Click on the Save button to save and schedule this job.
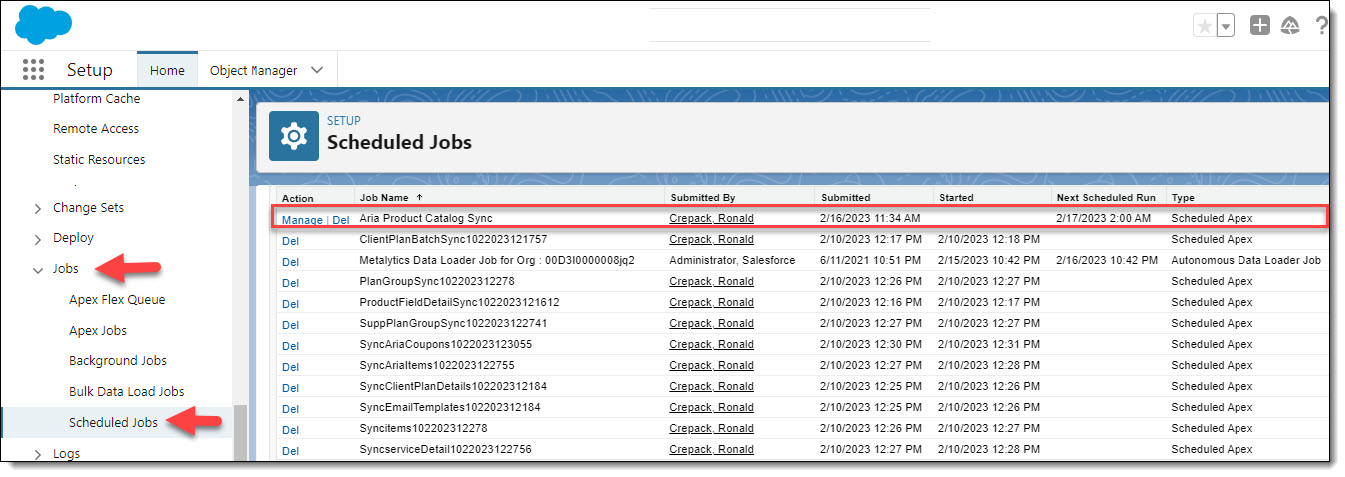
The newly scheduled Apex job, as shown below, can be found in the Salesforce Setup Home menu under > Environments > Jobs > Scheduled Jobs.
Turn On Sync Aria Transactions to SFDC Objects
Clicking the Refresh Aria Transactions button on the Aria for Salesforce Accounts page pulls transaction records (transactions, statements, comments, payments, refunds, invoices, etc.) on-demand from Aria into Aria for Salesforce. To enable this functionality, perform the following steps.
Log into Salesforce

- From the Salesforce Setup Home menu, click on the Custom Code down-arrow key, and then click on Custom Settings.
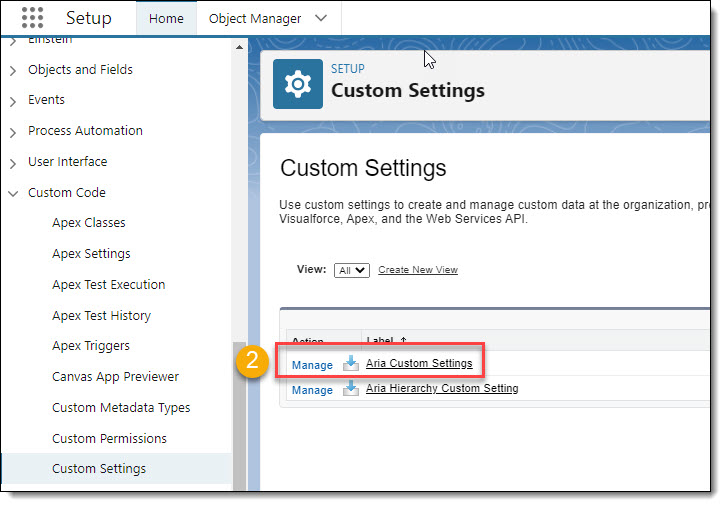
- Click the Manage link next to Aria Custom Settings.

- Click the Edit link next to SYNC ARIA TRANSACTIONS TO SFDC OBJECTS.
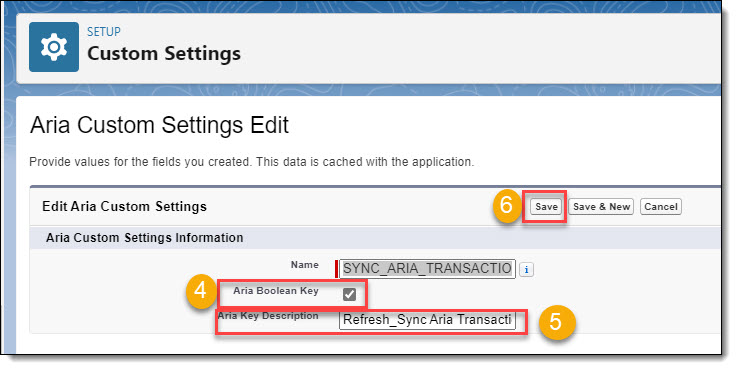
- Click the Aria Boolean Key checkbox
- Type in an Aria Key Description (for example: Refresh_SyncAria Transaction)
- Click on the Save button.
Account Re-Synchronization
There are occasions when it may be required, either manually or programmatically, to cause one or more accounts to be fully re-synchronized. The process of performing an account re-synchronization requires that a special account supplemental field be created in Aria which is modified, per account, each time you want to trigger a re-synchronization.
Account Supplemental Field Setup
Before any account re-synchronization, you need to create the following account supplemental field.
Log into Aria
Getting Here: Configuration > Client Settings > Account Fields > New
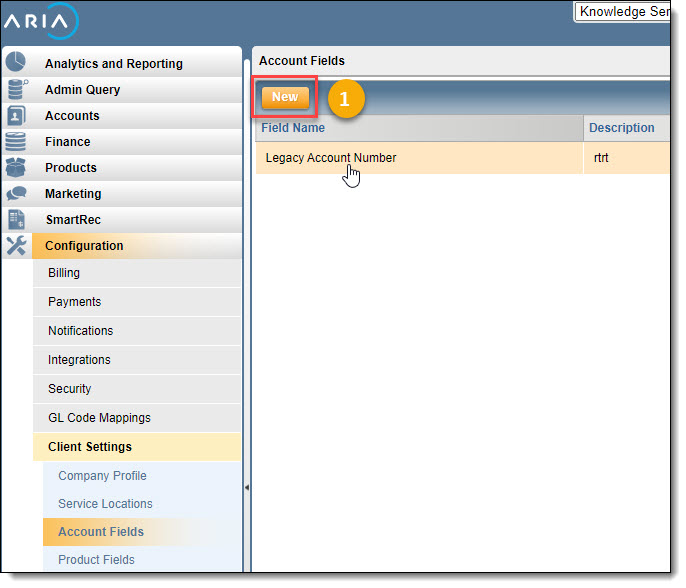
- Click on the New button.

- Type in a Field Name of SYNC_ACCOUNT.
- Type in a Description. In this example "This account supplemental field supports the full account synchronization between Aria and Salesforce".
- The Field Order will automatically populate based on the number of Account Fields previously created in your Aria instance.
- Use the Required field's default selection of No.
- If you plan to use the Aria UI to re-synchronize an account(s), select No from the Hidden fields drop down. If you plan to programmatically re-synchronize accounts, select Yes from the field's dropdown.
- Use the Presentation Mode field's default selection of Text input.
- Use the Minimum Selection field's default value of 0.
- Use the Maximum Selection field's default value of 1.
- Click on the Save button to save this new account supplemental field.
Triggering an Account Re-Synchronization
For a given account, you must set the SYNC_ACCOUNT account supplemental field value to the current Unix epoch timestamp, seconds since January 1, 1970 at 00:00:00 GMT (1970-01-01 00:00:00 GMT).
As an example, if the current time was 2018-07-19T22:11:38Z, the seconds since the epoch would be 1532038298.
The following is a link to an external website that provides information on how to get the epoch time in seconds in various programming languages: https://www.epochconverter.com/#code
Once this is done, the system supports the following logic:
- The system will examine any changes to an account's supplemental fields looking for the SYNC_ACCOUNT supplemental field.
- If the key is Not present, supplemental field processing will proceed as normal.
- If the key is present, the timestamp will be examined:
- If it is Not a valid timestamp, the supplemental field processing will proceed as normal.
- If the timestamp is valid and is within a certain system-wide threshold, and has not already been recently processed (based on local cache):
- A full re-synchronization of the account and all associated objects will occur.
- The timestamp is added to local cache to prevent reprocessing.
- If the timestamp is outside of the system-wide threshold or has recently been processed (based on local cache), normal supplemental field synchronization will occur.
Assign or Customize Your Page Layouts
In order for your Salesforce users to be able to utilize Aria functionality in Salesforce, they must have access to the applicable Aria page layouts or access to Aria controls (fields, buttons, etc.) on your existing Accounts, Contacts, Opportunities, and Quotes layouts.
To provide your Salesforce users with access to Aria functionality, you can do either of the following:
- If you are new to Salesforce, assign Aria page layouts to your Salesforce profiles.
- If you have previously used Salesforce, customize your existing page layout. This will allow you to display the same controls as the Aria page layouts.
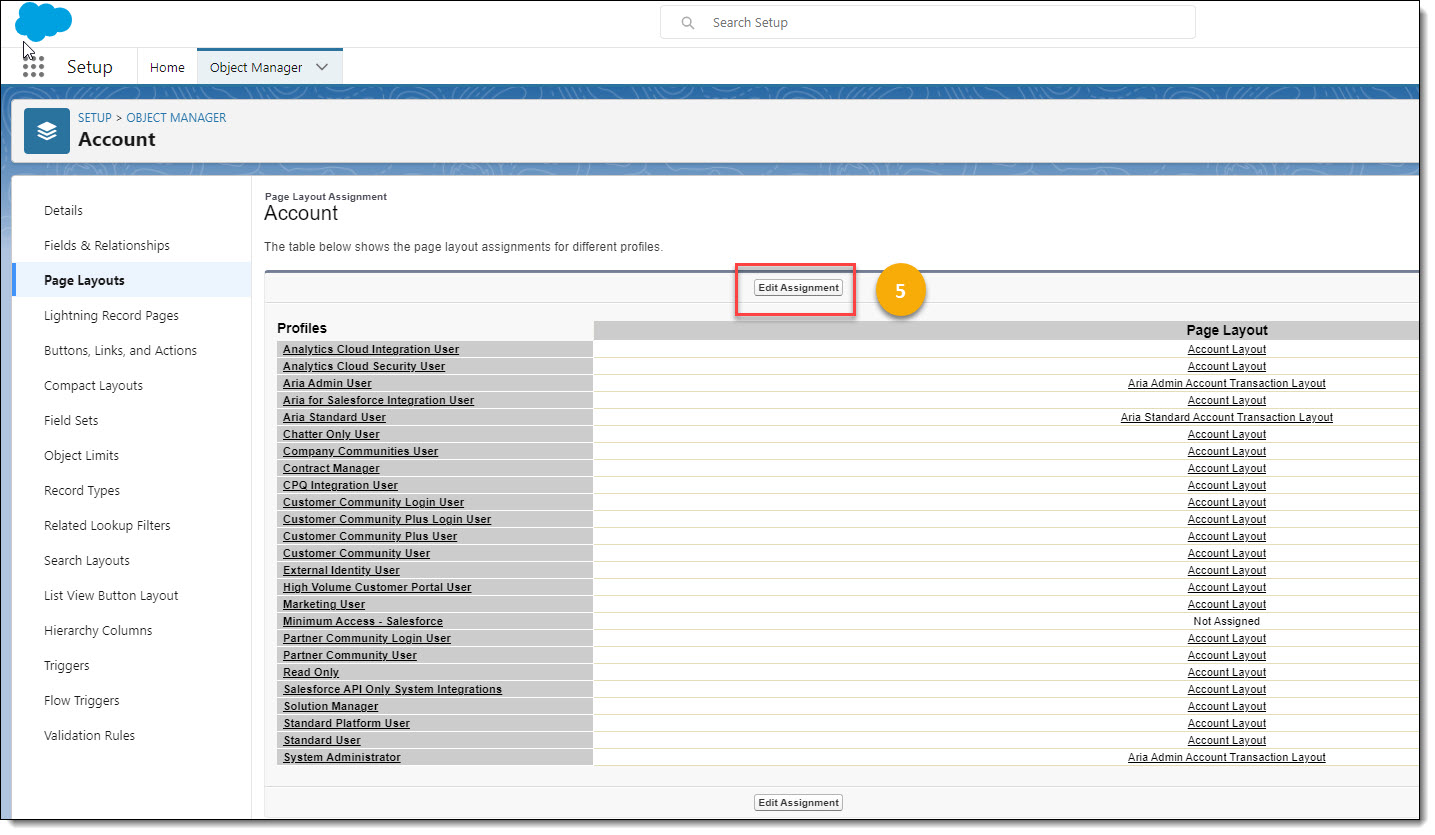
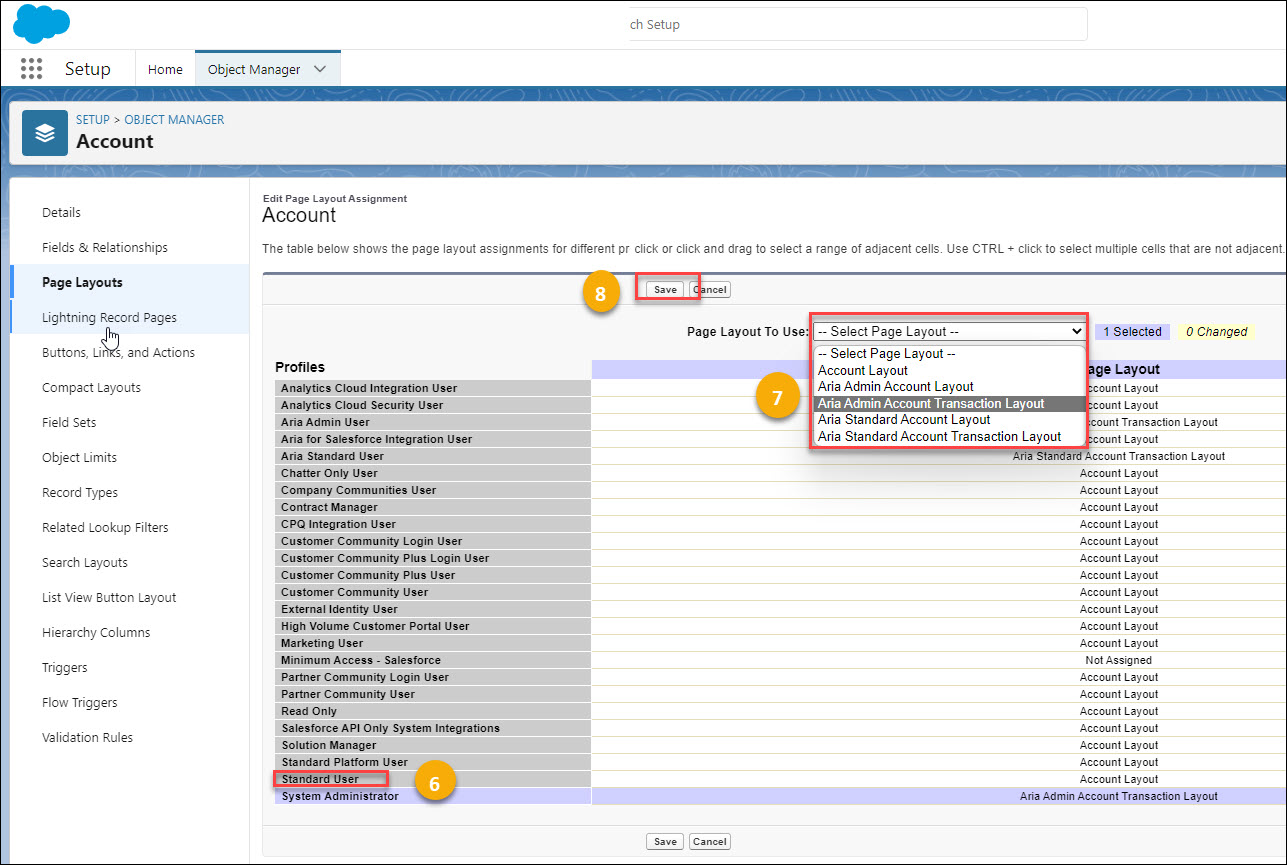
Assigning Aria Page Layouts to Your Salesforce Profiles
If you are new to Salesforce, you want to assign Aria page layouts to your Salesforce profiles by following the steps below. You may then choose to customize the Aria page layouts by removing and/or rearranging controls on them.
Log into Salesforce
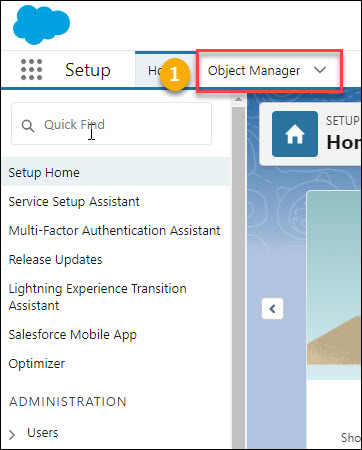
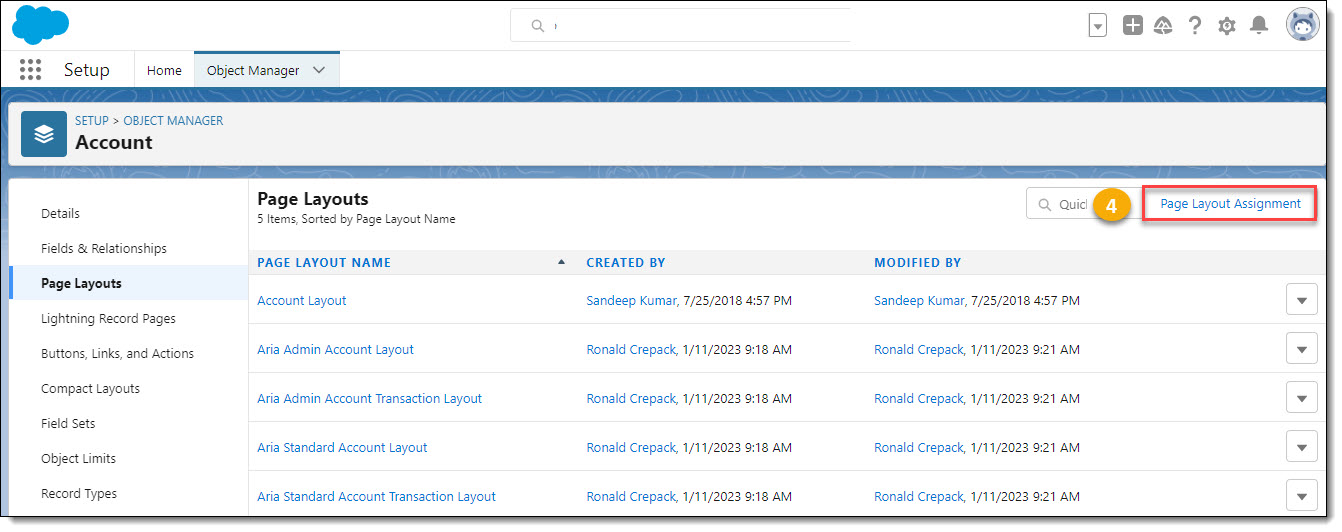
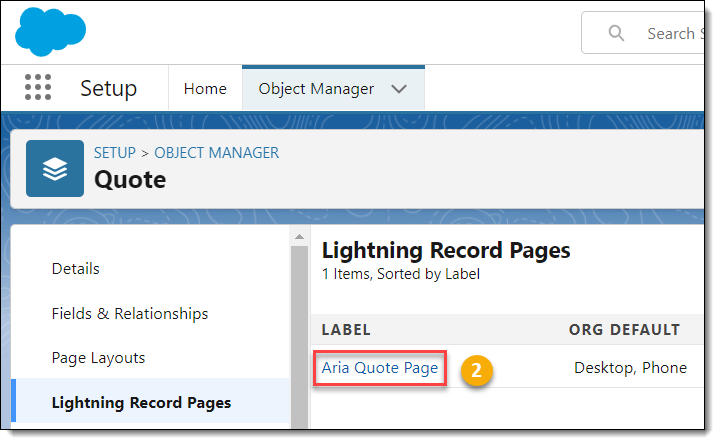
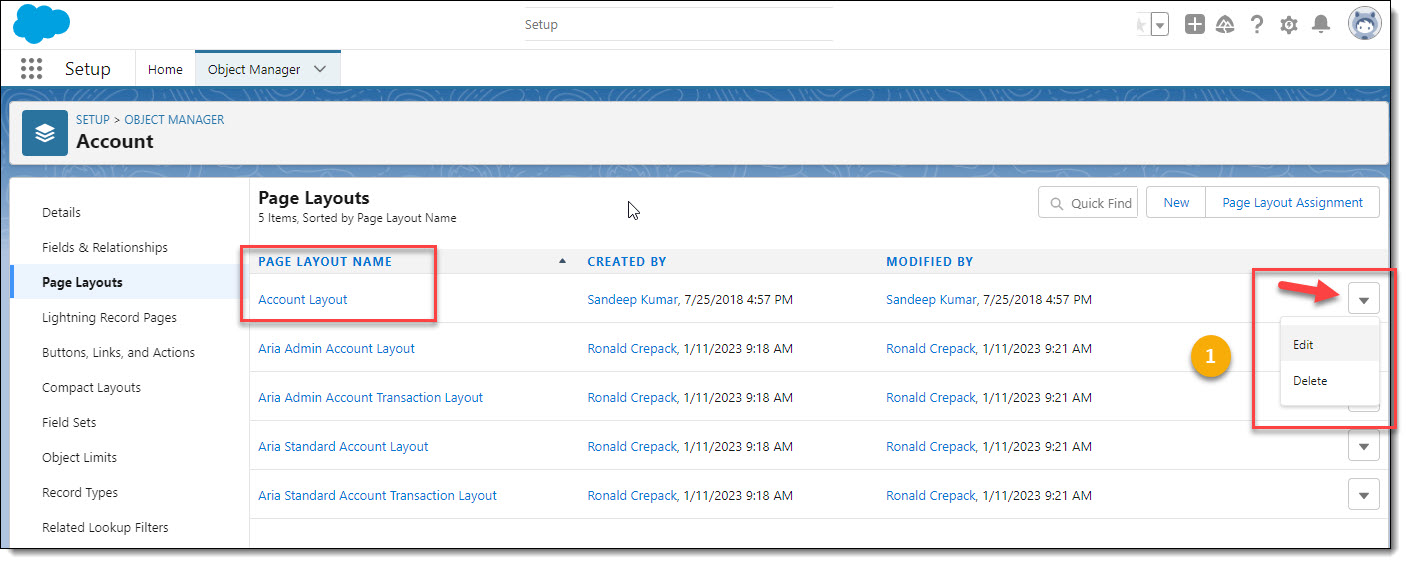
- From the Salesforce Setup menu, click on the Object Manager tab.

- Click on the Account label.
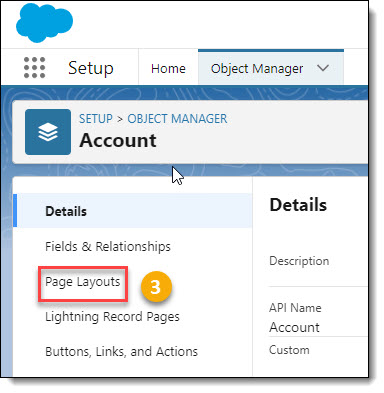
- Click on Page Layouts.