Aria Transactions (Lightning)
To implement Lightning interface aesthetics and usability in support of Aria Transactions, the following enhancements detailed below were implemented in this release.
(SFDC-2466, SFDC-2467, SFDC-2468, SFDC-2683)

- A new "Aria Transactions" button has been added to the Account screen. Clicking on this button displays Aria Transactions in a full screen modal.

- The top section of the screen is labeled "Aria Transactions". "Aria Transaction History" is labeled in the main section.
- An "X" in the upper right corner just outside the screen is used to close the window and return the user to the main Account screen.
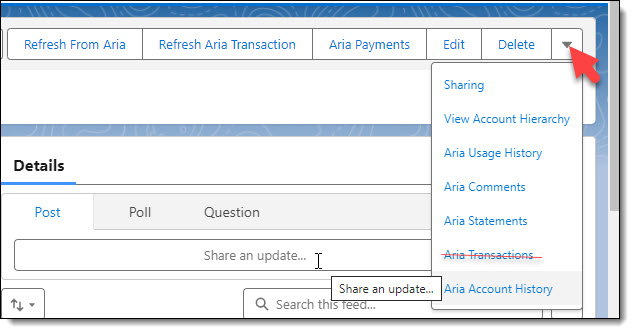
- The "Aria Transactions" link to the "Classic" view of Aria transactions has been removed.
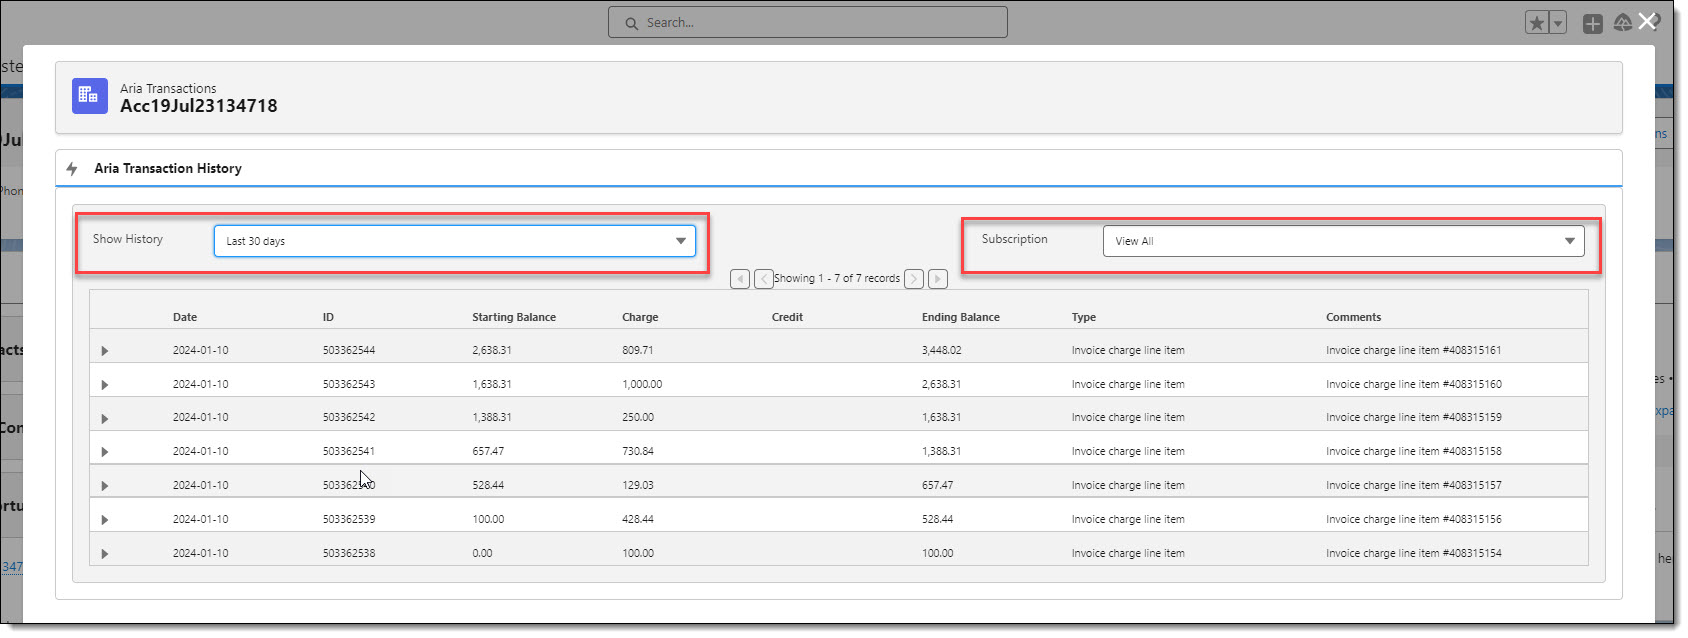
- Lightning filters have been implemented for "Show History", and "Subscription".
- The "Show History" filter displays a static value of 30 days. Other selectable values from the dropdown include 60 Days, 90 Days, 180 Days, 1 Year, and 2 Years.
- The "Subscription" filter displays a static value of View All. The dropdown arrow provides for the viewing of transactions at the individual subscription level.
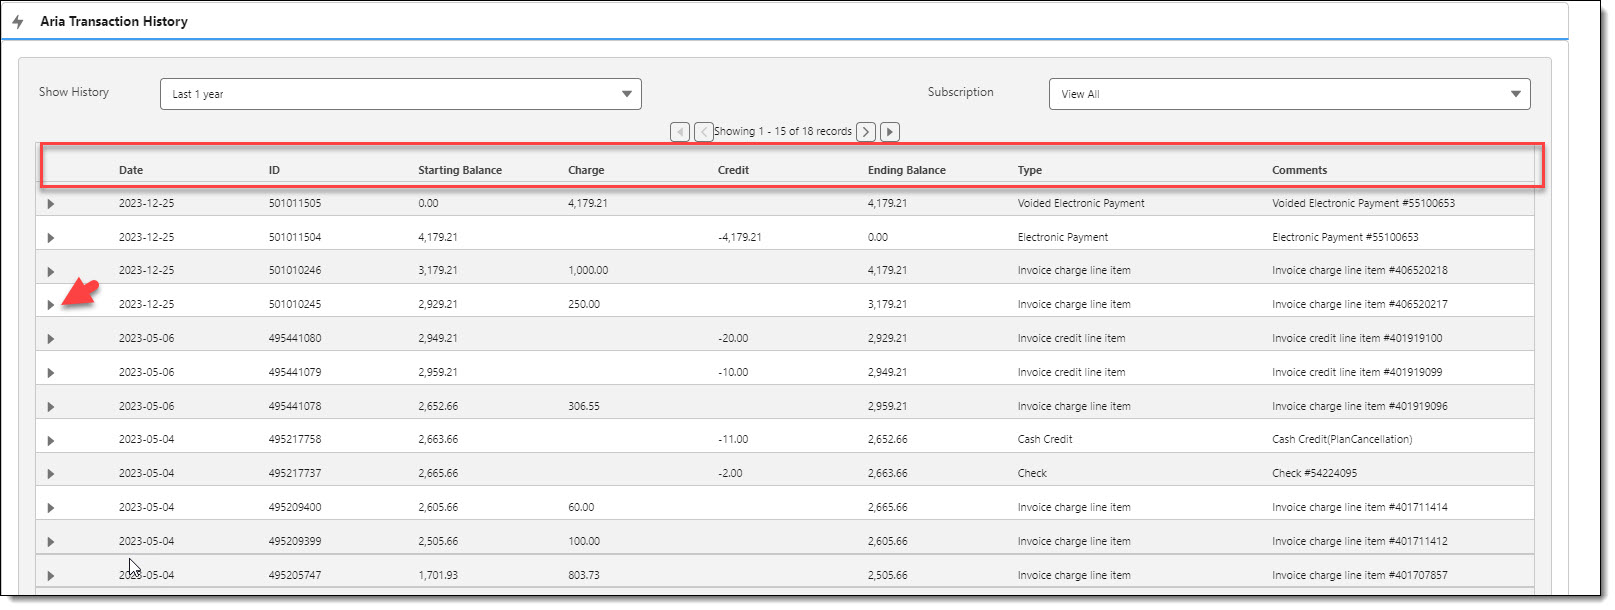
- Pagination on the screen has been set to display up to 15 transactions per page.
- A striped-row Lightning table style is used to display transaction history.
- The collapsed table header displays transaction information in the following columnar order:
"Date" "ID" "Starting Balance" "Charge" "Credit" "Ending Balance" "Type" "Comments"
- Each row is an accordion, that if expanded using the transaction rows' right arrow, displays a table of expanded transaction details.
- The "Credit Reason Description" column as displayed in the Classic view has been removed, and its data now populates a new "Comments" column.
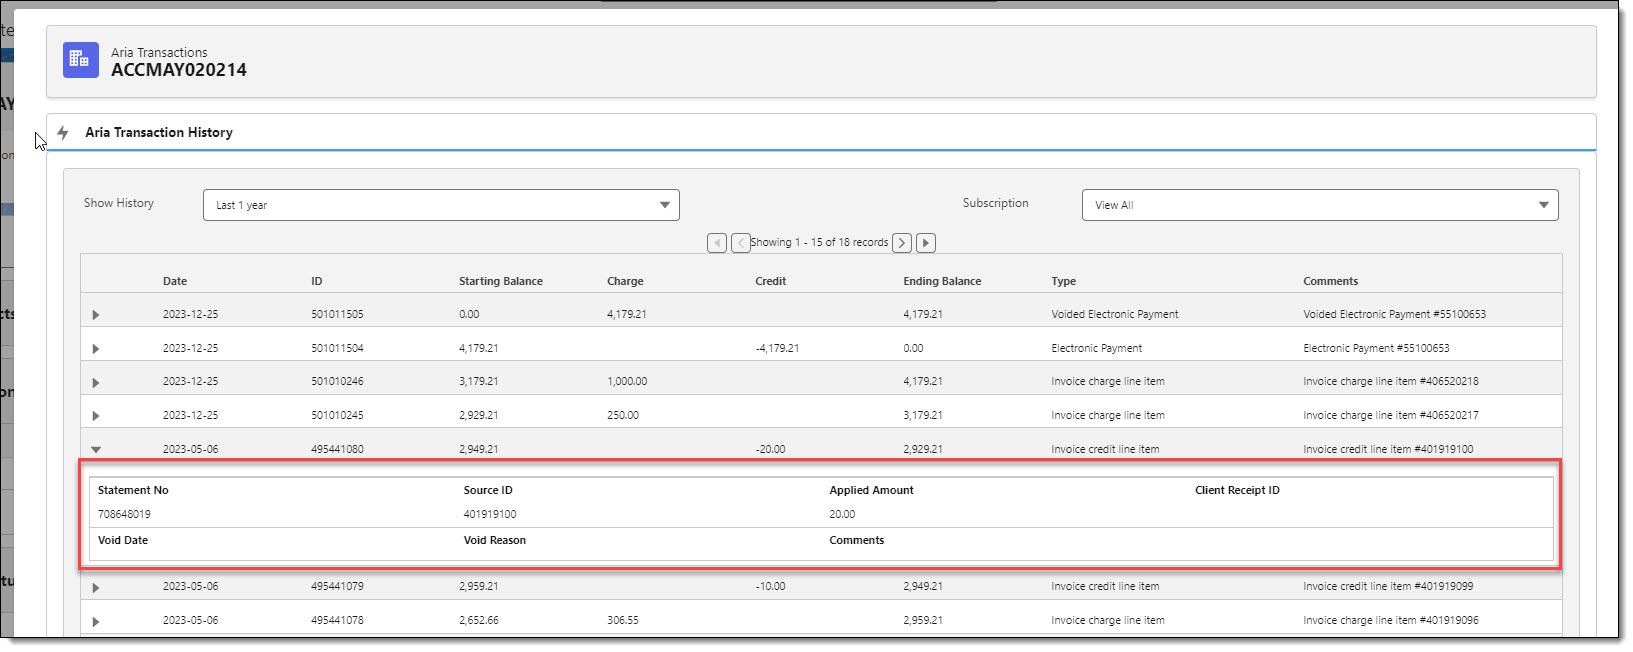
- Expanded table view "Header" information is displayed in two rows:
1st Row: "Statement No." "Source ID" "Applied Amount" "Client Receipt ID"
2nd Row: "Void Date" "Void Reason" "Comments"
- All financial data displayed is supported up to two(2) decimal points.
- The "Create Date" and "Currency" headers as displayed in the Classic view have been removed.
Aria Cash Credits & Service Credits (Lightning)
The following enhancements were implemented in this release to facilitate Lightning interface aesthetics and usability, and to support the creation of Cash Credits and Service Credits, and the viewing of Credit History, and Recurring Credits History.
(SFDC-2150, SFDC-2511, SFDC-2512, SFDC2550, SFDC2551, SFDC-2552, SFDC-2731, SFDC-2724, SFDC-2612, SFDC-2688, SFDC-2714, SFDC-2509, SFDC-2499, SFDC-2508, SFDC-2497, SFDC-2498, SFDC-2634, SFDC-2649, SFDC-2513, SFDC-2553, SFDC-2609, SFDC-2610, SFDC-2601, SFDC-2611, SFDC-2602, SFDC-2603, SFDC-2734, SFDC-2784, SFDC-2687, SFDC-2809, SFDC-2761, SFDC-2812

- From the Account screen, click on the "Aria Payments" button.
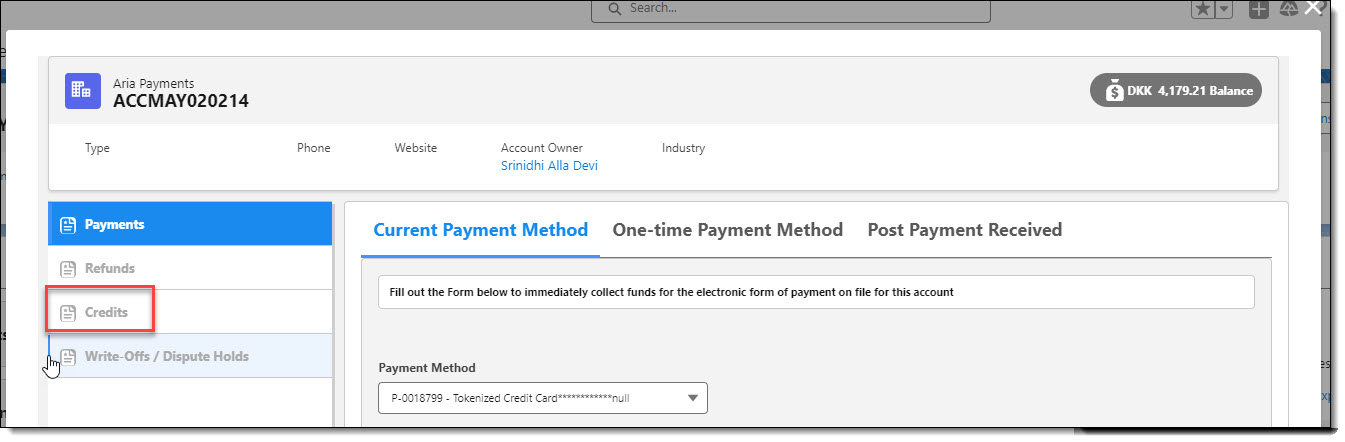
- A "Credits" menu option has been added to the Aria Payments screen.
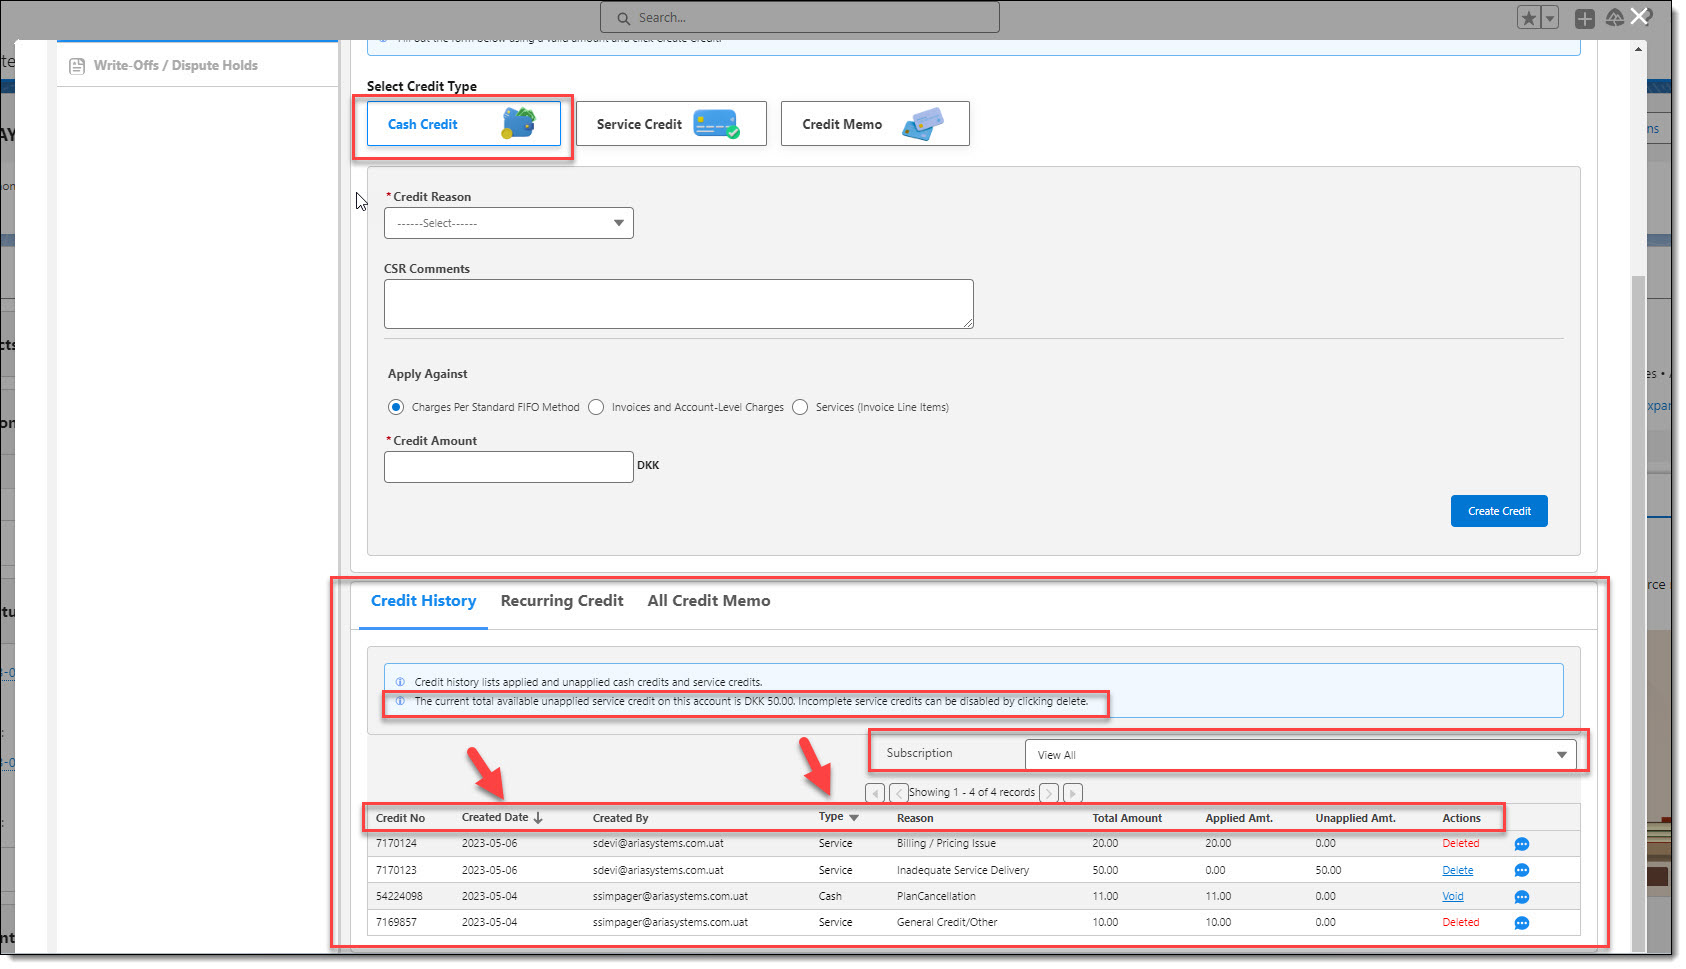
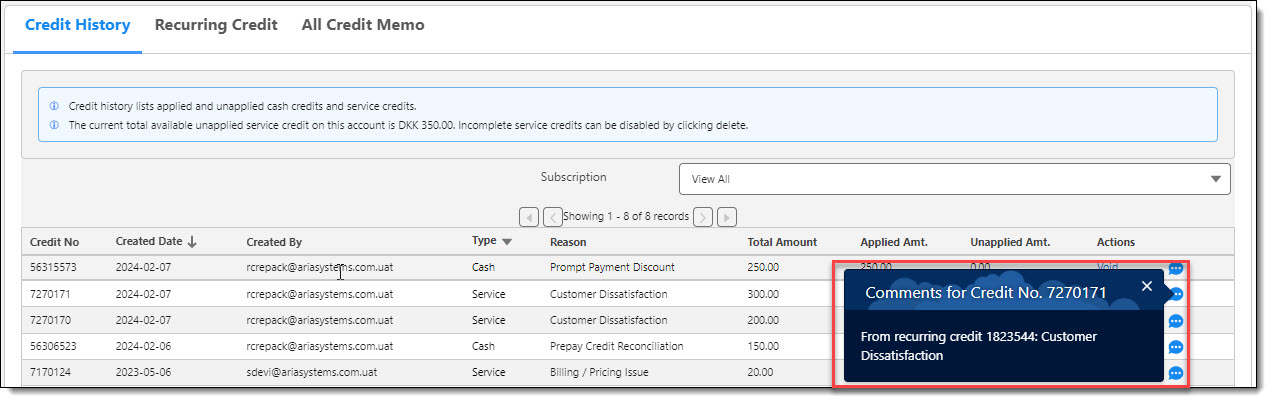
- When the user lands on the default "Cash Credit" screen (Credit section) from the Credit menu link, the screen displays the accounts' "Credit History".
- "Credit History" lists applied and unapplied Cash Credits, and Service Credits.
- Credits can be filtered via use of the Subscription dropdown arrow. Selecting a Subscription from the dropdown will filter and display credit history for the selected subscription. All Credits (View All) are displayed by default.
- Column Headers include the following:
"Credit No" "Created Date" (sortable) "Created By" "Type" (default is All) "Reason" "Total Amount" "Applied Amt" "Unapplied Amt." "Actions"
- In the "Actions" column, actionable credit history lines (example: Delete, Void) are "underlined".
- Click the "Comments" icon to see any comments associated with the credit.
- The Credit History table displays both "Cash Credit" and "Service Credit" history. See "Type" column.
- The "Type" column by default (All) displays both Cash Credits and Service Credits in the credit history. Use the "Type" headers' drop down arrow to filter for Cash Credits (Cash) only, or Service Credits (Service) only.
- The "Credit History" table is the same for both Cash Credits and Service Credits and displays when the user selects either the Cash Credit or Service Credit buttons. Only the column headers will be displayed if the account has no credit history.
- The "Unapplied Service Credit Amount" in the Credit History tab header is automatically updated when a new Cash Credit or Service Credit is added.
- Pagination has been set to display up to 10 credits per page on this screen.
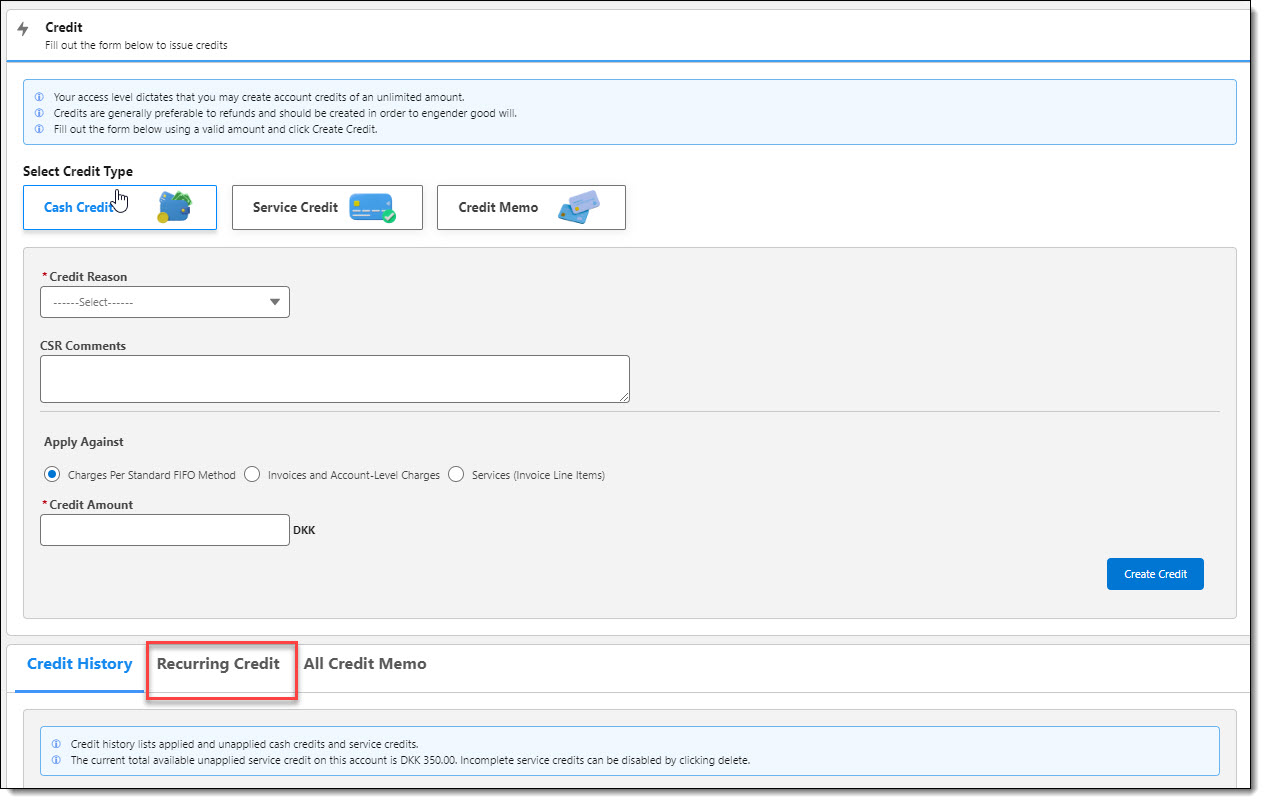
Create a Cash Credit
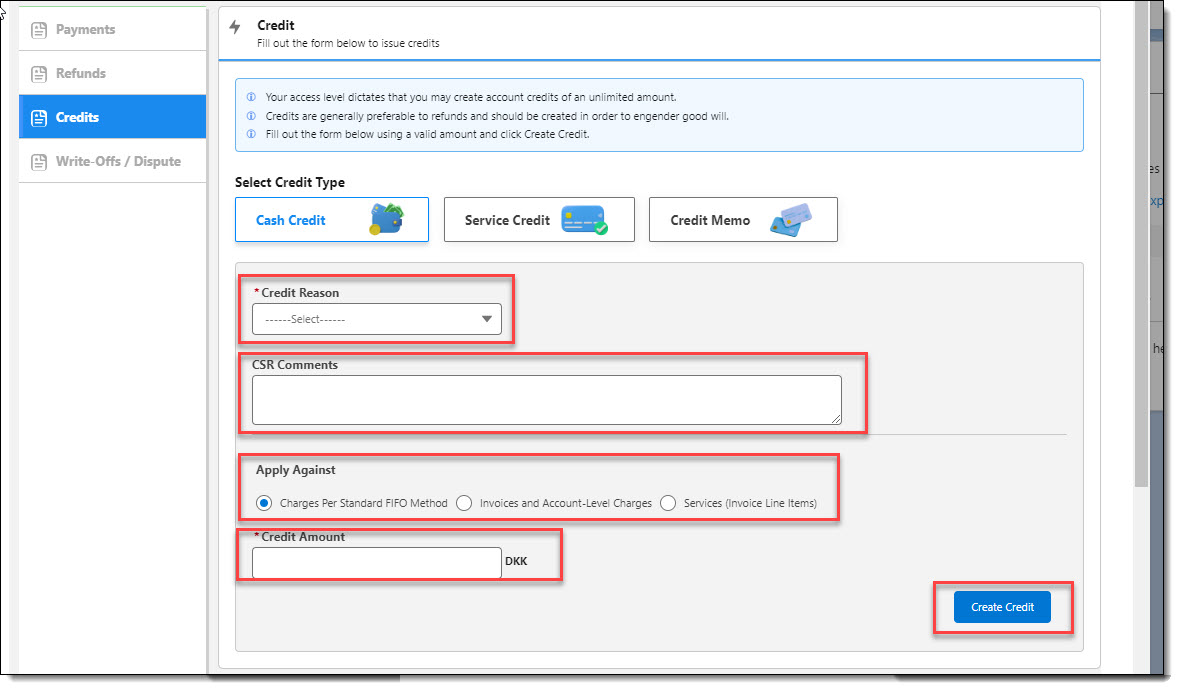
- Click on the "Credit Reason" (required field) dropdown, and select a credit reason.
- Type in any desired "CSR Comments".
- "Charges Per Standard FIFO Method" is the Apply Against' fields' standard default selection.
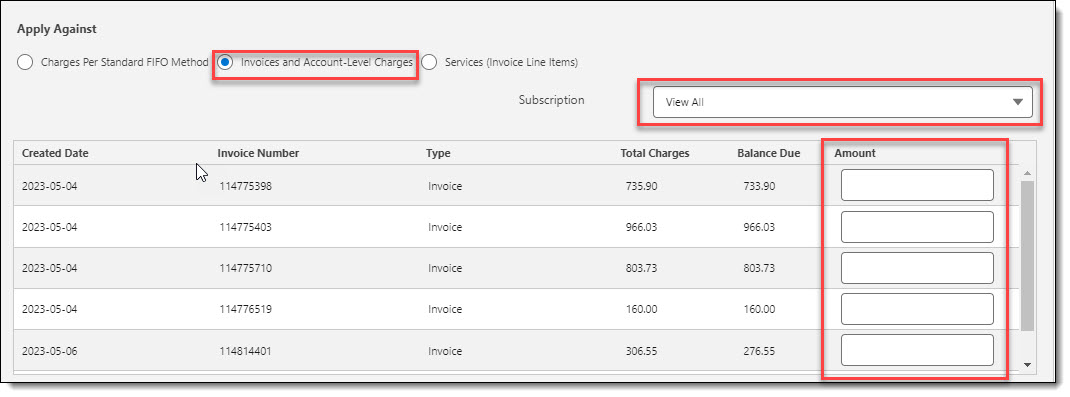
- Click on the Apply Against', "Invoices and Account-Level Charges" radio button to apply a cash credit to a specific invoice(s) or account-level charge(s).
- Use the "Subscription" filter dropdown arrow to view charges specific to an individual subscription.
- Invoices are sorted in ascending order based on Created Date and Invoice Number.
- A scroll bar is displayed if there are more than five(5) rows.
- Type in a desired "Amount(s)" for the credit.
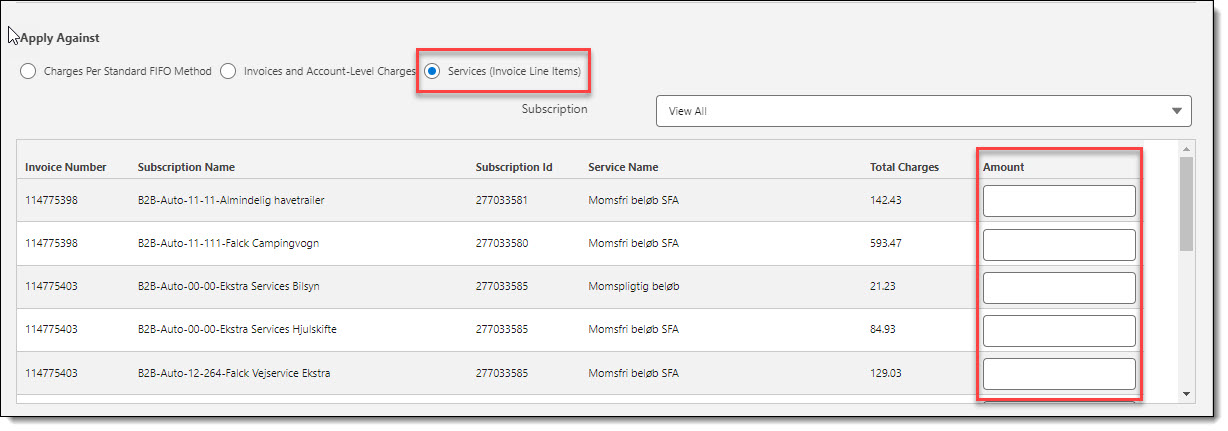
- Click on the Apply Against', "Service (Invoice Line Items)" radio button to apply a cash credit to a specific service(s) invoice line item.
- Services are sorted in ascending order based on Invoice Number and Subscription Name.
- Type in a desired "Amount(s)" for the credit.
Note: The "Credit Amount" (required field) is applicable and only displayed when "Charges Per Standard FIFO Method" is used.
- Click on the "Create Credit" button.

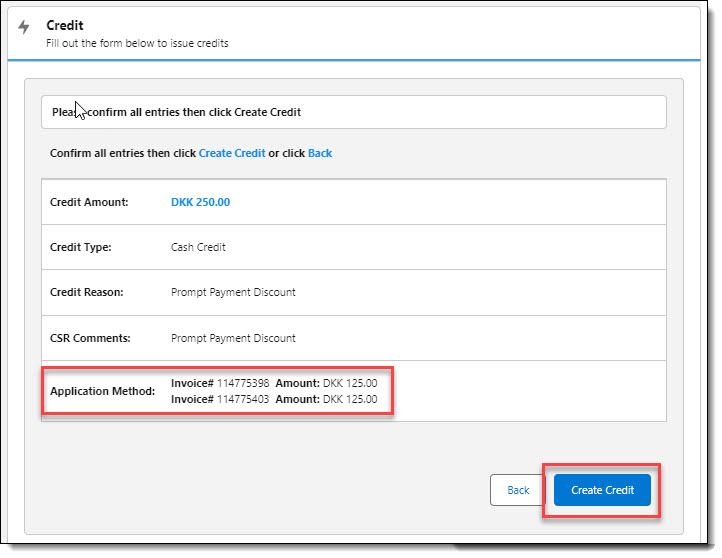
- A Cash Credit confirmation screen is displayed.
Note: The "Application Method:" fields' confirmation detail will vary based on the Cash Credits' "Apply Against" selection as follows:
- If Charges Per Standard FIFO Method was used, the "Application Method" confirmation detail will display as "FIFO Method".
- If Invoices and Other Account-Level Charges was used, the "Application Method" confirmation detail will display as "Invoice# XXXXXX" "Amount: Currency Code XXX.XX"
- If Services (Invoice Line Items) was used, the "Application Method" confirmation detail will display as "Invoice#XXXXX" "Service Name: XXXXX" "Amount: Currency Code XXX.XX"
- Click on the "Create Credit" button to confirm creation of the cash credit, or the "Back " button to edit and/or cancel its creation.
- A successful posting of the cash credit in Aria will display the message; "Success: Cash Credit in the amount of XXXX.XX applied to account." An unsuccessful posting of the cash credit in Aria will display the message; "Error: Message displayed from Aria API".
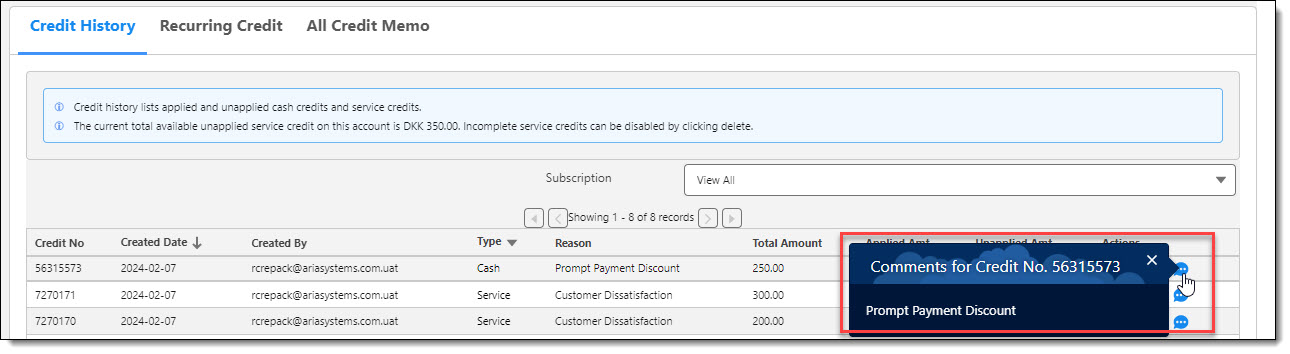
- From the Credit History screen, click on Cash Credits' blue "Comments" icon.
- A Comments popover screen is displayed to view comments specific to the credit. Click on the screens' "X' to close the popover.
Create a Service Credit

- Click on the "Service Credit" button.
- Use the "Subscription" filter dropdown arrow to view charges specific to an individual subscription.
- Select a "Credit Reason" from the dropdown.
- Type in any "CSR Comments"
- "Standard" is the Service Code fields' standard default.
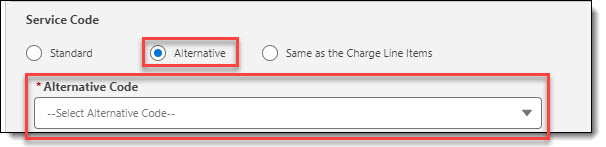
- Click on the Service Code fields', "Alternative", Service Code" radio button and use the dropdown to apply a service credit to a specific code. The "Alternative Code" field (required) only displays when the "Alternative" Service Code radio button is selected.

- Click on the "Same as the Charge Line Items" radio button to apply the service credit to the charges' service code.
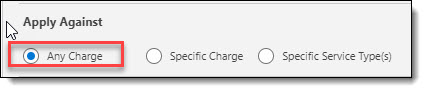
- "Any Charge" is the Apply Against fields' standard default selection.

- Click on the "Specific Charge" radio button to specify a service credit associated to a specific Subscription and Service (if desired). In this scenario, the "Subscription" field is a required field.

- Click on the "Specific Service Type(s)" radio button to specify the application of a service credit to one or more service types by clicking on its associated check box. In this scenario, at least one(1) "Service Type" must be selected.
- "Once" is the "Generation Frequency" fields' standard default selection.
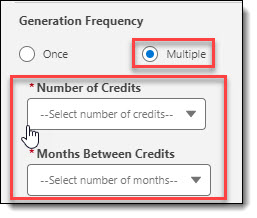
- Click on "Multiple" Generation Frequency in order to create multiple credits and months between credits using the associated field dropdowns.
- Type in the "Credit Amount" (required field) and click on the "Create Credit" button.
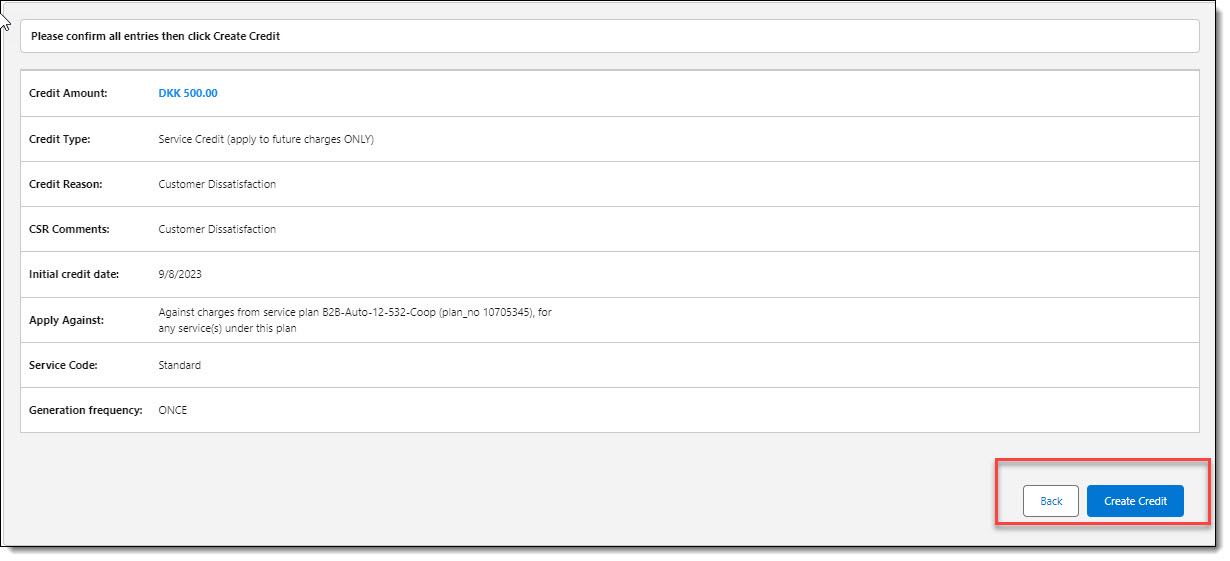
- A Service Credit confirmation screen is displayed.
Note: The "Apply Against" confirmation detail will vary based on the service credits' "Apply Against" selection as follows:
- If Apply Against' "Any Charge" was used, the "Apply Against" confirmation detail will display "Against any charge".
- If Apply Against' "Specific Charge" > "Service Plan" was used, the "Apply Against" confirmation detail will display "Against charges from service plan XXXXX (plan no XXXX), for any service(s) under this plan".
- If Apply Against' "Specific Charge" > "Service Plan" and "Service Type" was used, the "Apply Against" confirmation detail will display "Against charges from service plan XXXXX (plan no XXXX), service code XXXX).
- If Apply Against' "Specific Service Type(s)" was used, the "Apply Against" confirmation detail will display "Service Type(s): XXXX, XXXX, etc.".
The "Service Code" confirmation detail will vary based on the service credits' "Service Code" selection as follows:
- If Service Code "Standard" was used, the "Service Code" confirmation detail will display as "Standard".
- If Service Code "Alternative" was used, the "Service Code" confirmation detail will display as "Service Code (service_no XXXXXX)".
- If Service Code "Same as the Charge Line Item" was used, the "Service Code" confirmation detail will display as "Same as the charge line item".
The "Generation Frequency" confirmation detail will vary based on the service credits' "Generation Frequency" selection as follows:
- If Generation Frequency “Once” is selected, the "Generation Frequency" confirmation detail will display as "Once".
- If Generation Frequency “Multiple” is selected, the "Generation Frequency" confirmation detail will display as "Multiple: X credits, X months between each credit".
- Click on the "Create Credit" button to confirm creation of the service credit, or the "Back " button to edit and/or cancel its creation.
- From the Credit History screen, click on Service Credits' blue "Comments" icon.
- A Comments popover screen is displayed to view comments specific to the credit. Click on the screens' "X' to close the popover.
Void a Cash Credit
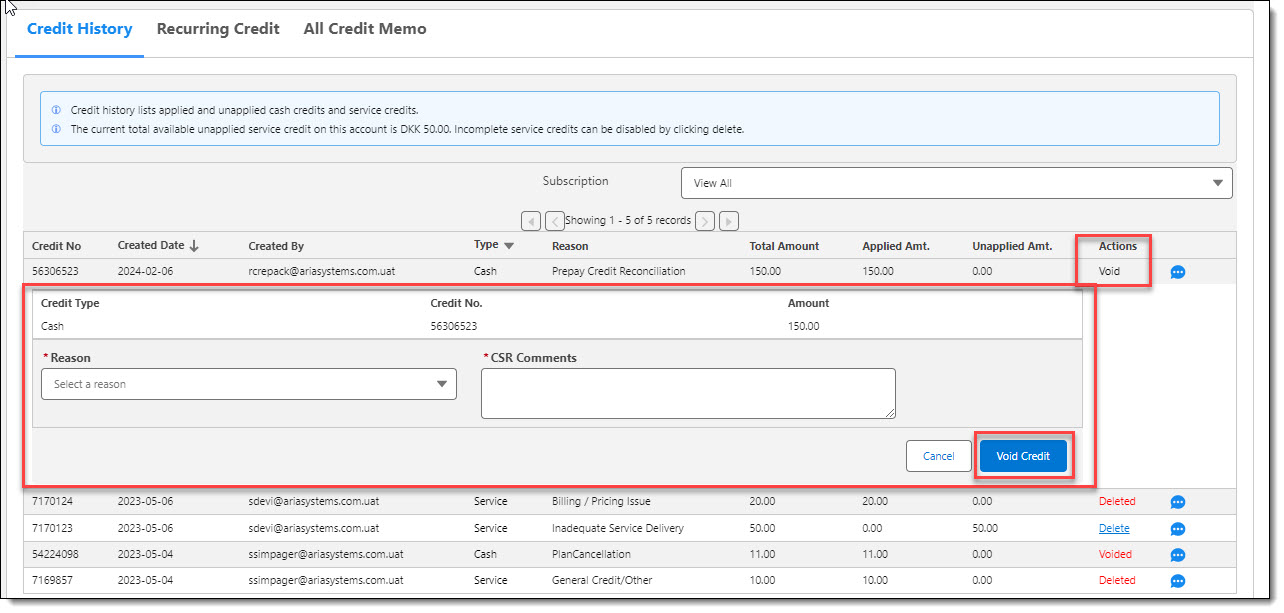
- Click on the cash credit items' actionable "Void" link.
- An expanded display shows the credits':
1st Row: "Credit Type" Credit No." "Amount"
2nd Row: "Reason" (Required Field) "CSR Comments" (Required Field)
- Click on the "Reason" dropdown arrow to select a reason for credit void.
- Type in comments in the "CSR Comments" field.
- Click the "Void Credit" button" to confirm the voiding of the credit. Click the "Cancel" button to cancel the void process.
Delete a Service Credit
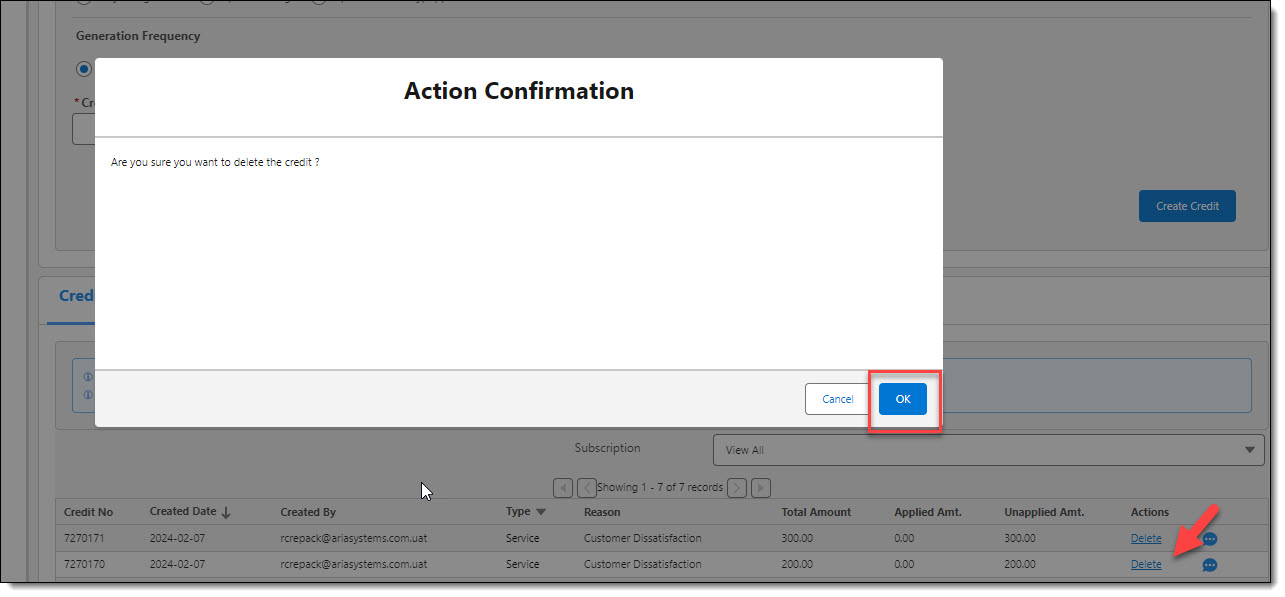
- To delete a service credit, click on the service credit items' actionable "Delete" link.
- An "Action Confirmation" popup displays. Click on the "OK" button to confirm the service credits' deletion. Click the "Cancel" button to cancel the delete process.
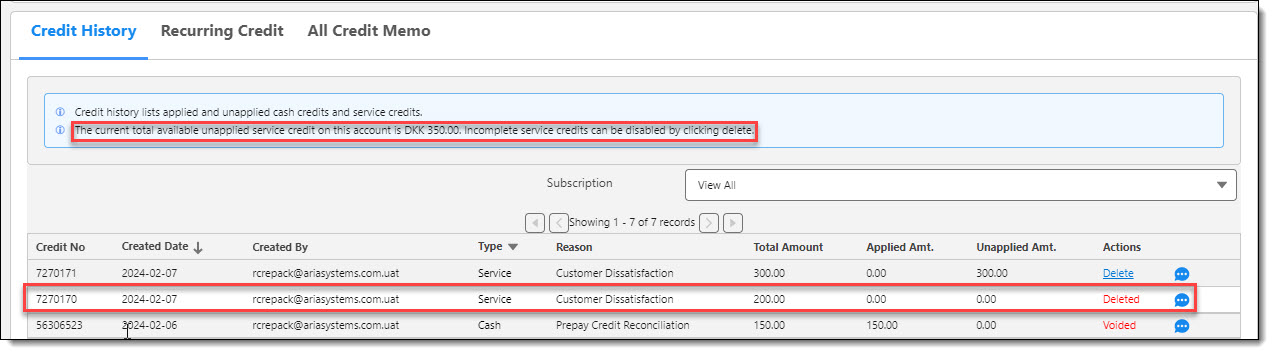
- The Service Credit is marked "Deleted". And the "Unapplied Service Credit" amount is automatically adjusted.
Recurring Credits
- Click on "Recurring Credit" link via the Credits menu tab.
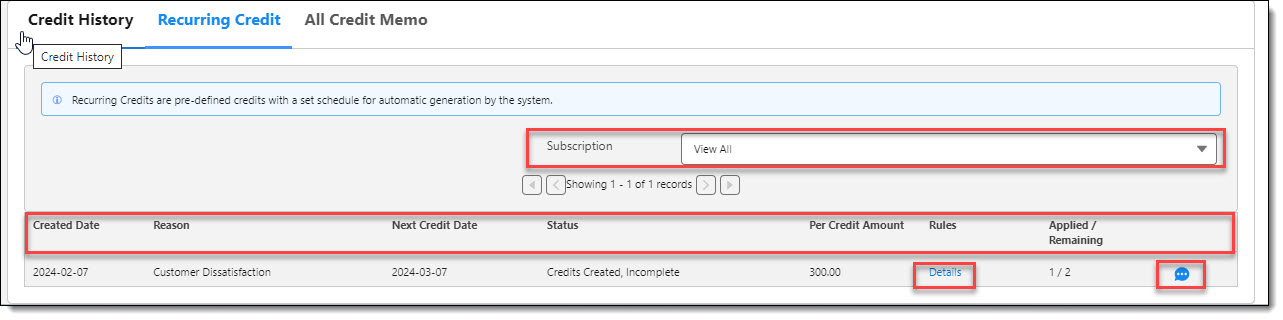
- Recurring Credits are pre-defined credits with a set schedule for automatic generation by the system.
- Recurring Credits can be filtered via use of the Subscription dropdown arrow.
- Selecting a Subscription from the dropdown will filter and display recurring credit(s) for the selected subscription.
- Recurring Credits are sorted by "Creation Date"
- Pagination has been set to display up to 10 recurring credits per page on this screen.
- Column Headers include the following:
-
Click on the "Comments" icon to see comments specific to the recurring credit.
-
Click on the "Details" link in the Rules column to see details specific to a recurring credit". Click on the "Comments" icon to see comments specific to the recurring credit.
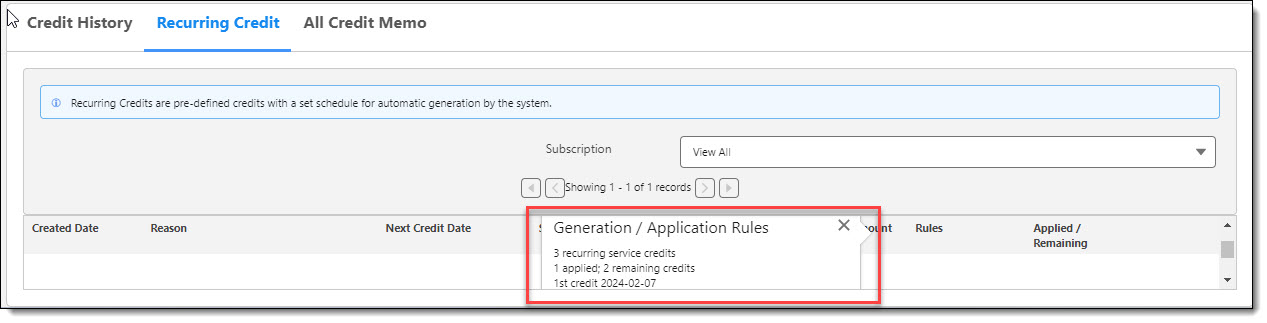
- A "Generation / Application Rules" popover screen is displayed and scrollable inclusive of the following information:
- number of recurring service credits.
- number of recurring service credits applied thus far / number of remaining service credits to be applied.
- first recurring service credit application date.
- months between credits.
- offset any/specific charge.
- service code application.
- Click on the "Generation / Application Rules" popover screens' "X" to close the screen.
Aria Credit Memos (Lightning)
The following enhancements were implemented in this release to facilitate Lightning interface aesthetics and usability, and to support the creation of Credit Memos, and the viewing of Credit Memo History.
(SFDC-2690, SFDC-2713, SFDC-2716, SFDC-2718, SFDC-2715, SFDC-2763, SFDC-2725, SFDC-2719, SFDC-2717, SFDC-2726, SFDC-2729, SFDC-2775, SFDC-2730, SFDC-2728, SFDC-2825, SFDC-2844)
Credit Notes in Aria for Salesforce exist to comply with EU laws to track VAT tax deltas for invoices that have been voided and result in a customer credit. In this scenario, Aria customers receive a statement-like notification of a credit. Aria retains a numbering system for statements and credit notes as an accounting best practice to comply with these EU laws.
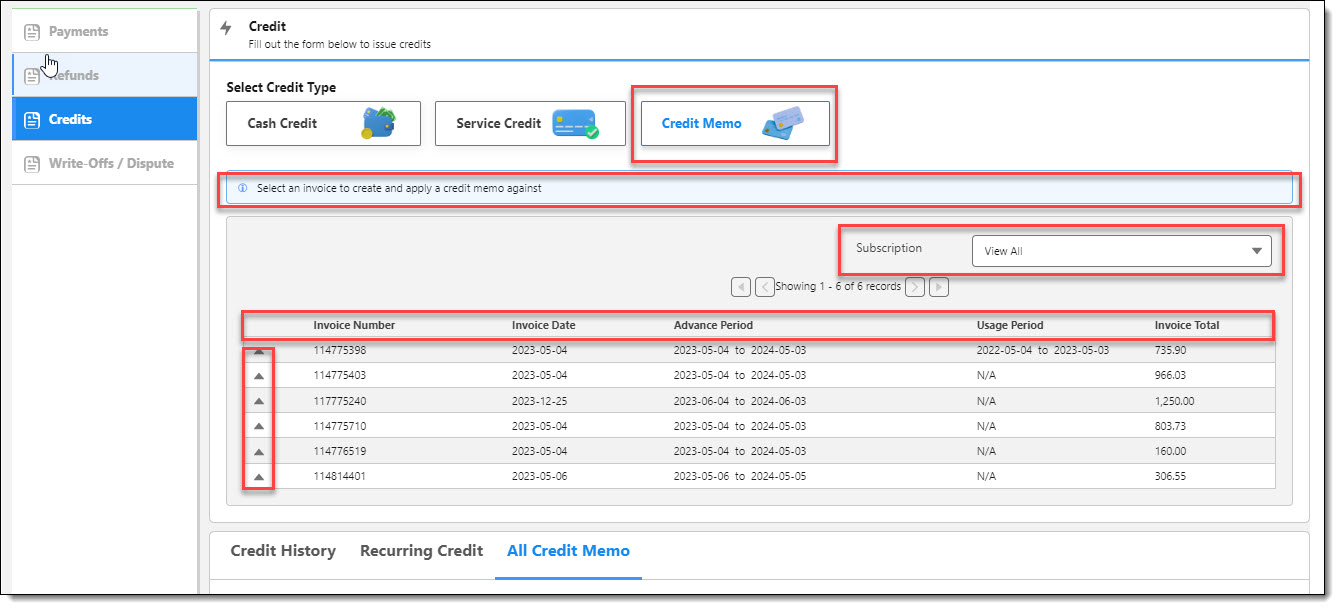
- When the "Credit Memo" button is clicked via the "Credits" menu selection, a credit memo landing page is displayed.
- The "light-blue" banner below the Credit Memo button displays an informational message informing the user to "select an invoice to create and apply a credit memo against".
- Selecting a "Subscription" from the dropdown will filter and display invoices for the selected subscription.
- The invoice table, in Lightning-striped accordion style, displays the following column "headers and data":
"Invoice Number" "Invoice Date" "Advance Period" "Usage Period" "Invoice Total"
- Each of the invoices' "arrows" when expanded, will allow the user to create a credit and apply a credit memo against.
- Pagination has been set to display up to 10 invoices per page on this screen.
Create a Credit Memo

- Click on the desired invoices' "up arrow" to display a component screen enabling the creation and applying of a credit memo against that invoice.
- Click on the "Reason" (required field) dropdown to select a reason for the Credit Memo. When a "Reason" is left blank, an error, "Select a reason" will be displayed.
- Type in "CSR Comments" (required field). When "CSR Comments" is left blank, an error, "Enter comments" will be displayed.
- The invoices' line table displays the following "headers and data": A scrollbar will be displayed when the invoice line items exceed five(5) rows.
"Subscription ID" Subscription Name" "Service Number" "Service Name" "Max. Credit" "Amount" "Comments".
- A "tooltip" in the "Amount" column indicates that the "Amount entered cannot be greater than the maximum credit".
- Type in an Amount(s). The "Amount" cannot be blank, or greater than the "Max. Credit" amount.
- Click on the Comments' "+" symbol to add an additional comment. Adding and saving the "Comment" will replace the "+" sign with a comment icon for viewing and editing/adding comments.
Note: Clicking on another invoices' "up arrow" will wipe out any information for the previous invoice.
- Click on the "Create Credit" button.

- A component screen is displayed to "confirm" creation of the Credit Memo.
- Click on the "Create Credit" button to create the credit memo, or the "Back " button to edit and/or cancel its creation.
All Credit Memo
An "All Credit Memo" tab has been added to the credit history screen to provide users the functionality to view credit memo history.
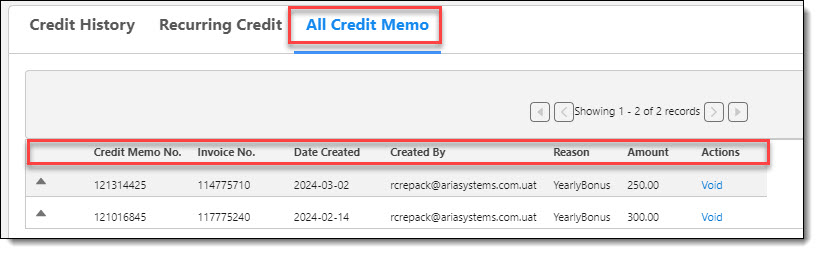
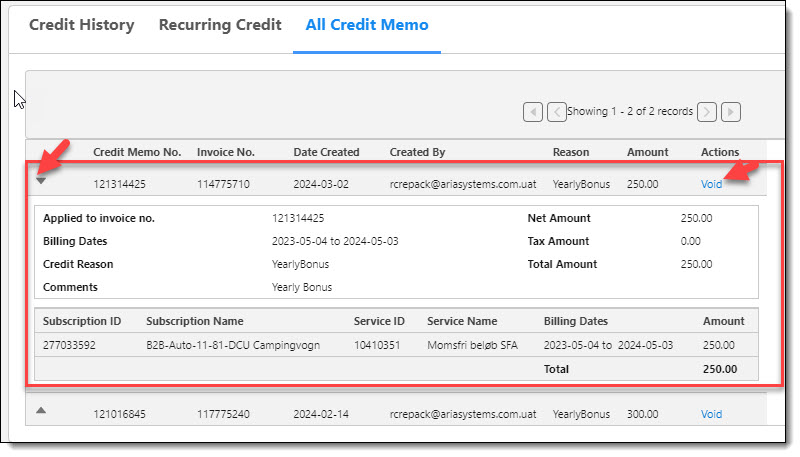
- Click on the credit memos' "up arrow" to display a component screen that provides additional detail regarding the credit memo.
- The credit memos' table displays the following "row headers and data":
-
"Applied to invoice number" "Net Amount
-
"Billing Dates" "Tax Amount"
-
"Credit Reason" "Total Amount"
-
"Comments"
- The credit memos' line table displays the following "column headers and data":
"Subscription ID" "Subscription Name" "Service ID" "Service Name" "Billing Dates" "Amount"
"Total"
- Click on the credit memos' "Void" link to void a credit memo.

- A component screen is displayed to "confirm" voiding of the Credit Memo.
- Click on the "OK" button to void the credit memo, or the "Cancel" button to cancel voiding of the credit memo.
- A successful voiding of the credit memo will display the message; "Credit Memo #XXXXXXX has been voided". An unsuccessful voiding in Aria (API Exception) will display the message; "Credit Memo #XXXXXXX was not voided: API error message".
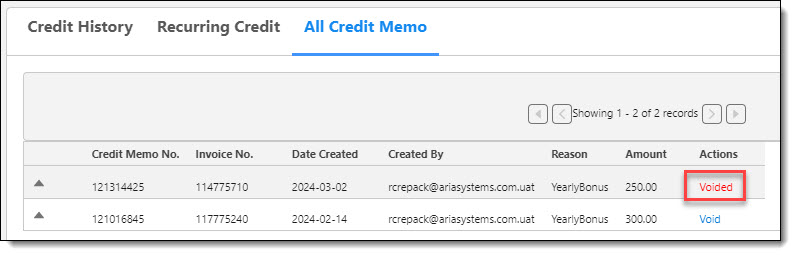
- A credit memo that has been successfully voided will display "Voided" in the "Actions" column.
Miscellaneous Updates
(SFDC-2528, SFDC-2187, SFDC-2570, SFDC-2577, SFDC-2813)
The following improvements were implemented in this release.
Refunds

-
On Invoice details inner table, "Previously Reversed", "Reversible Amount", and "Amount To Service" column headers have been re-labeled as follows:
-
The headers and values for "Invoice Date", Description", "Original Amount", and "Reversed" are now properly aligned.
-
The Description columns' detail now accommodates 25 characters in one row before it wraps text to the next row.
Payments

- All "voidable" payments, both electronic and external, now have a Void link in the payments' Action column that support the voiding of a payment via the Aria for Salesforce connector.
Contracts
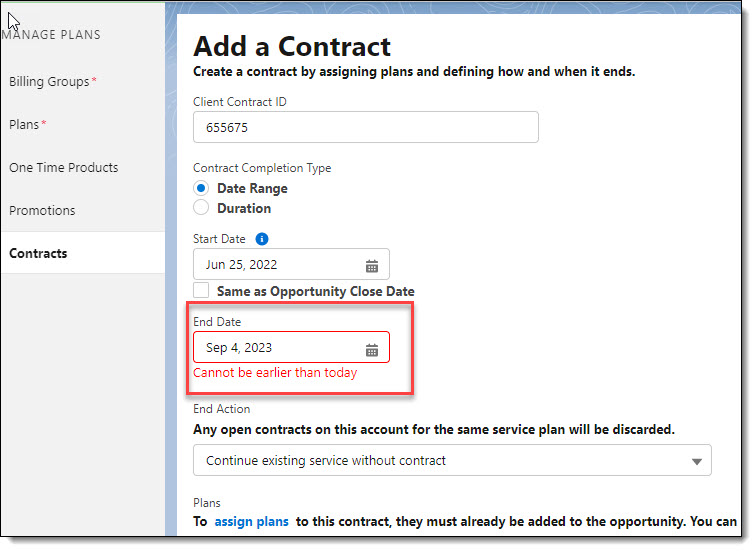
- An inline validation message on the End Date field, "Cannot be earlier than today" has been added on the Contracts (Manage Plans > Contracts) page when a user enters a contract end date in the past.
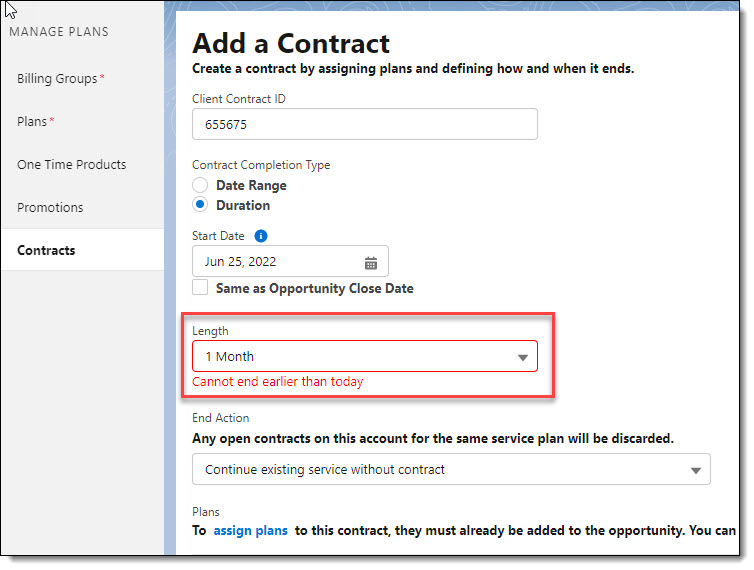
- An inline validation message on the Length field, "Cannot end earlier than today" has been added on the Contracts (Manage Plans > Contracts) page when a user enters a contract start date in the past, and the Length option selected makes the contract end date also in the past..
Aria for Salesforce Fixes