Legal Entities
This feature provides the use of legal entities as a way to organize accounts. Large enterprise clients have a need for an additional layer of organization within the Aria platform. This need stems from the existence of various business units which, due to geographic or other limitations, require the ability to report on and manage a group of customers individually. Legal entities provide this additional layer of account organization and reporting. A maximum of 99 legal entities is permitted for a client.
Configure Legal Entities
Aria Customer Support must enable legal entities for a client before they can be set up. Contact Aria Customer Support for assistance with this feature.
There are two components that Aria Customer Support can enable:
- Legal Entities Module: When this module is enabled, Legal Entities settings become visible in the Aria UI. You can create legal entities, assign permissions to user roles to create, modify and delete them, and, if a legal entity exists, you can assign user accounts to them.
- Legal Entities Master Parameter: This parameter allows you to require that all new accounts be assigned to a legal entity, if one exists.
Legal Entity Restrictions
For individual accounts, the link to a legal entity has the following restrictions:
- An account can only be assigned to a single legal entity. Multiple accounts must be created for customers who span multiple legal entities.
- If the Legal Entities module is enabled for the client, the Legal Entity Master parameter is enabled, and at least one legal entity is defined, you must assign all new accounts to a legal entity. The account cannot be reassigned to another legal entity at a later date.
- If the Legal Entities module is enabled for the client, the Legal Entity Master parameter is disabled, and at least one legal entity is defined, accounts can optionally be assigned to a single legal entity upon creation or at a later date. The account cannot be reassigned to another legal entity at a later date.
- For clients who enable legal entities after they have existing accounts, you can use a script or the Aria user interface to assign accounts to a legal entity. Contact Aria Customer Support for assistance with setting up a script.
- While an account can only be assigned to a single legal entity, child accounts can be assigned to a different legal entity than the parent account or than their sibling accounts.
- Multiple accounts that have varying currencies can be assigned to a single legal entity.
- A single product catalog and marketing section exist across all legal entities within a single client. If clients require unique product catalogs for different legal entities, they must either implement multiple Aria instances or use plan groups.
- Functional account groups and legal entities can co-exist and each does not impact the other.
Granting Role Access to Legal Entities
The Administrator role initially can see and assign the authority to read, create, edit, and delete legal entities. All other roles must be assigned this authority.
Getting Here: Click Configuration > Security > Roles > Select a role
- Select the Permissions tab and scroll down to Legal Entities, which is located under Client Settings.
- Click the checkbox for each permission you want to assign to the role.
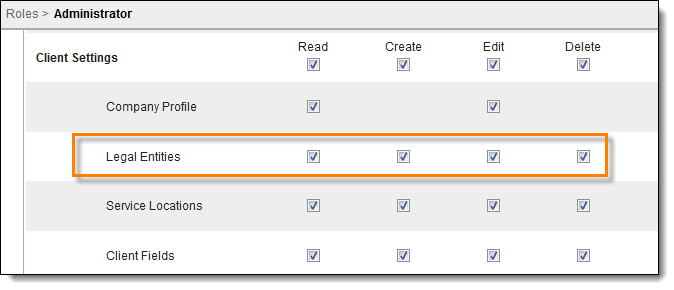
- Scroll to the bottom of the page and click Save. The permissions are assigned to the role. You can now assign a user to this role who can then access Legal Entities.
Create Legal Entities
To create a legal entity, use the following steps:
Getting Here: Click Configuration > Client Settings > Legal Entities
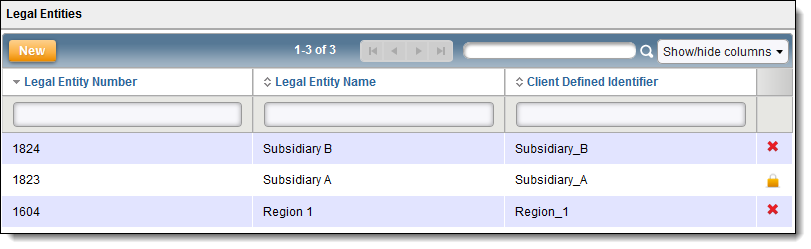
A list of legal entities displays. Note that the default sort order for this page is by Legal Entity Number in descending order.
Note: If no legal entities exist, and you have configured the Legal Entities parameter to require all new accounts be assigned to a legal entity, the parameter is not enforced.
- Click New. The Create New Legal Entity screen displays.
- Enter values in the following fields as described below.
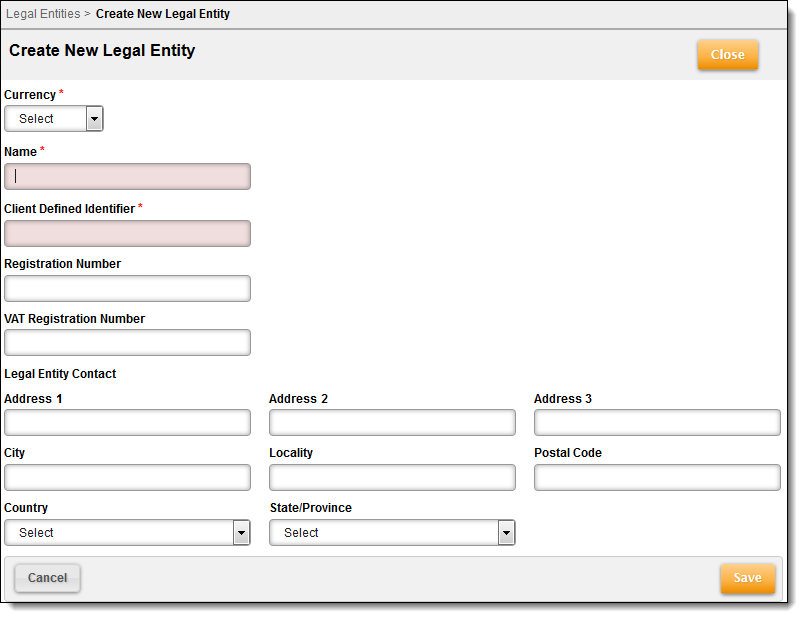
- Currency: Select a currency to assign to the legal entity. Currencies defined in Add A Currency are displayed here.
Note: You can only select a currency when you create a legal entity. You cannot change it at a later time.
- Name: Enter the name of the legal entity. This value must be unique for this client.
- Client-Defined Identifier: Identifier used for reporting purposes. You can accept the default or change it to another value. This value must be unique for this client.
- Registration Number: Client-defined registration number for the legal entity. This value must be unique for this client.
- VAT Registration Number: Client-defined Value Added Tax number for the legal entity.This value must be unique for this client.
- Legal Entity Contact: Name of the person responsible for administrating the legal entity.
- Address 1-3: Street address of the legal entity.
- City: City of the legal entity.
- Locality: For countries other than the U.S., Canada, and Australia, use this field to indicate the state or province of the legal entity. This field is otherwise ignored.
- Postal Code: Additional code, such as the U.S. Zip Code, used in the legal entity's mailing address.
- Country: Country where the legal entity is located.
- State/Province: For the U.S., Canada, and Australia, select the state or province of the legal entity. For other countries, this field is ignored, and you can use the Locality field to enter this information.
- Click Save. The legal entity is saved and is displayed on the Legal Entities page. You can now assign accounts to it.
Note: Once an account is assigned to a legal entity, it cannot be reassigned. And once a legal entity has an account assigned to it, the legal entity cannot be deleted.
Assigning an Existing Account to a Legal Entity
If legal entities are optional for a client, or if they were implemented after other accounts have been created, then accounts can exist that are not assigned to a legal entity. While you cannot change which legal entity is assigned to an account, you can make the initial assignment at any time.
Getting Here: Click Accounts > Search for and select an account
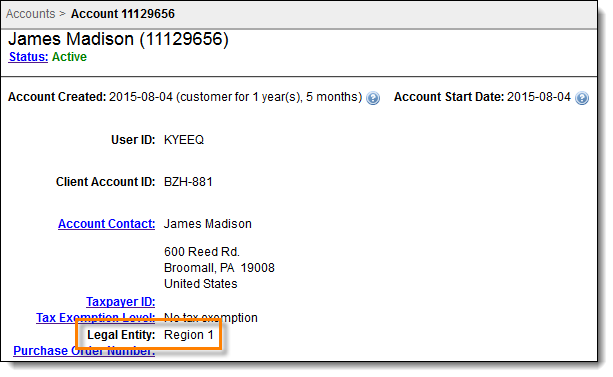
Legal Entity displays as a link on the Account Overview page for accounts that have no legal entity assignment.

To assign a legal entity, click the link. A drop-down menu displays with a list of legal entities.
Note: Once you have assigned an account to a legal entity, you cannot change the assignment.

Select a legal entity and click Save. The assignment displays on the Account Overview page. The Legal Entity link is now text and cannot be selected.