Creating Accounts Using Aria For Salesforce Opportunity and Quote Management
Overview
The following is intended for Account Managers and Sales Representatives having responsibility for the maintenance and sale of Aria products and one time orders using Aria For Salesforce from within their Salesforce.com application.
Create a New Salesforce.com Account and Account Contact in Aria For Salesforce
To create a new account in Aria using Aria For Salesforce, you must first create a Salesforce.com account and an opportunity with at least one billing group and one plan. You can also add one-time products and contracts to the opportunity.
Create a New Salesforce.com Account

- From the Aria Systems Main Menu, click Accounts, then click the New button.
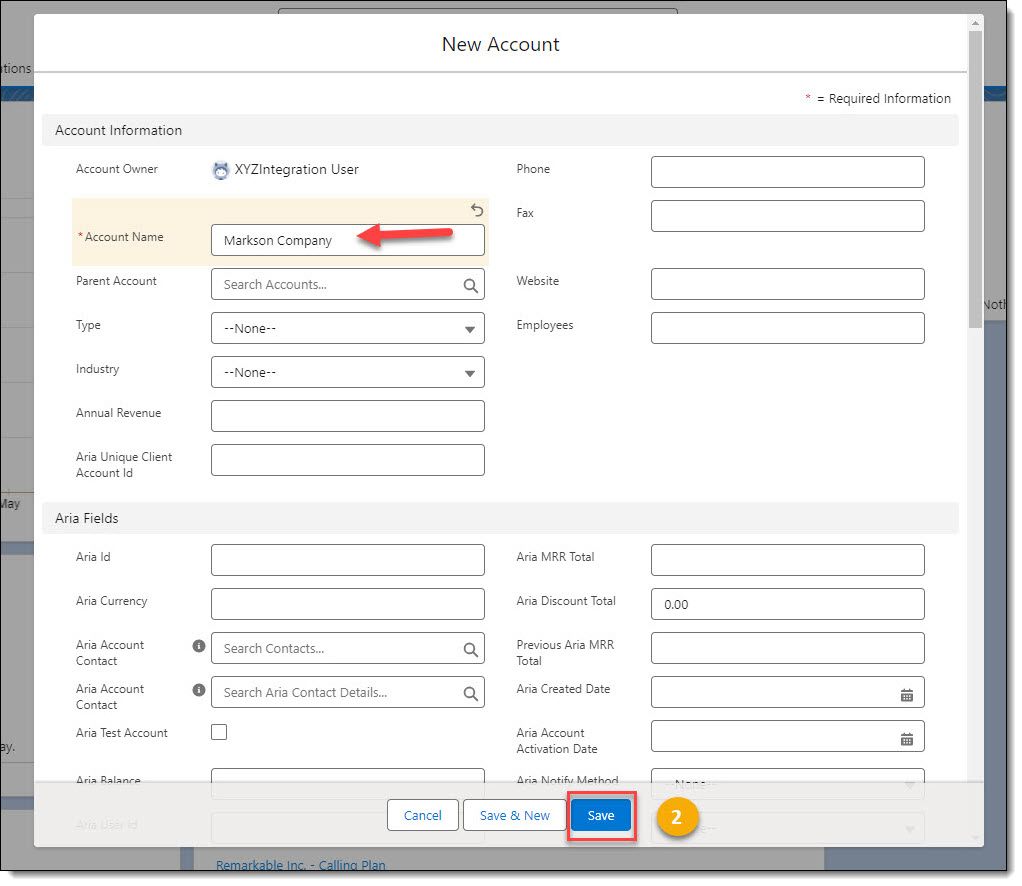
- Complete the desired fields and then click the Save button.
Note: The Account Name field is the only required field to set up a Salesforce.com Account.
The new Salesforce.com account is displayed as shown below.
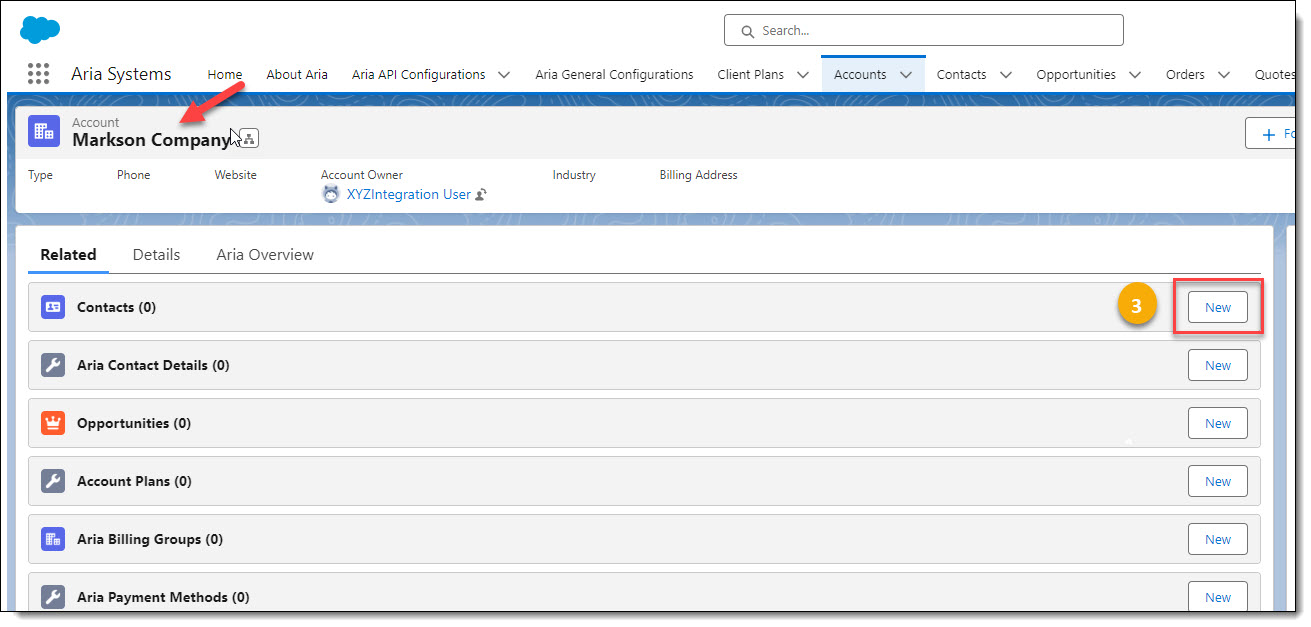
Creating a New Salesforce.com Account Contact
- Click the Contacts' New button.
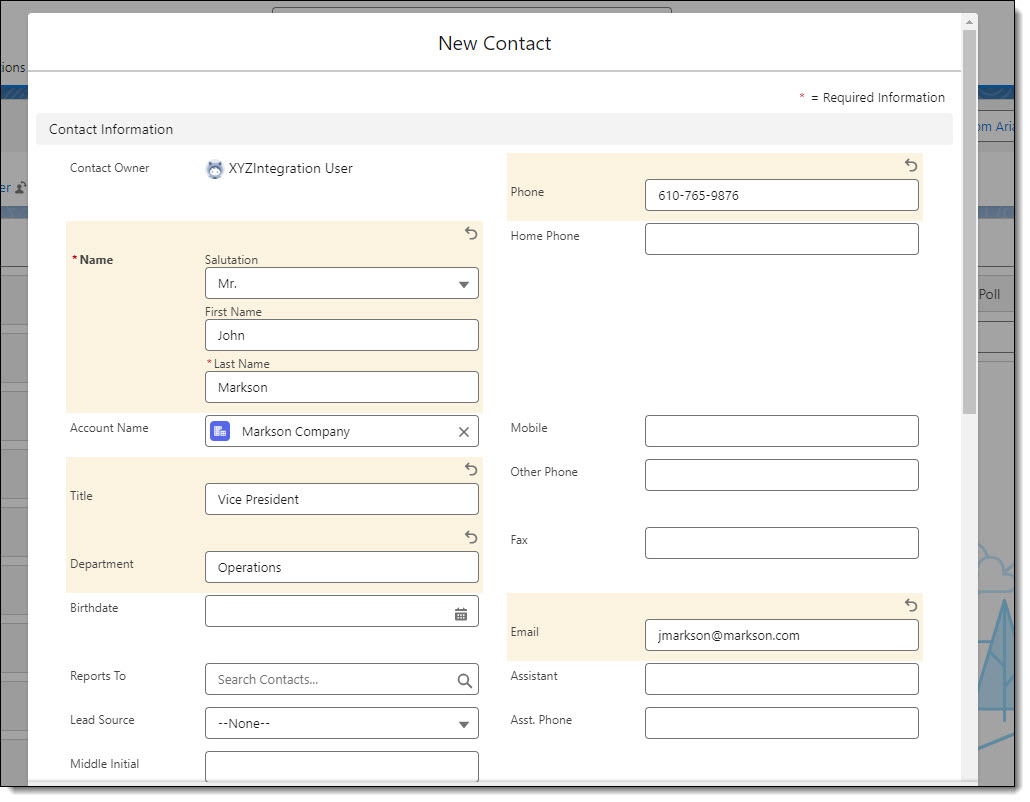
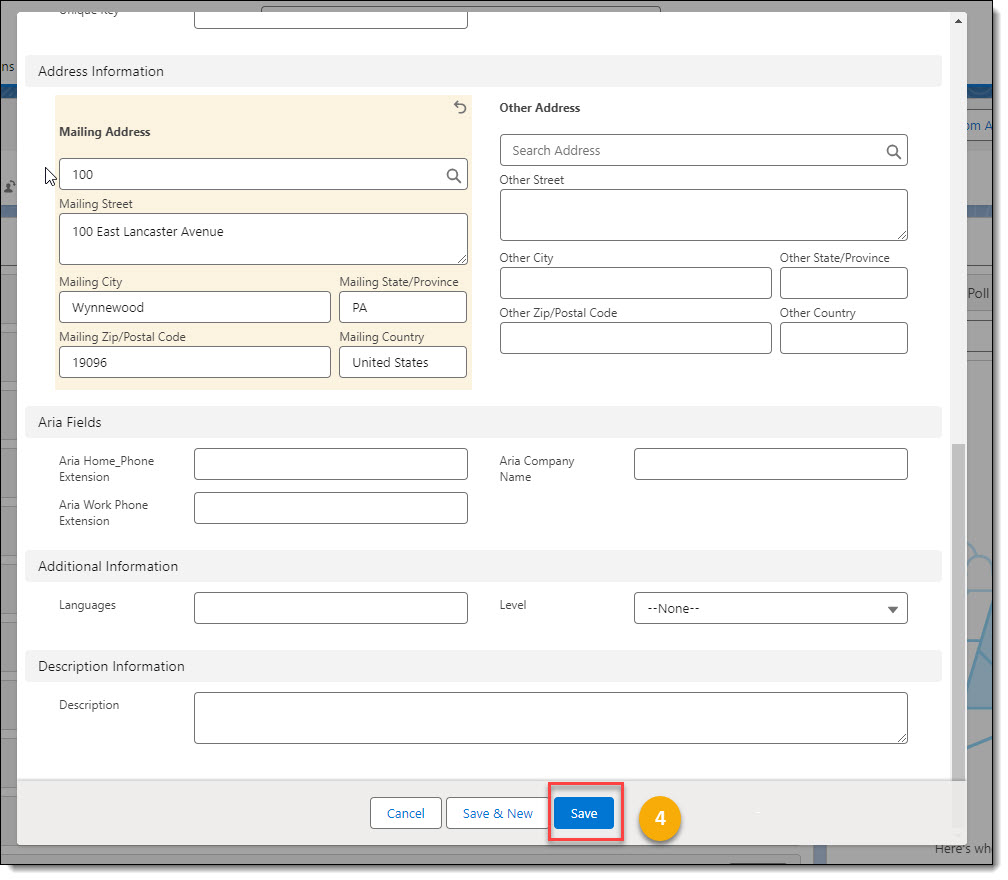
- Type in the Salesforce.com account's contact information and click the Save button.
The Salesforce.com account's new contact information is displayed as shown below.
Creating the Aria Account Contact
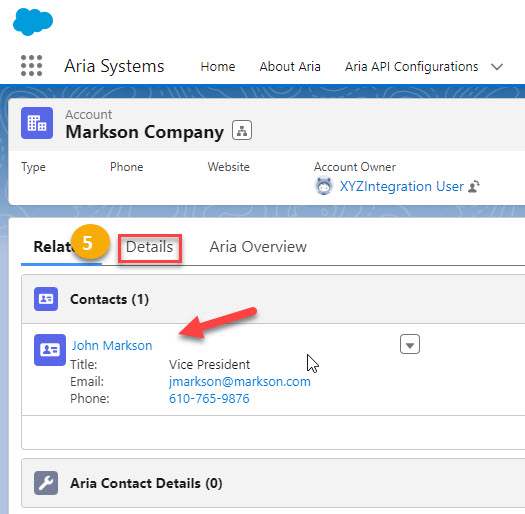
- Click the Accounts Details menu option.
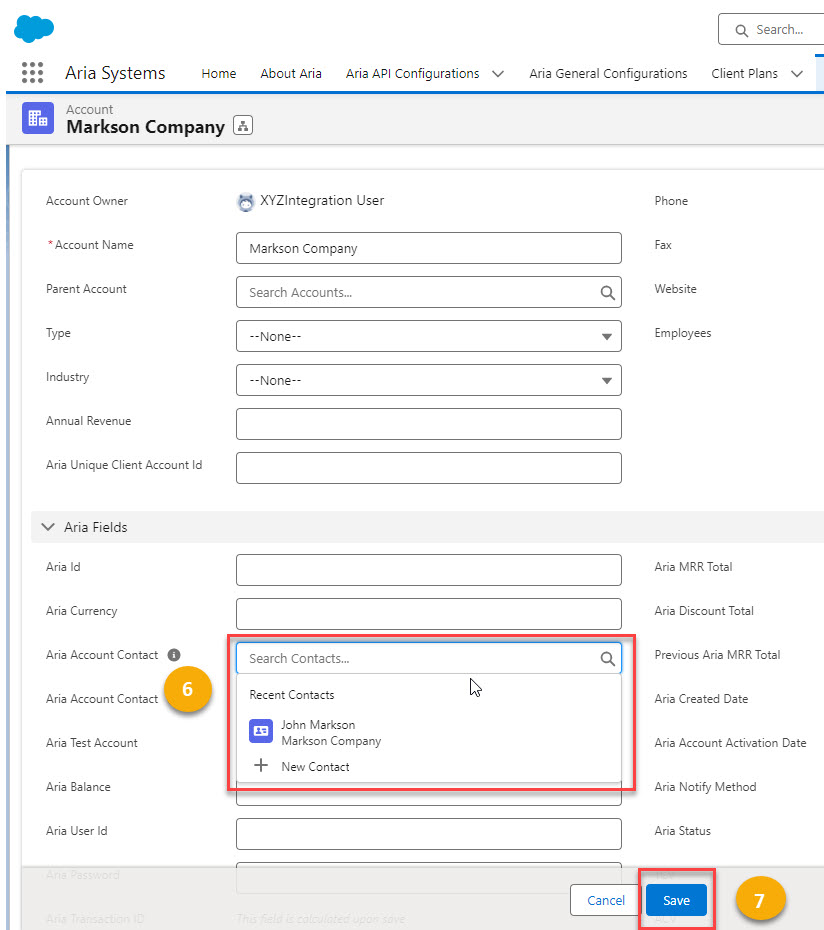
- Use the Aria Account Contact field's search option to associate the Salesforce.com account's contact details to the Aria Account Contact details.
- Click the Save button to save this contact information as the Aria Account Contact and address.
Note: The Aria Account Contact details serves as the Account Contact information in Aria once the account is sold.
Create a New Opportunity for an Account Using Aria For Salesforce
Opportunities are deals in progress. An account can have multiple opportunities associated with it. Opportunity records track information about deals, including which accounts they're for, who the contacts are, and the amount of potential sales.
Creating a New Opportunity

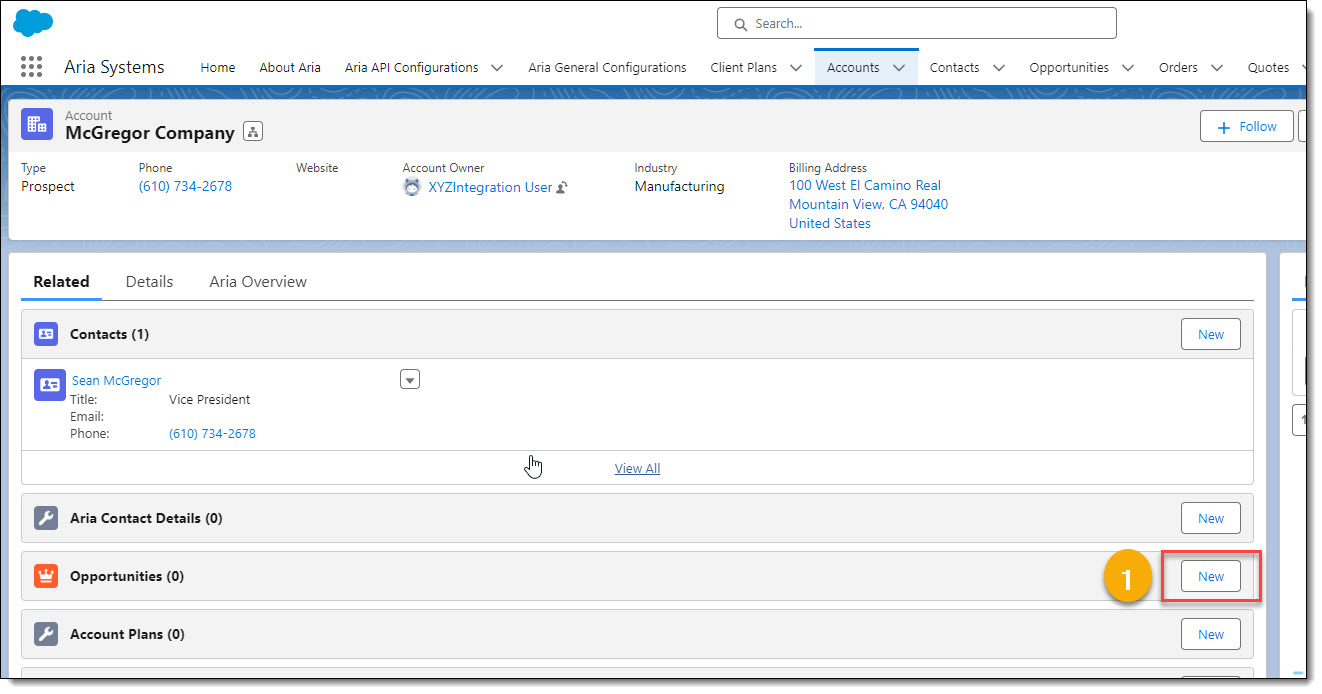
- From the Account screen, click the Opportunities New button.
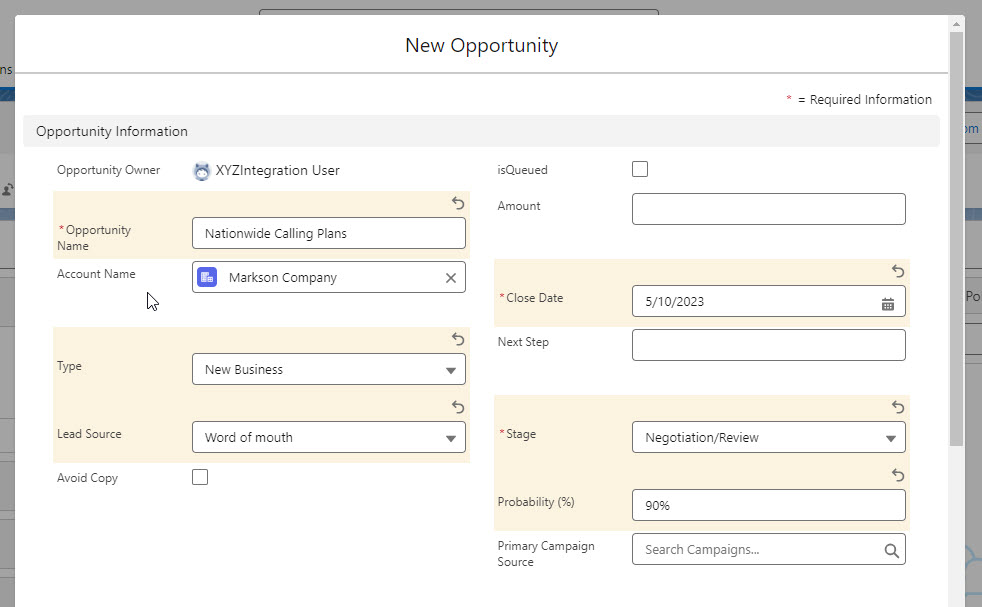
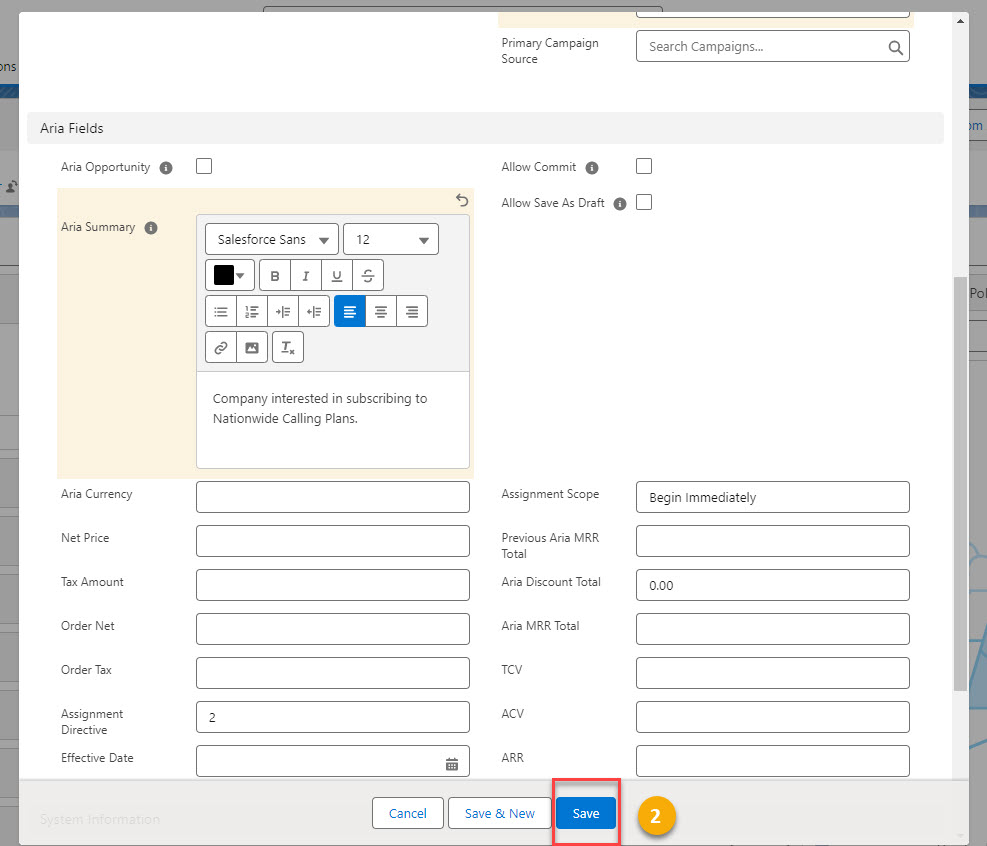
- Fill in the desired Opportunities information fields and then click the Save button. Fields having a red * are required fields.
Note: Aria fields will populate once an Aria Plan(s) and/or one-time products are associated with the opportunity.
The account's new opportunity displays on the Account screen as shown below.
Adding and Editing Opportunities
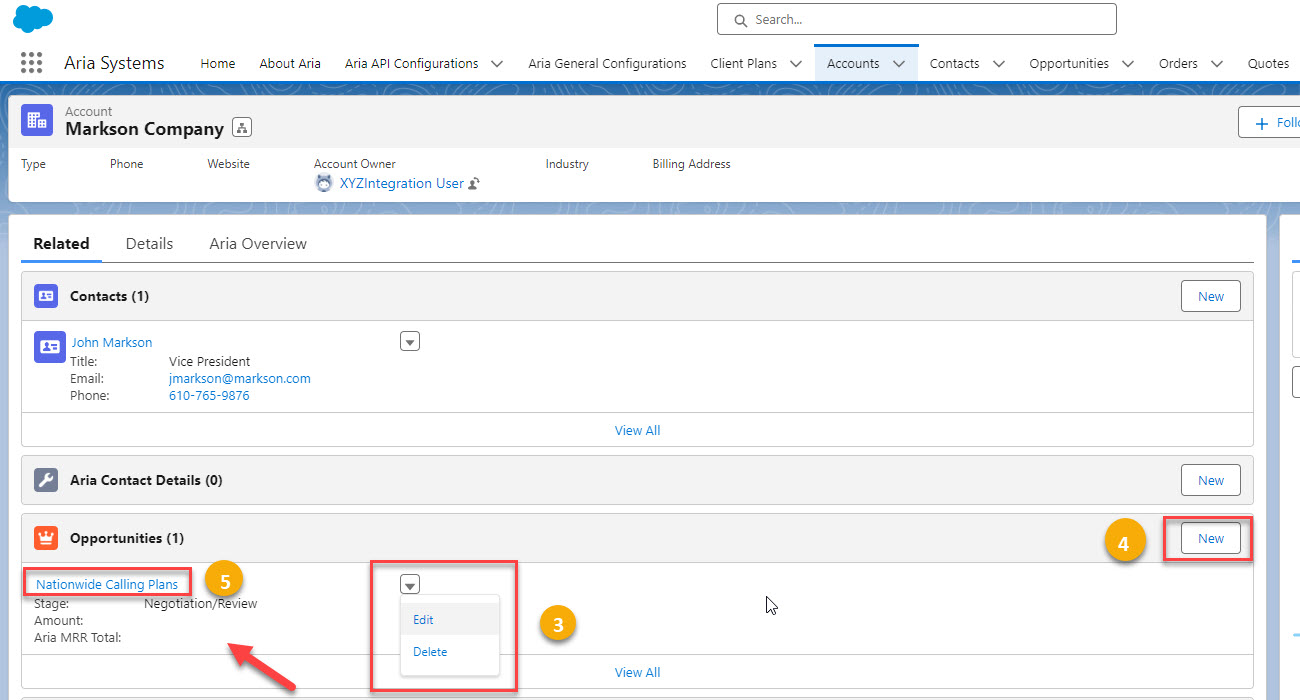
- To edit or delete this opportunity, click the down-arrow button next to the opportunity, and click Edit or Delete.
- To add a new opportunity to this account, click the New button.
- To add Aria plan offerings and one-time products to this opportunity, click the Opportunity Name.
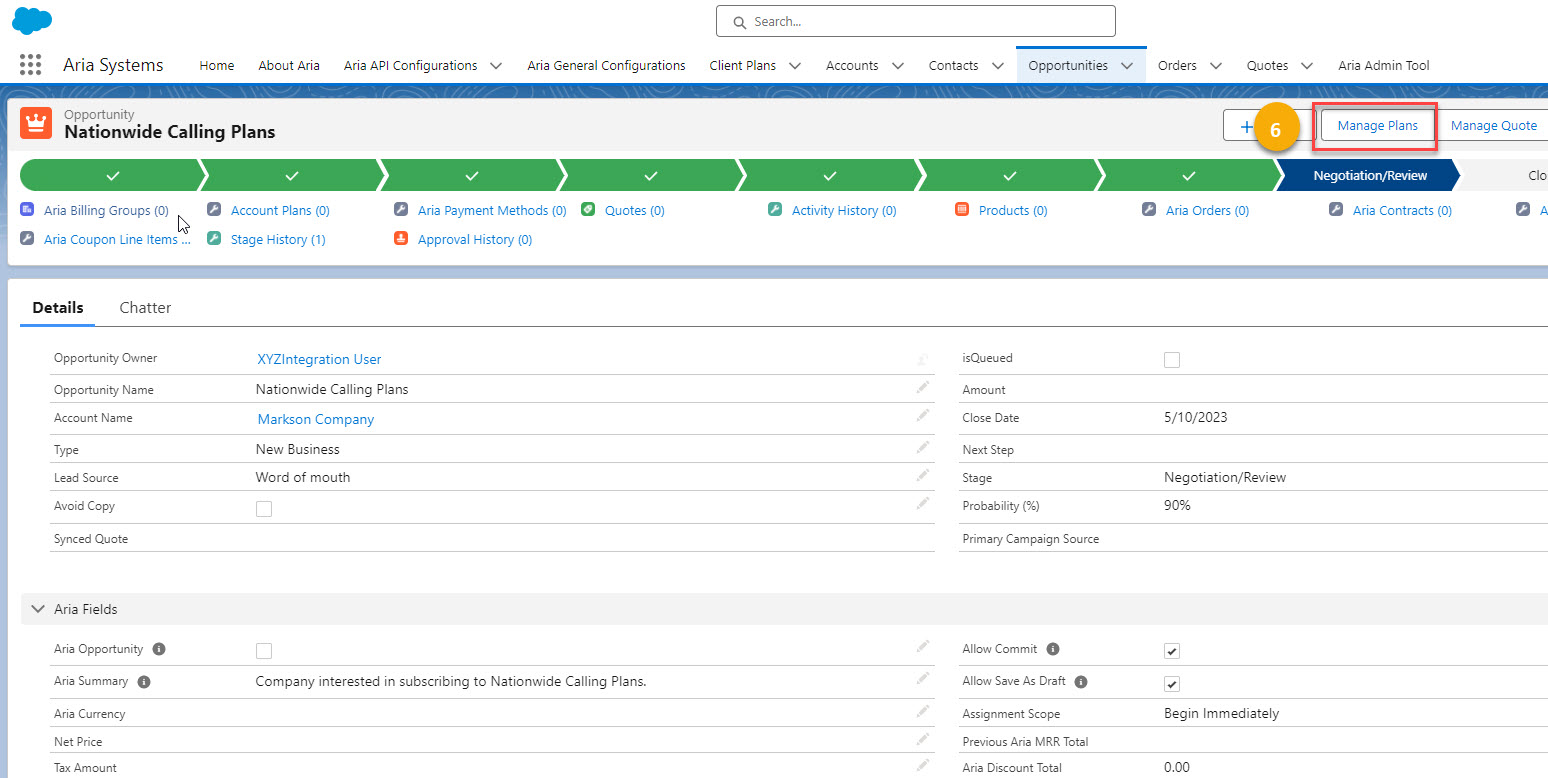
Assigning Plans, One-Time Orders, Promotions, and Contracts to an Opportunity
- From an Account's Opportunities screen, click the Manage Plans button.
Note: Clicking on the Manage Plans or Manage Quotes buttons invokes the Plan Wizard screen to create a Billing Group, Assign Plans, One-Time Orders, Promotions (Coupons), and Contracts to an account. From here, the information can be "Committed" to create an active account in Aria or saved as a Quote for review with the customer.
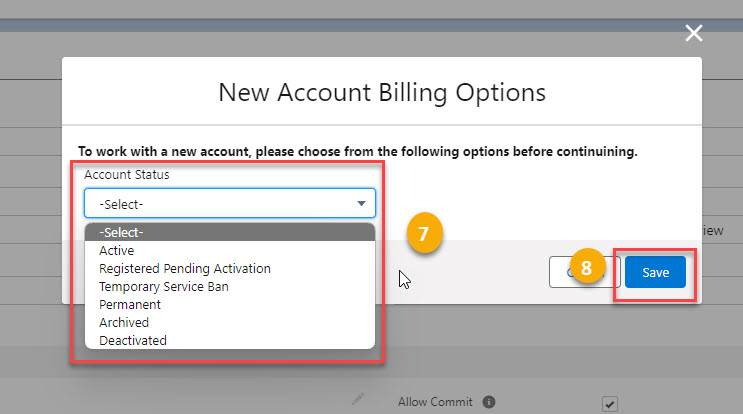
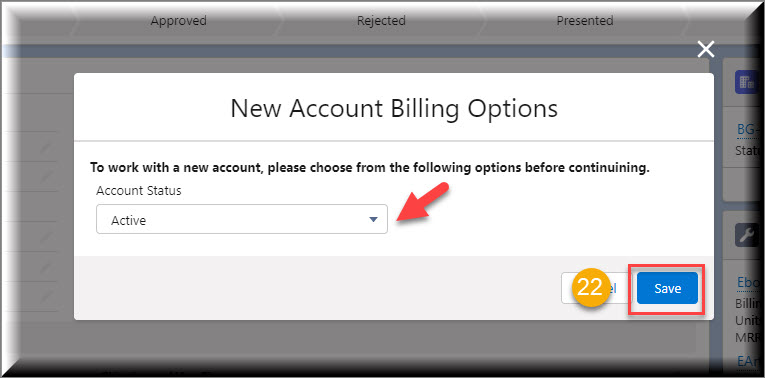
- Click the Account Status drop-down arrow and select an Account Status for this new account.
- Click the Save button.

- Type in a Billing Group Name and Client Defined Identifier for this new billing group.
Note: These field values must be unique within an Aria client instance. Values for these fields will be created dynamically for you, if left blank.

- Use the field dropdown arrows to display and select desired values for Notification Method, Statement Template, and Credit Note Template.

- Click the desired Primary Payment Option radio button.
Note: Based on your selection, use the drop-down arrow to select your desired Primary Payment Method (Electronic) or Payment Terms (Terms).
- Use the Primary Billing Contact and Statement Contact lookup feature to select account contacts for a billing and statement contact.
Note: Your selections for these fields will be used by Aria as the primary billing and statement contacts.
- Click the Save button.
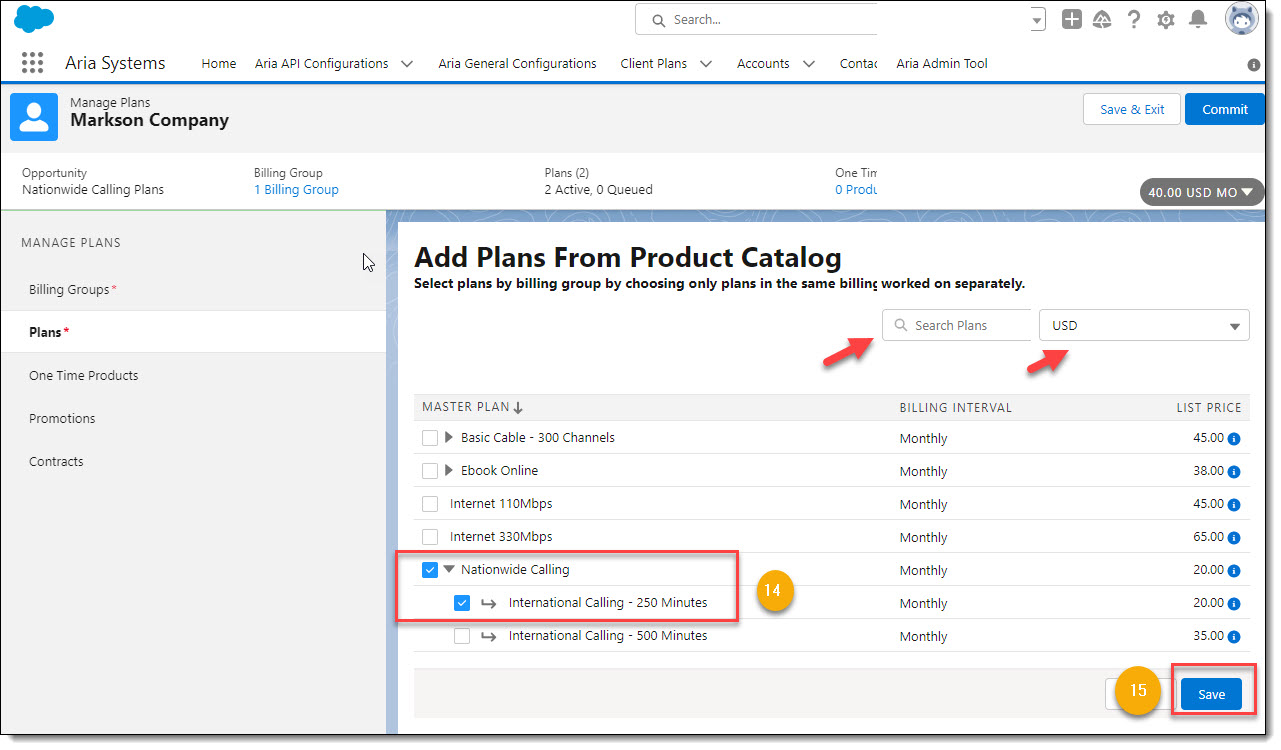
- Use the Search Name and/or Currency fields to display specific plans. Click the desired Plans check boxes to select plans to include in this Opportunity.
- Click the Save button.
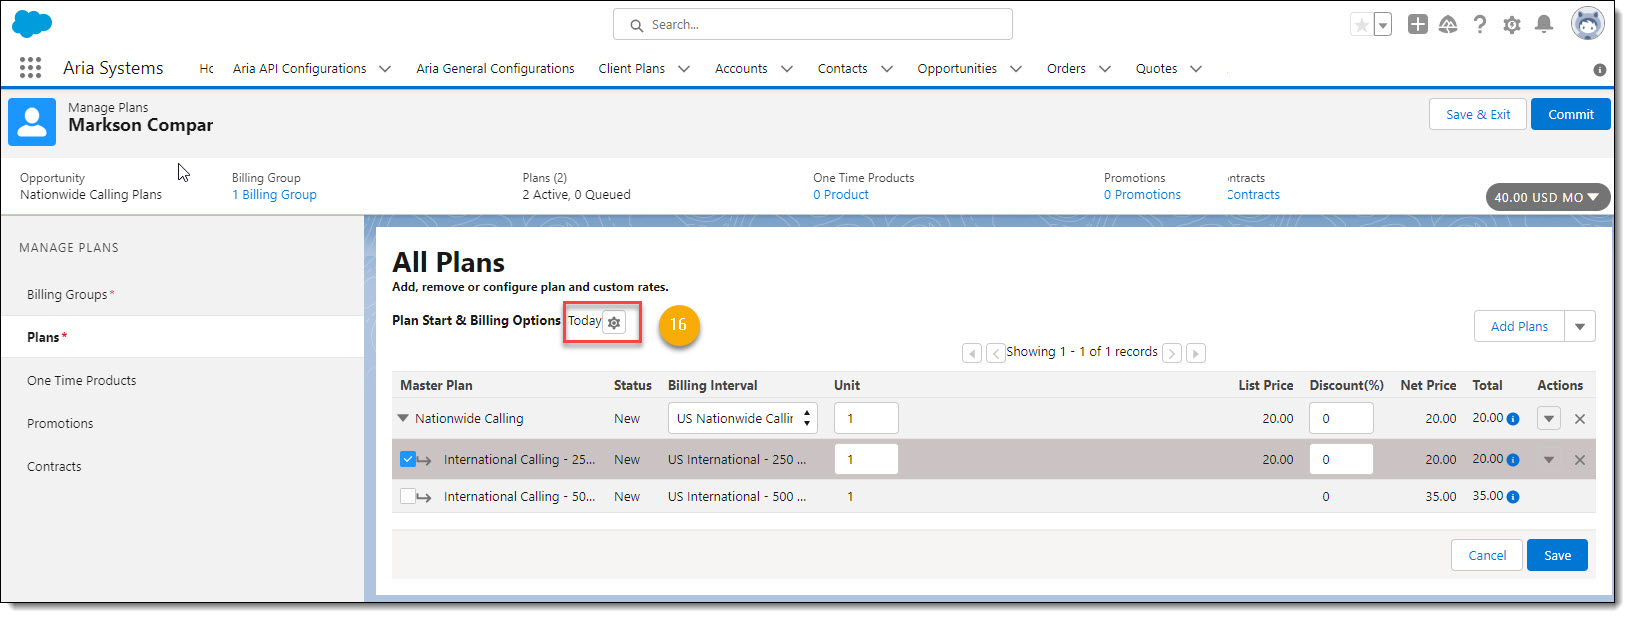
- Click the Plan Start & Billing Options Settings Icon.
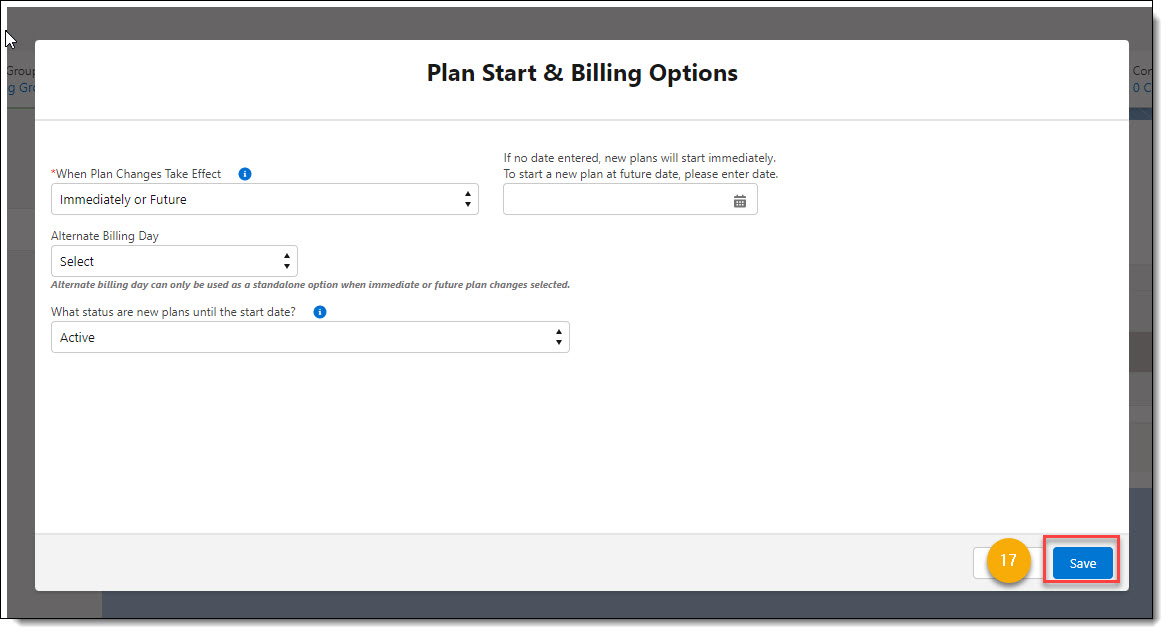
- Use the up/down arrows and/or calendar icon to select desired options for When Plan Changes Take Effect, Alternate Billing Day, What status are new plans until start date, and future date, and then click the Save button.
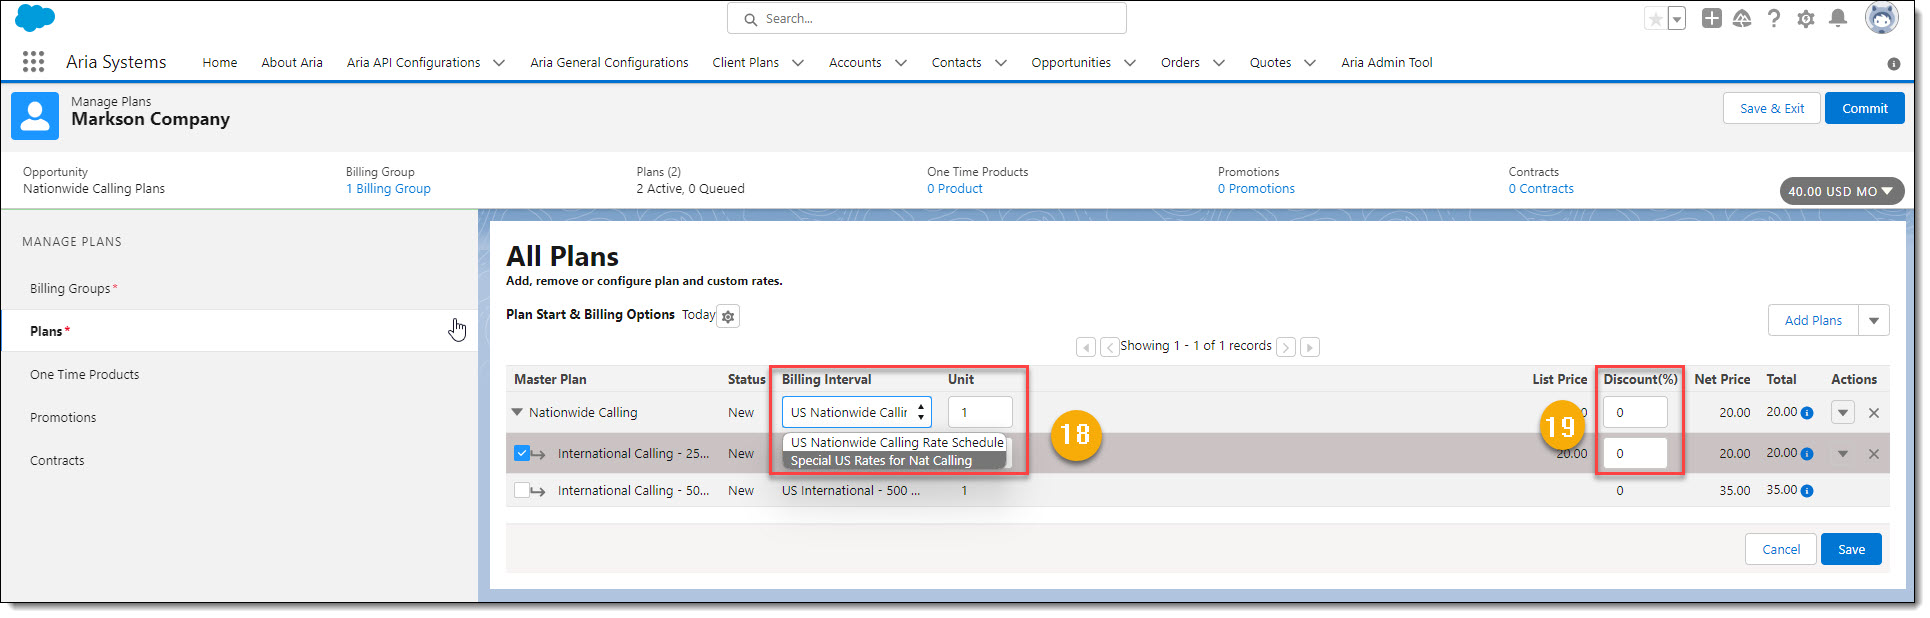
- Click the Plans' Billing Interval up-down arrows to select the desired billing interval. Click in the Units field and type in the desired number of units to be purchased.
- Click the Plan's Discount % field and type in any desired discount percentage for the plan(s).
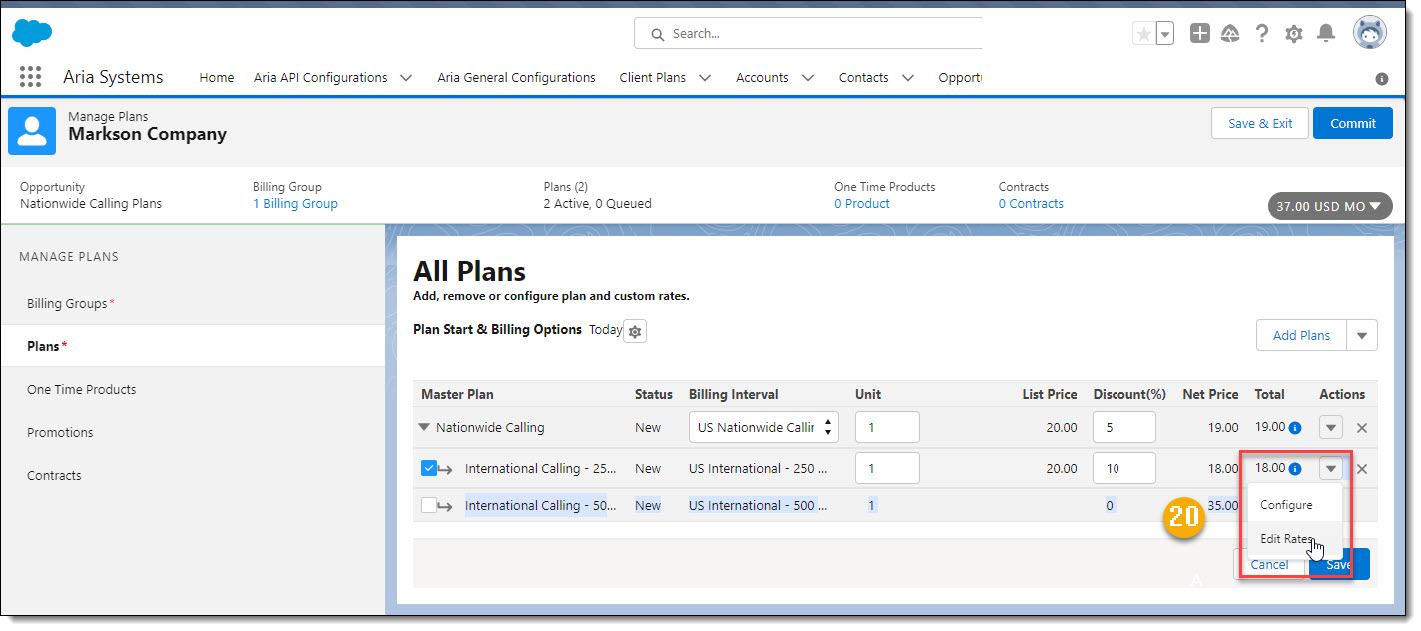
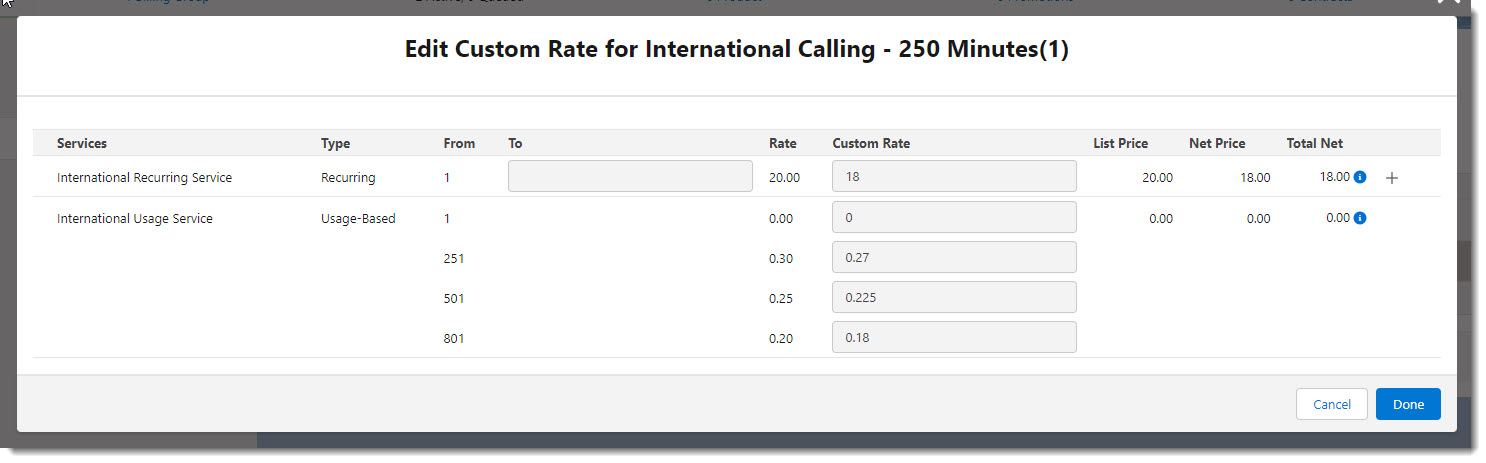
- Click the Plans' Action drop down arrow to Configure, Edit Rates, or Duplicate the Plan. Duplicate the Plan supports the purchase of additional instances of the plan(s).
Examples of the plan Configure and Edit Rates screens and fields are shown below:
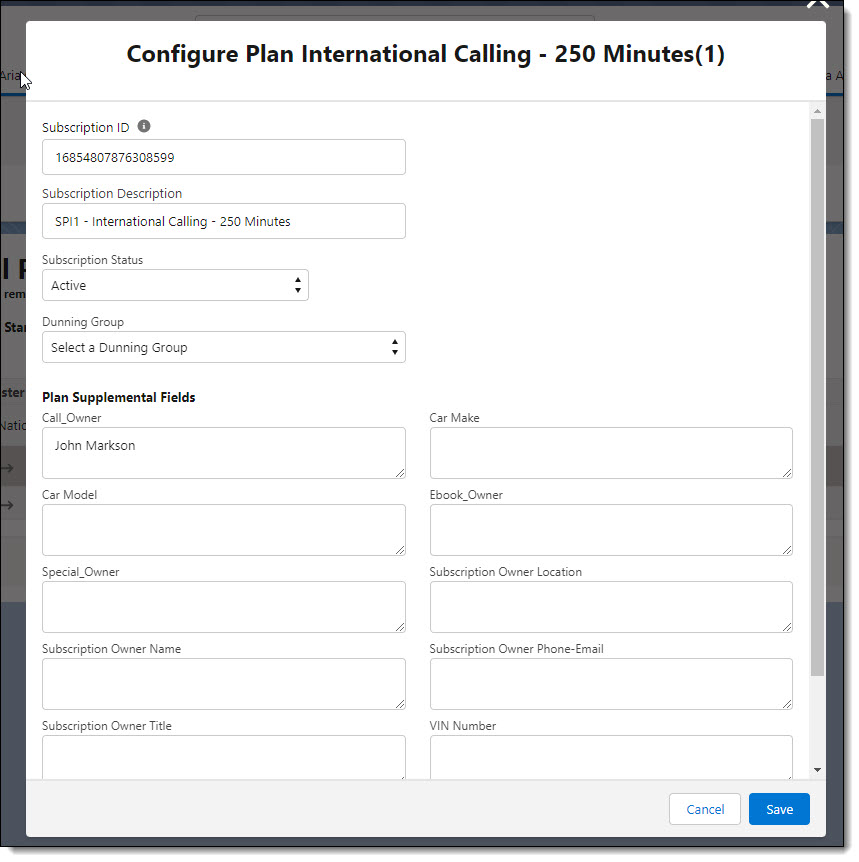
Note: All Plans associated to this Opportunity will be associated to the same Dunning Group.

- When finished, click the Save button.
Note: All Plans associated to this Opportunity will be billed to the same Billing Group with its associated Payment Method.
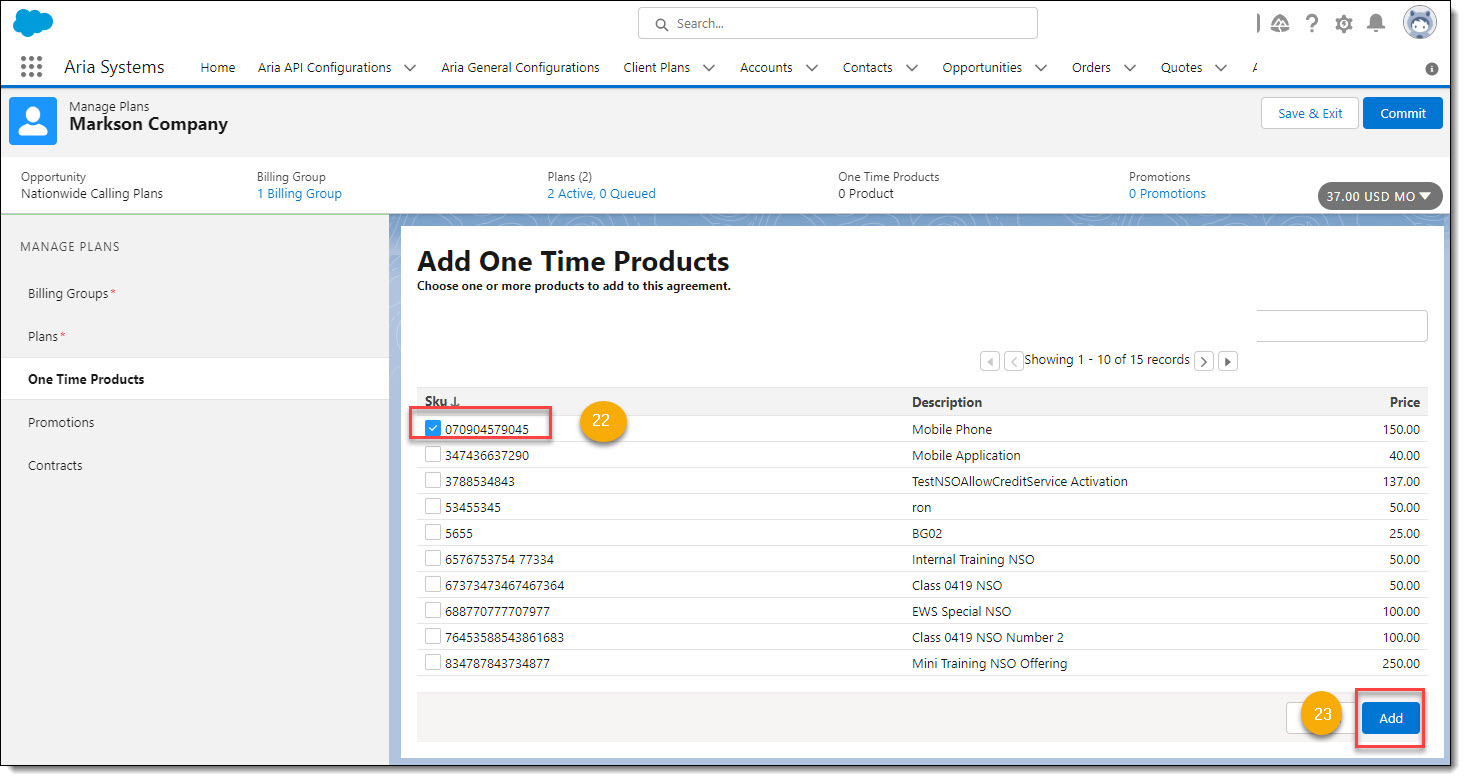
- To add a one-time product(s) to this opportunity, click the One Time Product(s)' checkbox to add this product(s) to the opportunity.
- Click the Add button.
Note: An error message will display if you do not select a One-Time Product and click the Add button. Instead, click the next menu items (Promotions or Contracts) within the Plan Wizard.

- Click the Add Products button to add additional one-time products to this opportunity.
- Click in the Units field and type in the number of units to purchase of the one-time product.
- Click the Assignment drop-down arrow and select the Plan this one-time product is associated to for billing.
- Click the Actions' Duplicate icon to add another instance of this one-time product to the opportunity. Use/click on the Actions' X symbol to delete the one-time product from the opportunity.
- Use/click the When to Invoice radio buttons to select Next Billing Cycle, Immediately or Pending State.
- Click on the Save button to save the one-time product(s) to this opportunity.
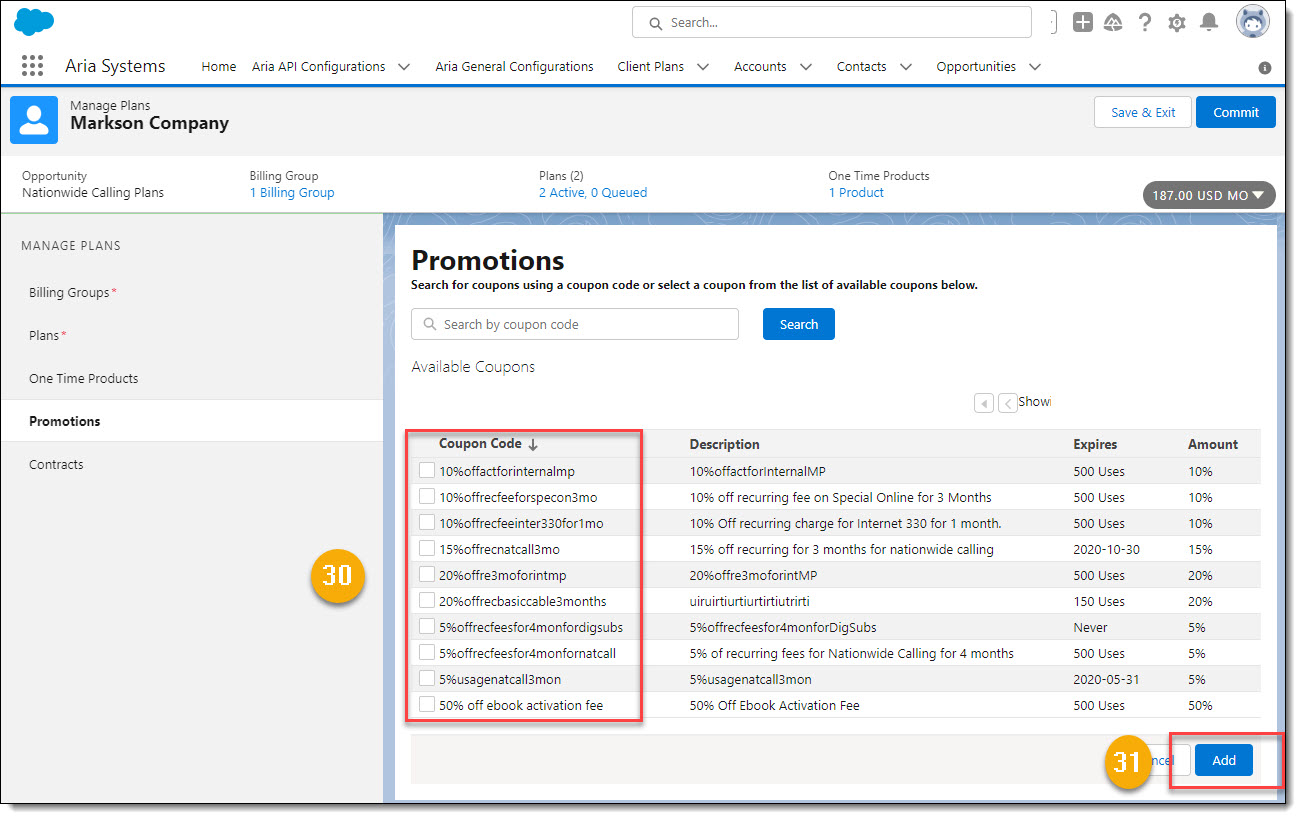
- To add a promotion to this opportunity, click the Coupon Code(s) check boxes to apply any discount coupon(s) to this opportunity.
- Click the Add button.
Note: An error message will display if you click the Add button and a Promotion is not selected. Instead, click on the next menu item (Contracts) within the Plan Wizard.
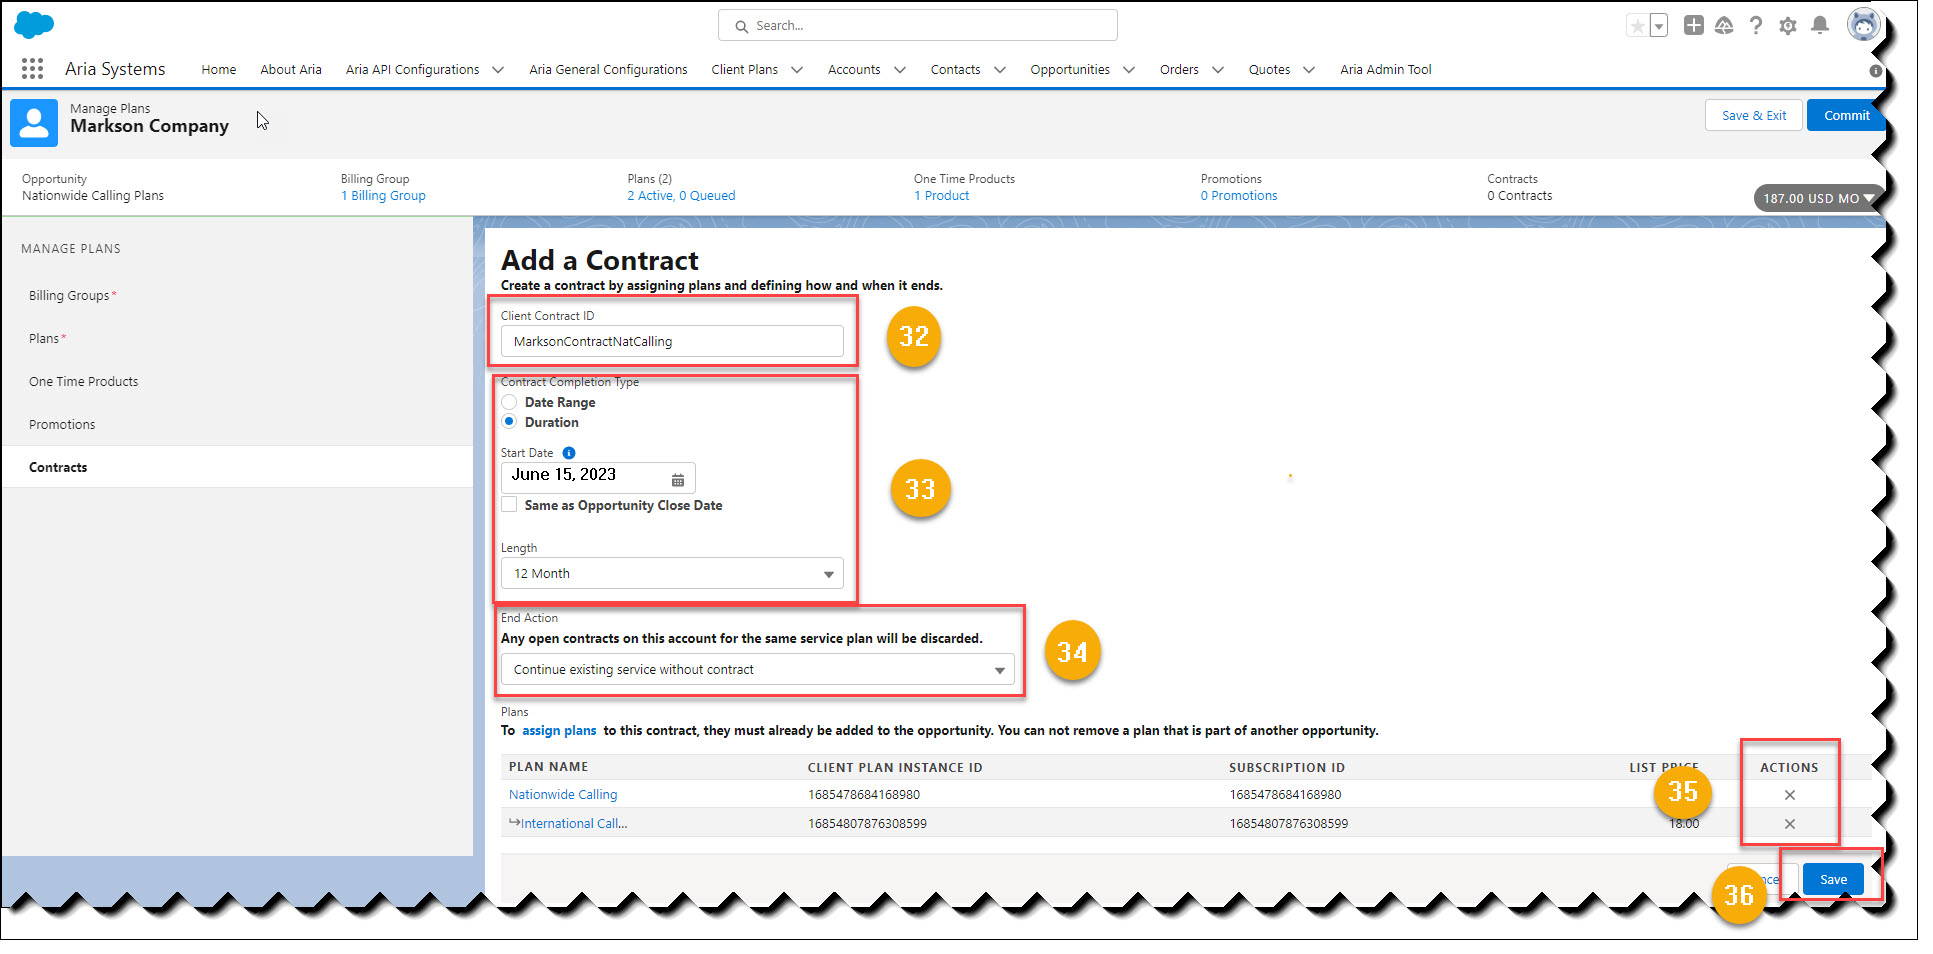
- To associate a contract with this opportunity, type in a unique Client Contract ID.
- Use/click the Contract Completion Type' radio buttons to select a contract Date Range or Duration. Use the Start Date calendar icon to select a start date of the contract. Use the Length drop-down arrow to select a length for the contract.
- Use the End Action drop-down arrow to select an end action for when the contract expires.
- Click a Plans' Action X symbol to remove the plan from the contract.
- Click the Save button.
The Opportunities' associated Contract is displayed as shown below:
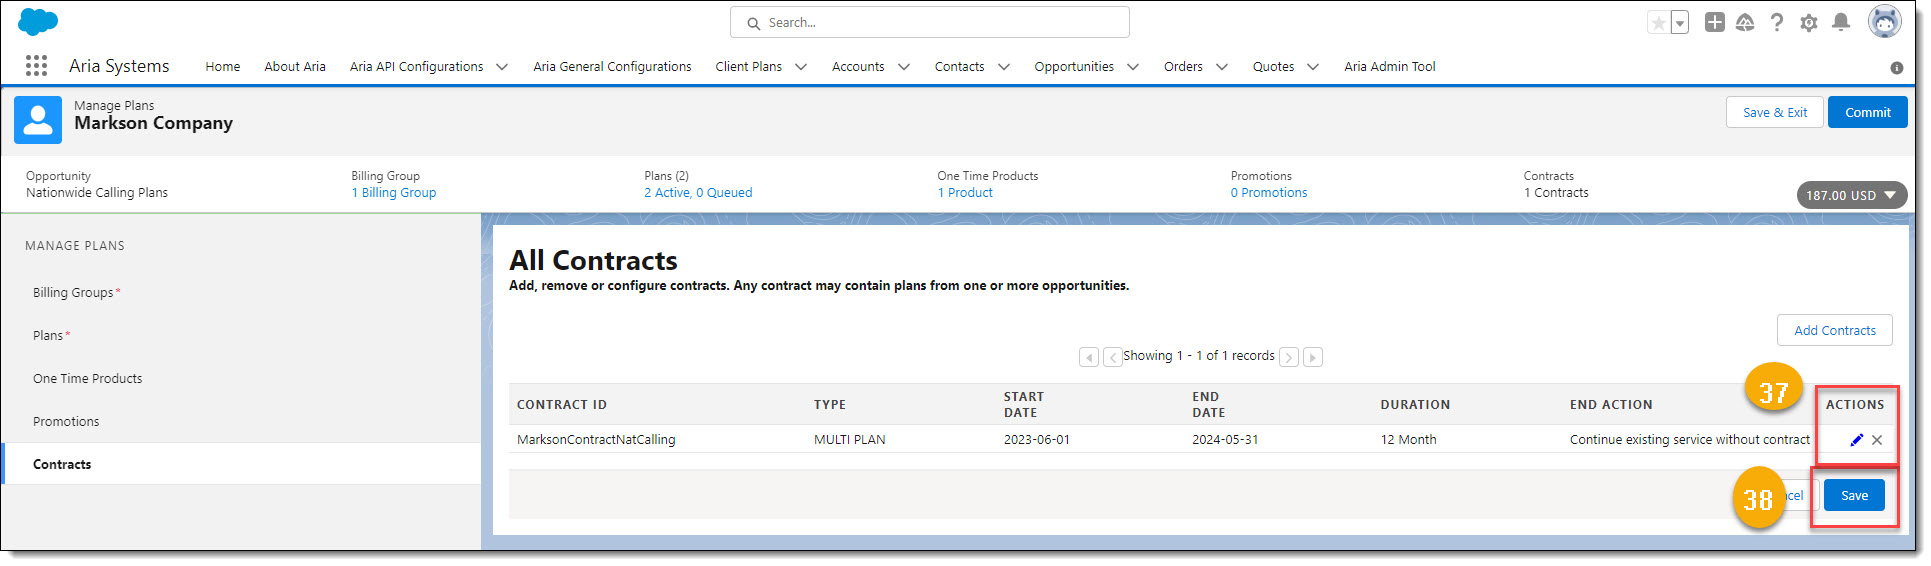
- Use the Contract Action' pencil icon to edit the terms and conditions of the contract. Click the Action' symbol X to remove the contract from the opportunity.
- When finished, click the Save button.
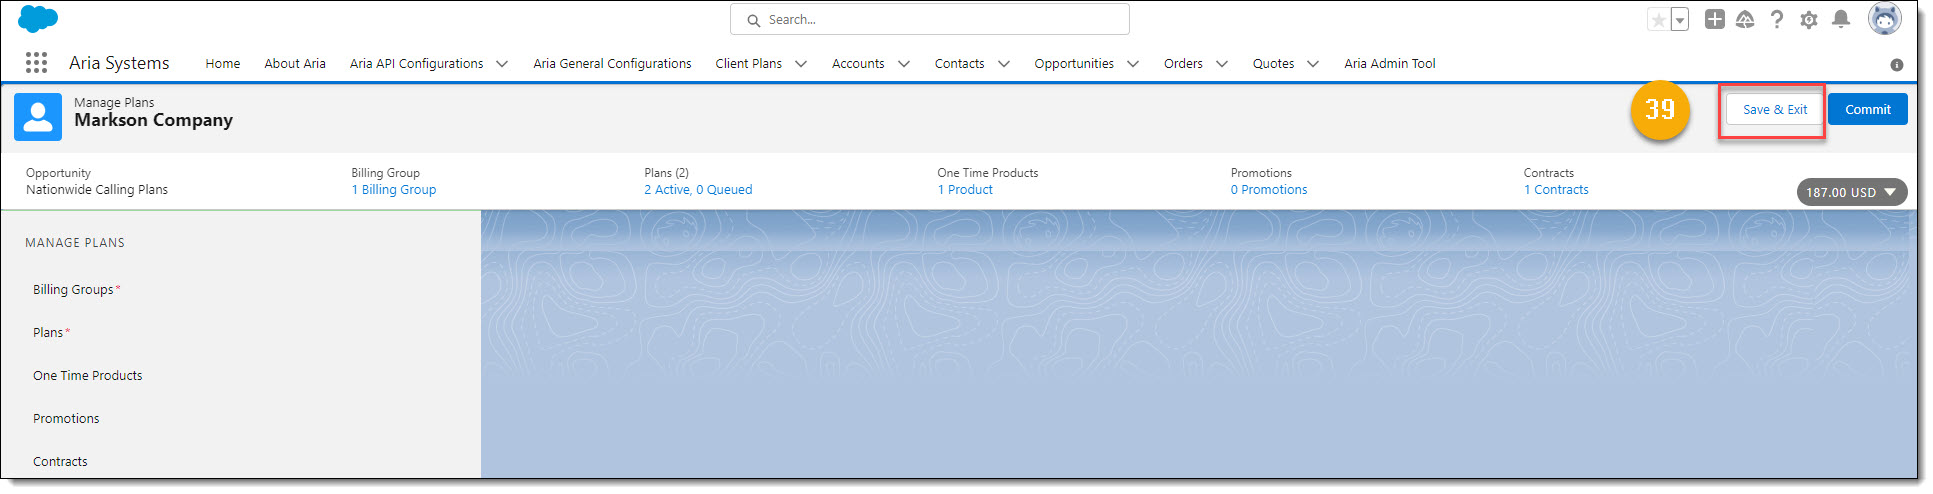
- Click the Save & Exit button to save this Opportunity.
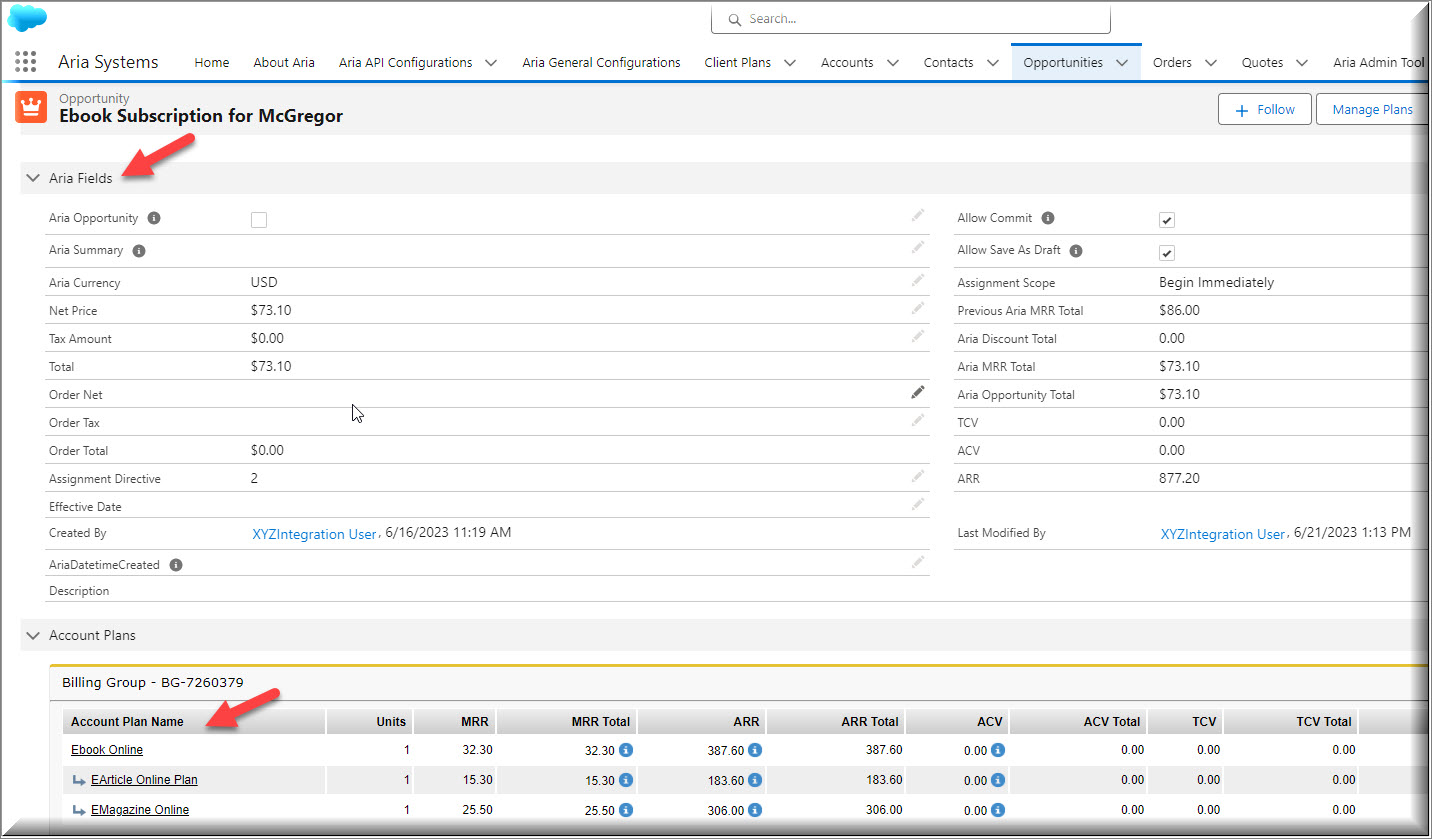
The Opportunity screen is displayed as shown below:


Note: The Aria fields are now populated with data respective of the Plans, and One-Time Products that have been associated to this Opportunity. The Account Plans section provides information regarding the Billing Group assigned and revenue detail respective to each of the account plans assigned to this opportunity.
- Use the buttons at the top of the screen to perform tasks such as accessing the Manage Plans or Manage Quotes wizards, Change the Owner of the Opportunity, Edit/Revise the Opportunity, or to obtain a printable version. Use the down-arrow to select and perform tasks such as Deleting or Cloning the Opportunity.
- Hover your cursor over the Action links (Aria Billing Groups, Account Plans, Aria Payment Methods, etc.). A pop-up screen displays to view and/or edit any of these elements within the Opportunity.
OR
Committing the Opportunity to Create an Aria Account
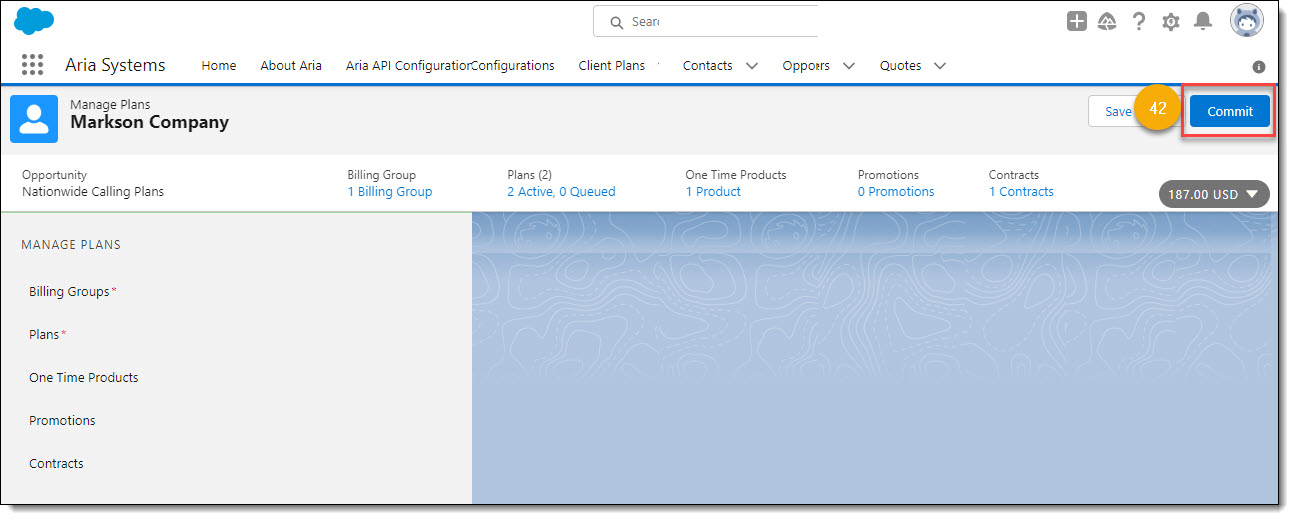
- Click the Commit button to begin the process of closing the account/opportunity sale and creating the account in Aria.
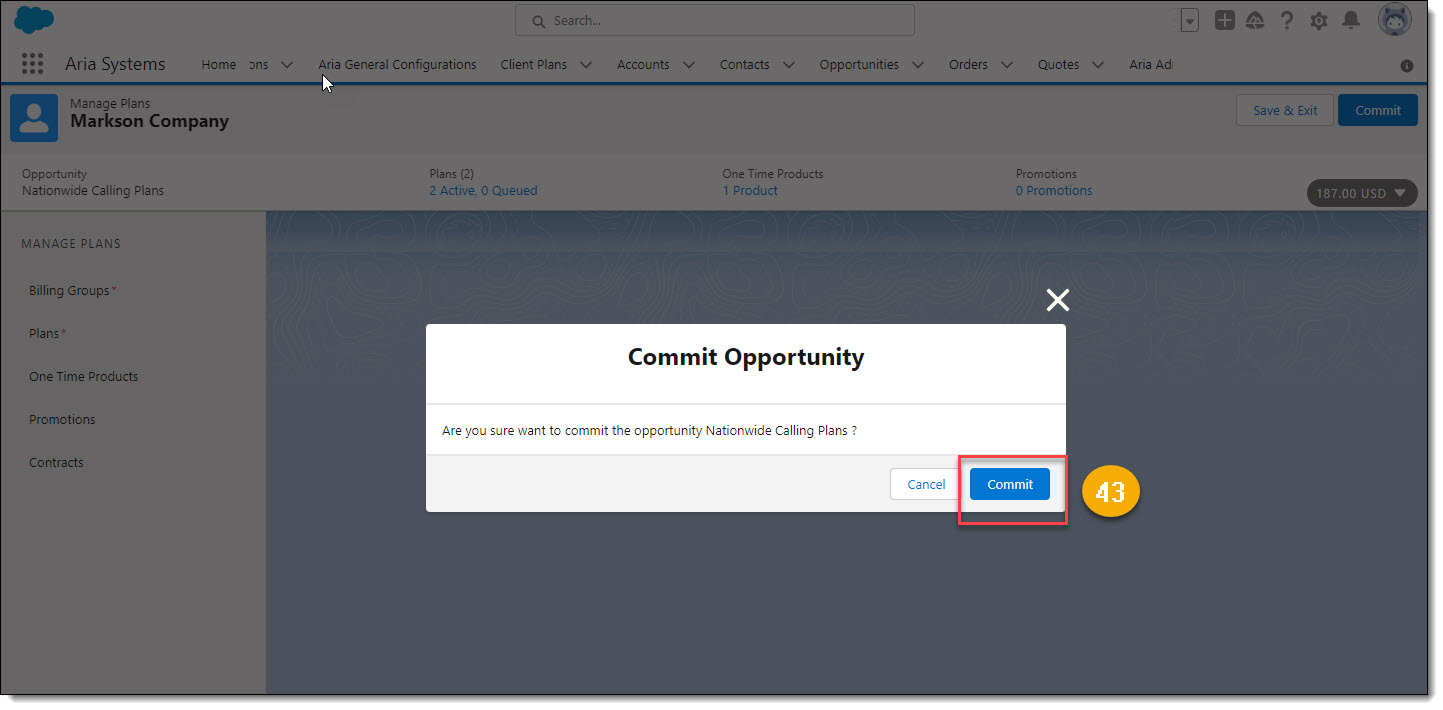
- A pop-up screen displays asking if you want to commit the Opportunity. To commit the Opportunity, click the Commit button.
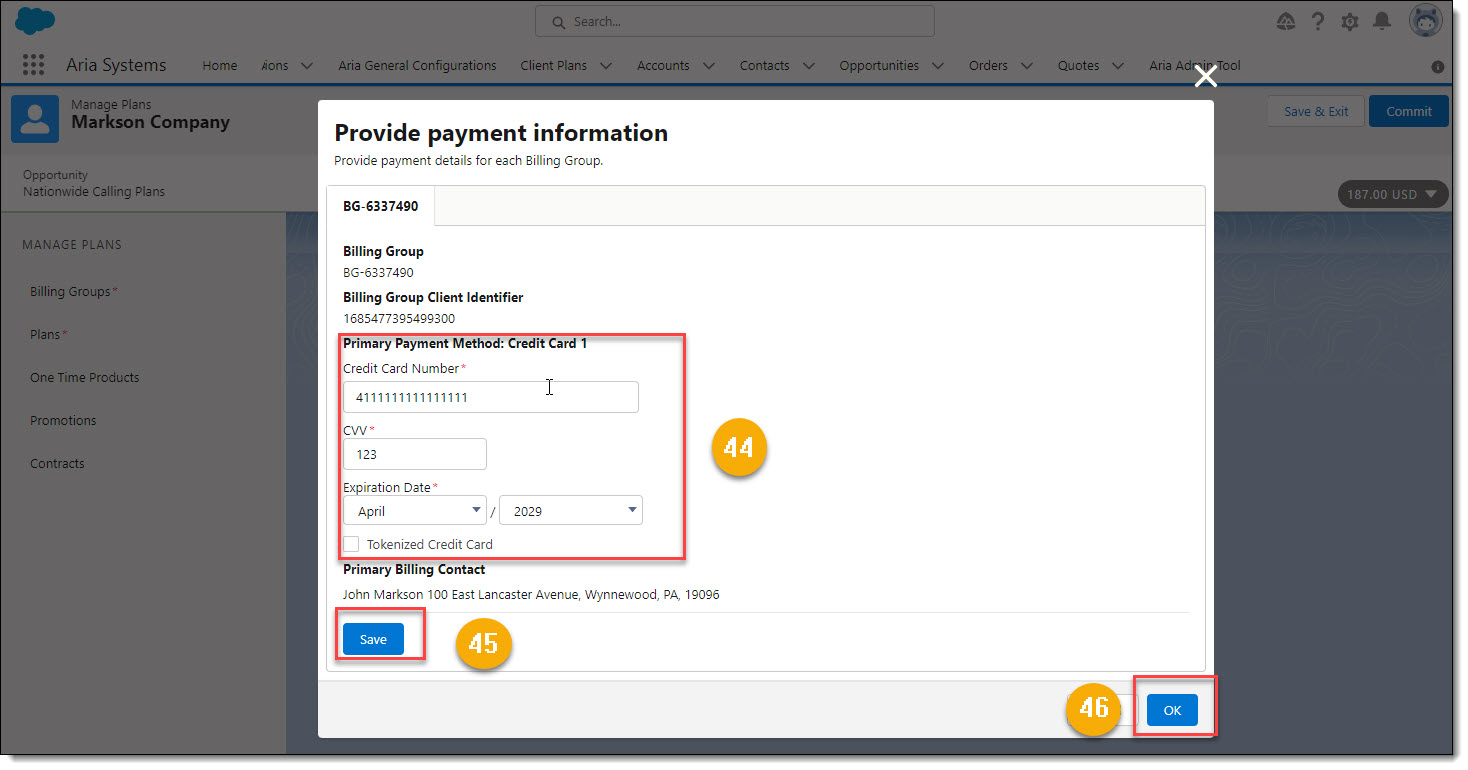
- A Payment Information pop-up screen is displayed requesting payment details for each associated billing group.
- Click the Save button when completed.
- Click OK to commit the sale and create the account in Aria..
The Opportunity screen is re-displayed as shown below showing the Opportunity as being Closed/Won.

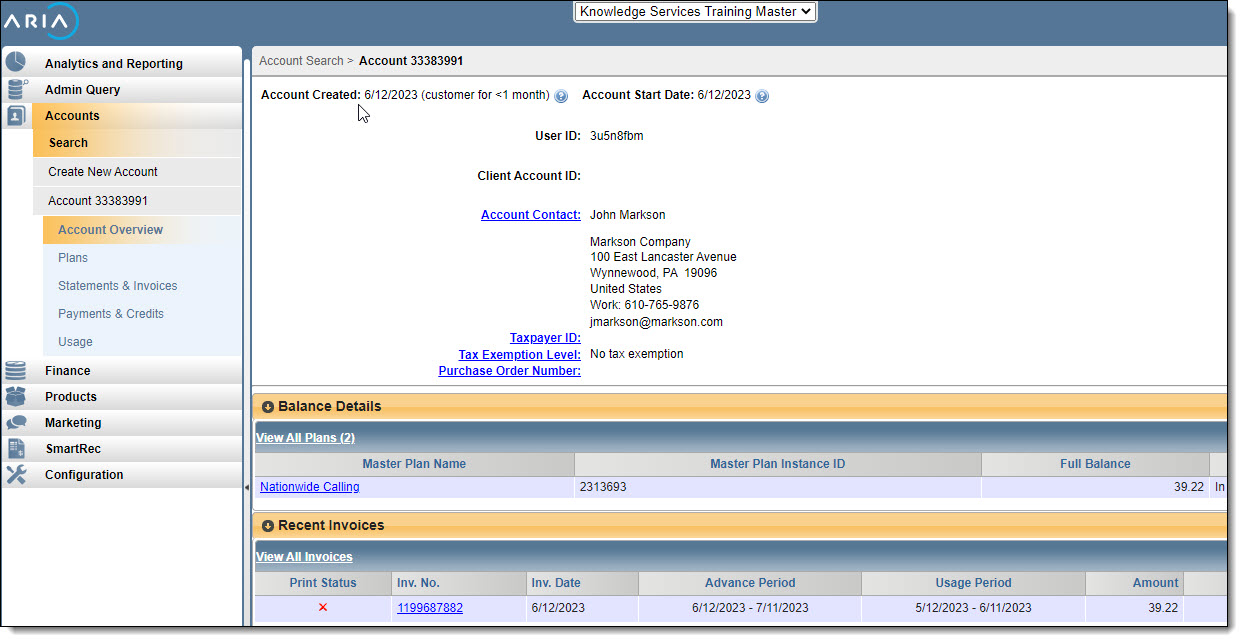
Below we see this new account created in Aria.
Create a New Quote for an Account Using Aria For Salesforce
Quotes represent the proposed prices of your company's products and services. You create a quote from an opportunity and its products. Each opportunity can have multiple associated quotes, and any one of them can be synced with the opportunity. When a quote and an opportunity are synced, any change to line items in the quote syncs with products on the opportunity, and vice versa.
Creating a New Opportunity
- From the Account screen. click the Opportunities' New Button. Complete steps 1 and 2 as detailed in Create a New Opportunity for an Account Using Aria For Salesforce.
Creating a New Quote
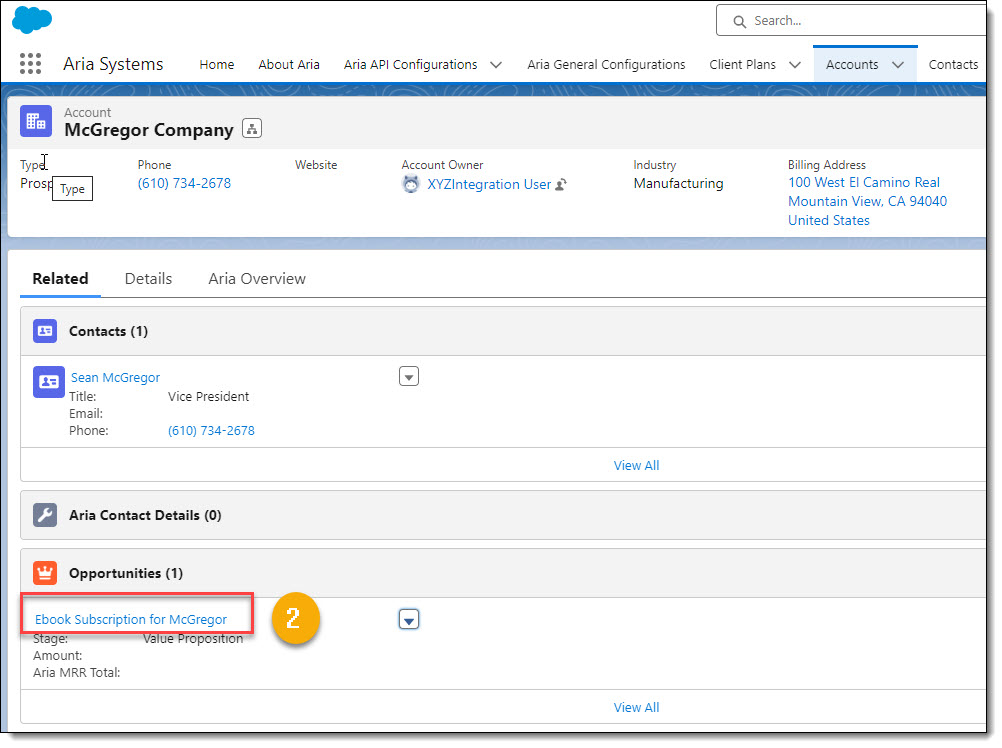
- From the Account screen, click the Opportunities' Name.
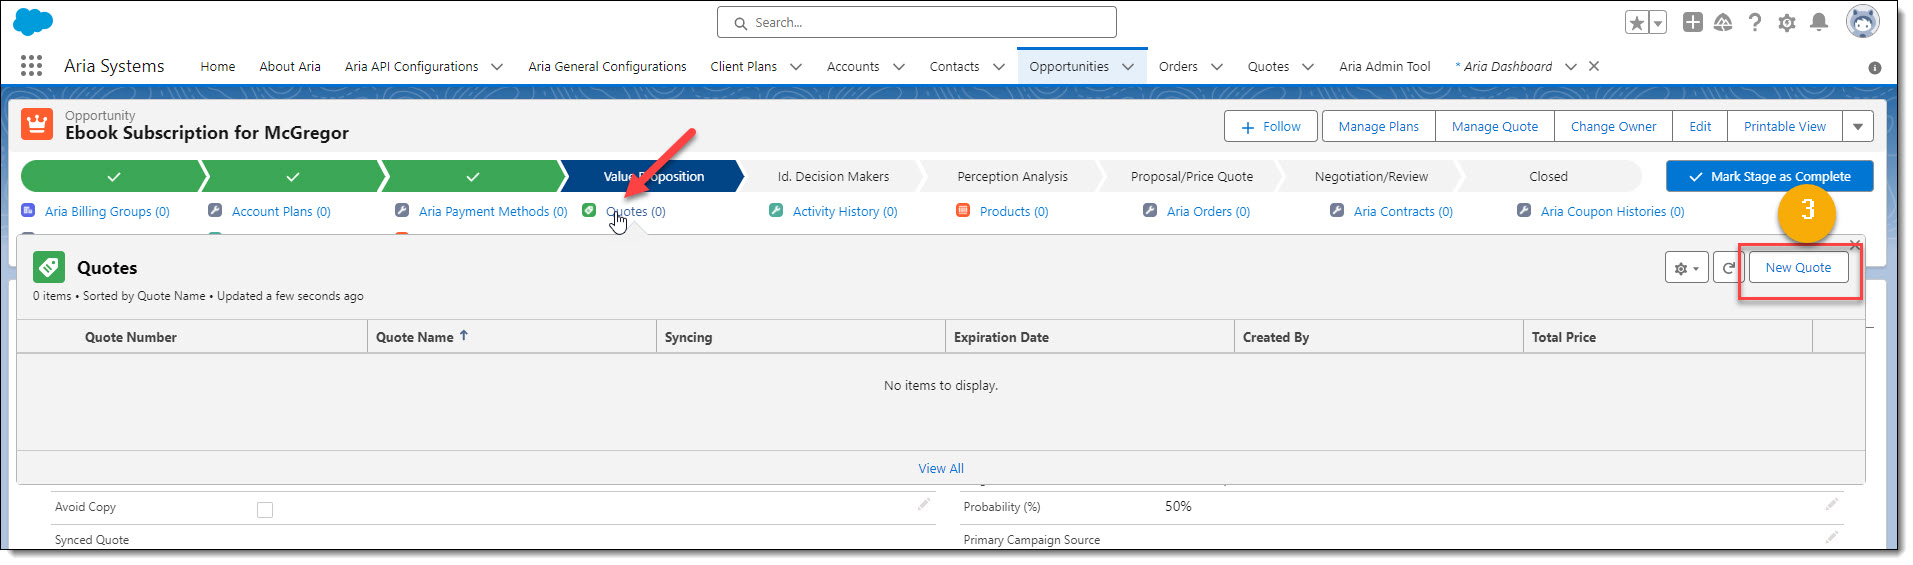
- Hover your cursor over Quotes and click the New Quote button displayed in the screen popup.
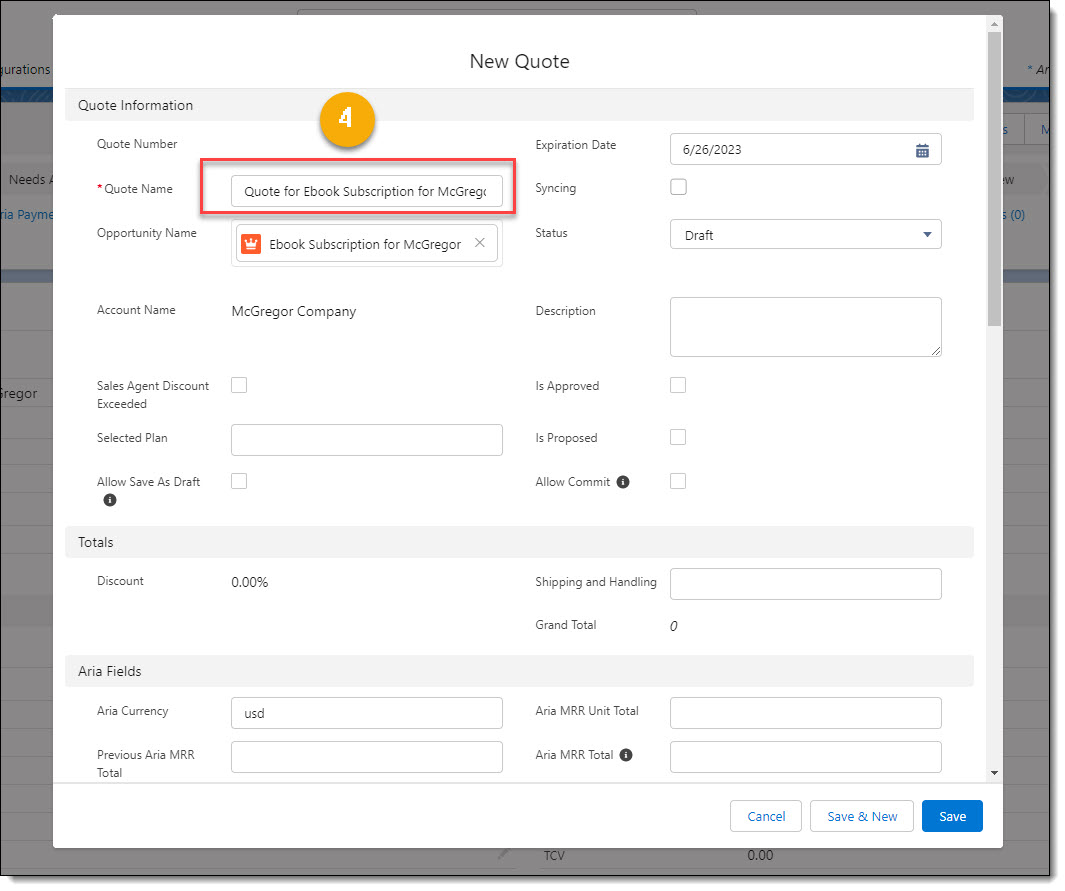
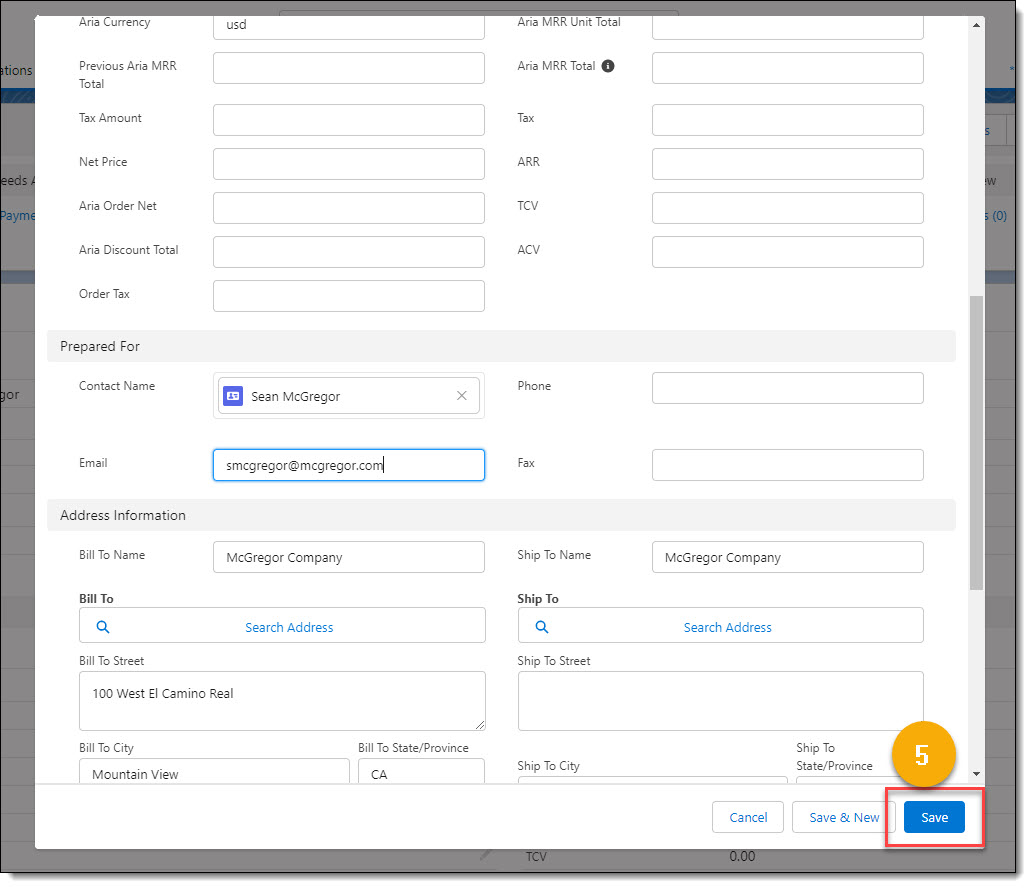
- Type in a Quote Name. Complete any additional fields as desired. For example, Expiration Date, Prepared for Contact Name, Email, etc.
- Click the Save button.
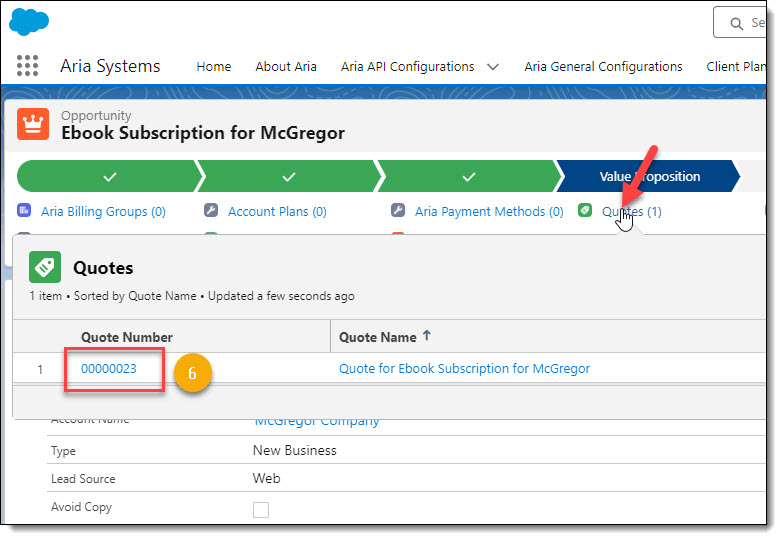
- From the Opportunities' screen, hover your cursor over Quotes and click the Quote Number displayed in the screen popup.
The Quote screen is displayed as shown below:
Assigning Plans, One-Time Orders, Promotions, and Contracts to a Quote
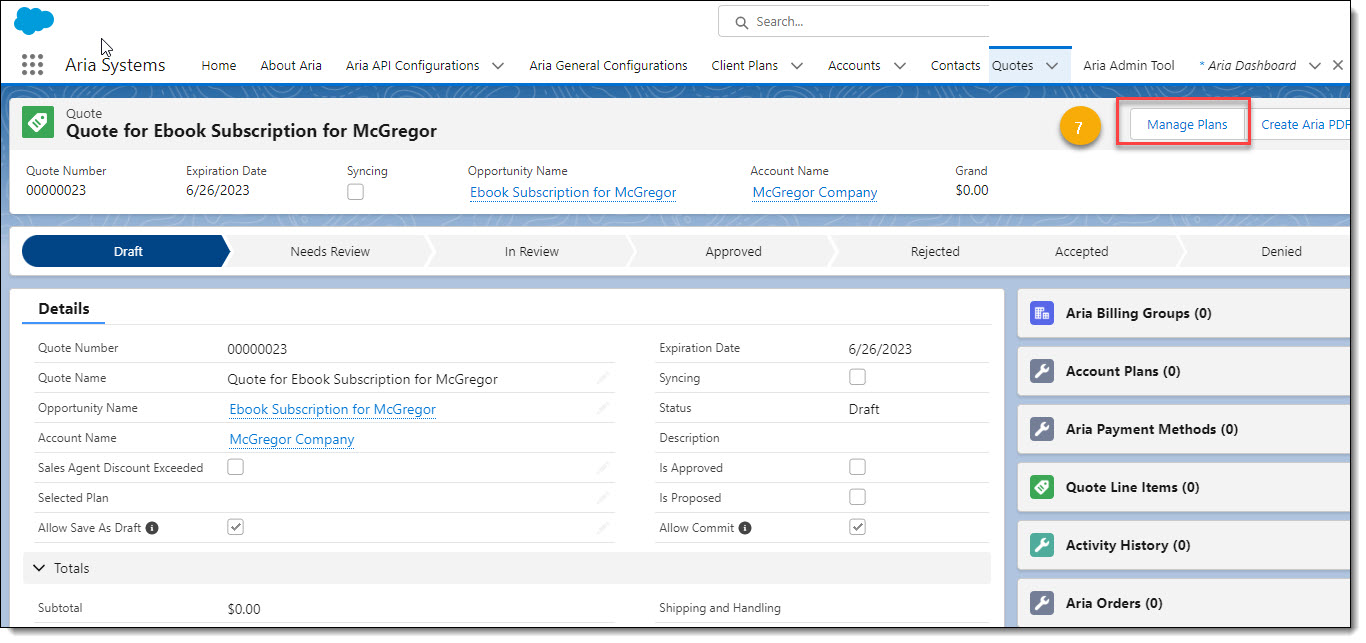
- Click the Manage Plans button. Complete steps 7 through 39 as detailed in the Create a New Opportunity for an Account Using Aria For Salesforce.
The updated Quotes screen is displayed as shown below:
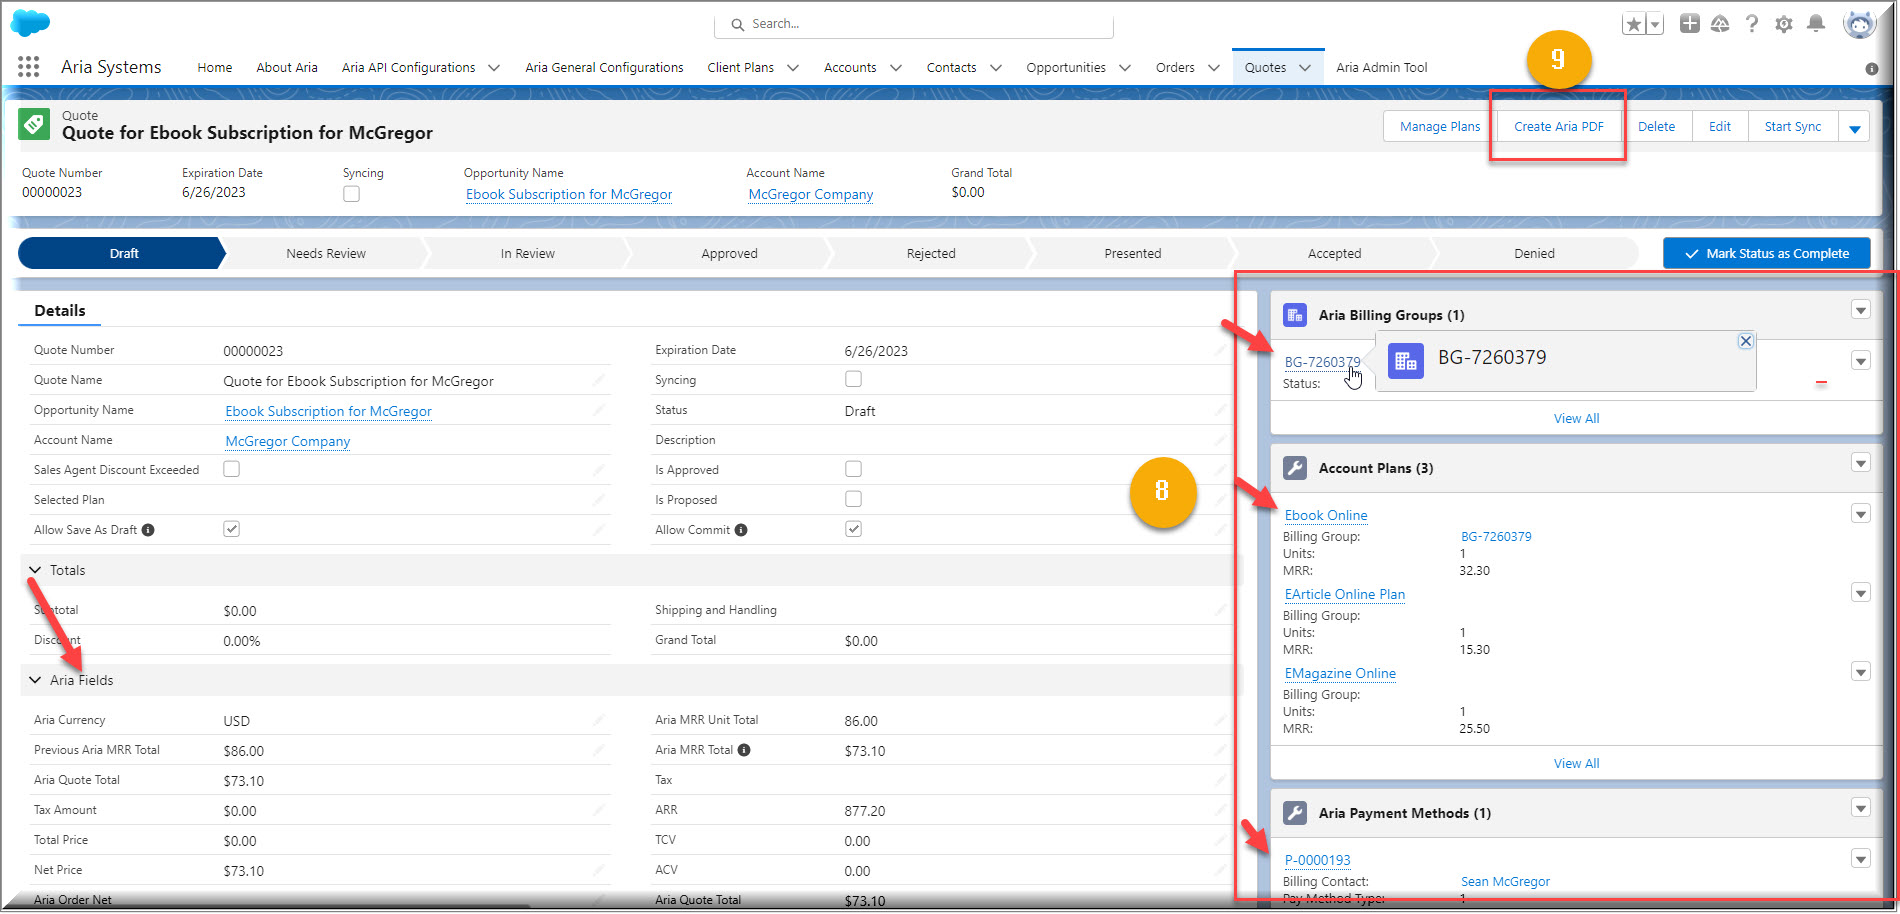

Note: The Aria fields are now populated with data respective of the Plans, and One-Time Products that have been associated to this quote. The Account Plans section provides information regarding the Billing Group(s) assigned and revenue detail respective to each of the account plans assigned to this quote.
- Use/click the blue hyperlinks to view/edit data respective to the Aria Billing Group(s), Account Plan(s), and Payment Method(s) associated with the quote.
Creating an Aria PDF of the Quote
- To create a PDF of the Quote, click the Create Aria PDF button.
A PDF of the Quote is displayed in a popup screen as shown below:
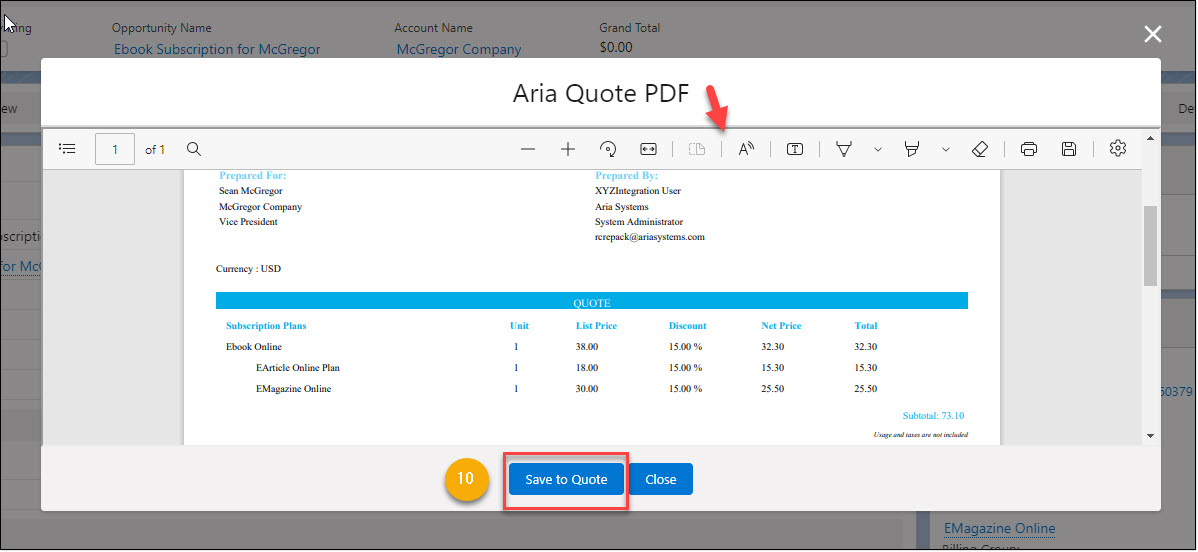
- Use the control icons at the top of the screen to perform various actions such as adding text, printing, etc. When finished, click the Save to Quote button to save the PDF to the Quote.
The updated Quotes screen re-displays with Quote PDF information as shown below:
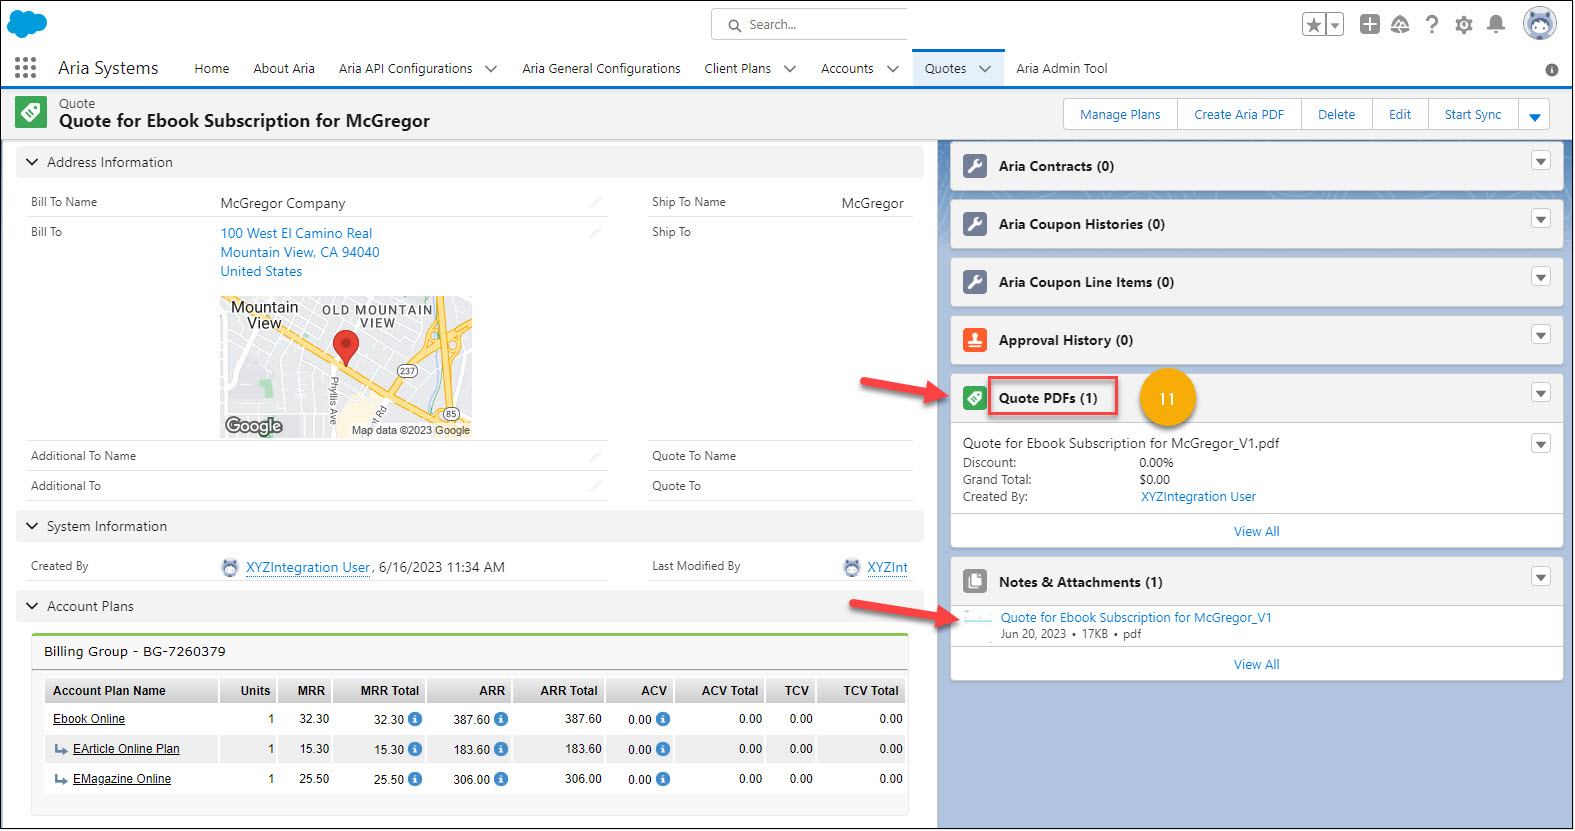
- Click Quotes PDF.
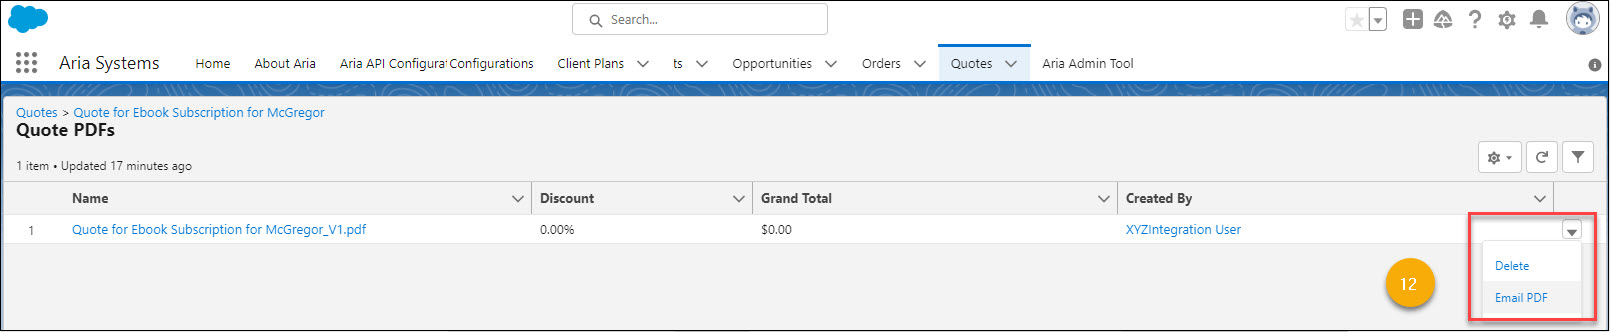
- Click the Quotes' down arrow. Click Delete to delete the PDF from the Quote. Click Email PDF to email a copy of the Quote.
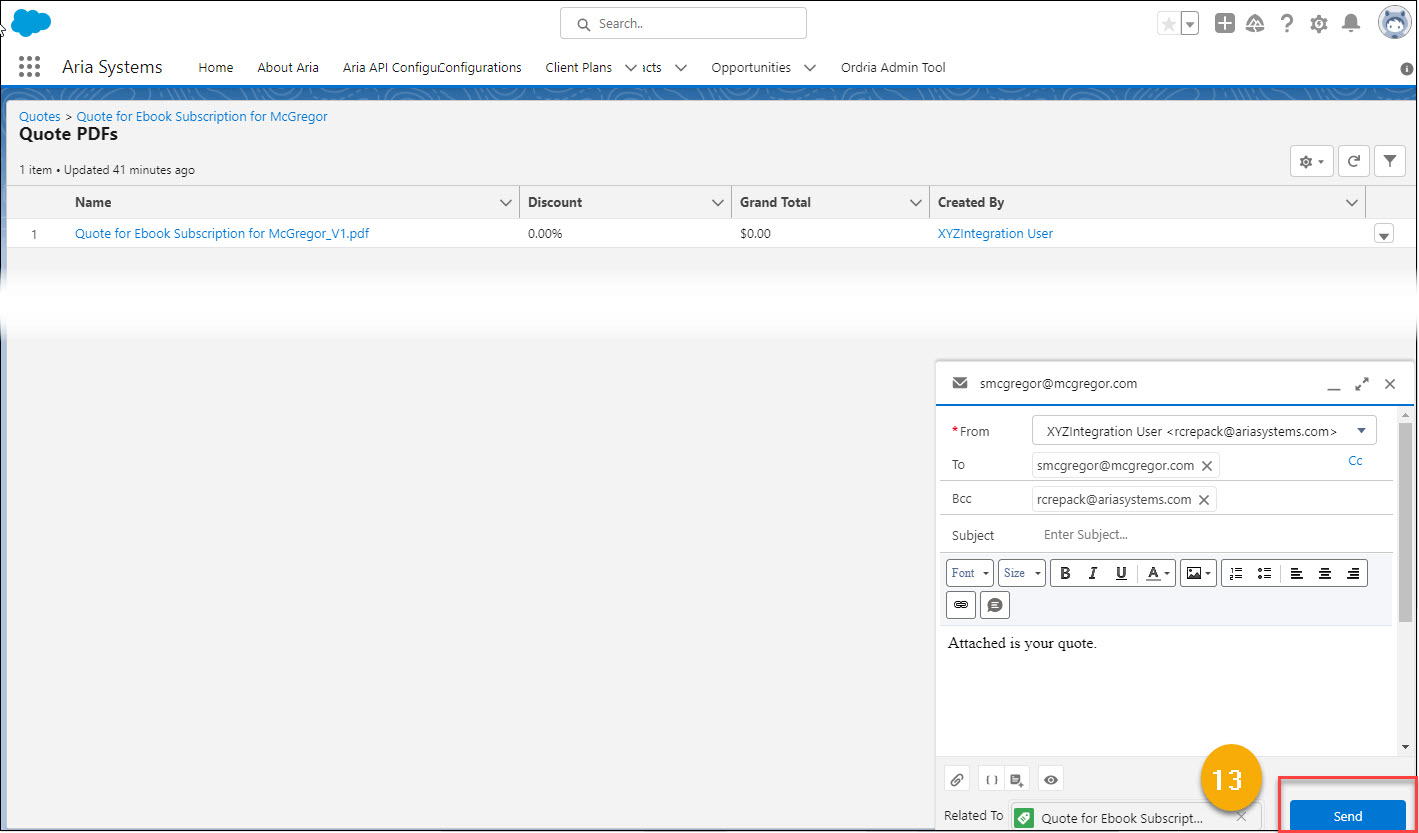
- An email popup screen displays. Fill in the appropriate fields and click the Send button to email the Quote to your customer.
Syncing a Quote to an Opportunity

- To sync this Quote to the Opportunity, click the Start Sync button.
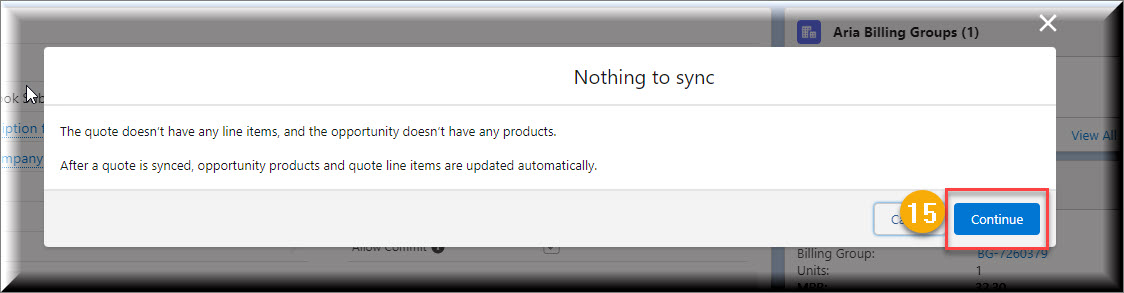
- A popup screen displays, click the Continue button to sync the Quote to the opportunity.
The Quote screen is updated to show the Quote linked to the Opportunity as displayed below:

Note: To disable the Quote from automatically syncing to the Opportunity, click the Stop Sync button at the top of the screen.
- From the Quote screen, click the Opportunity Name.
The Account's Opportunity screen is now updated with the Aria Fields and Account Plans via the syncing of the Quote to the Opportunity.
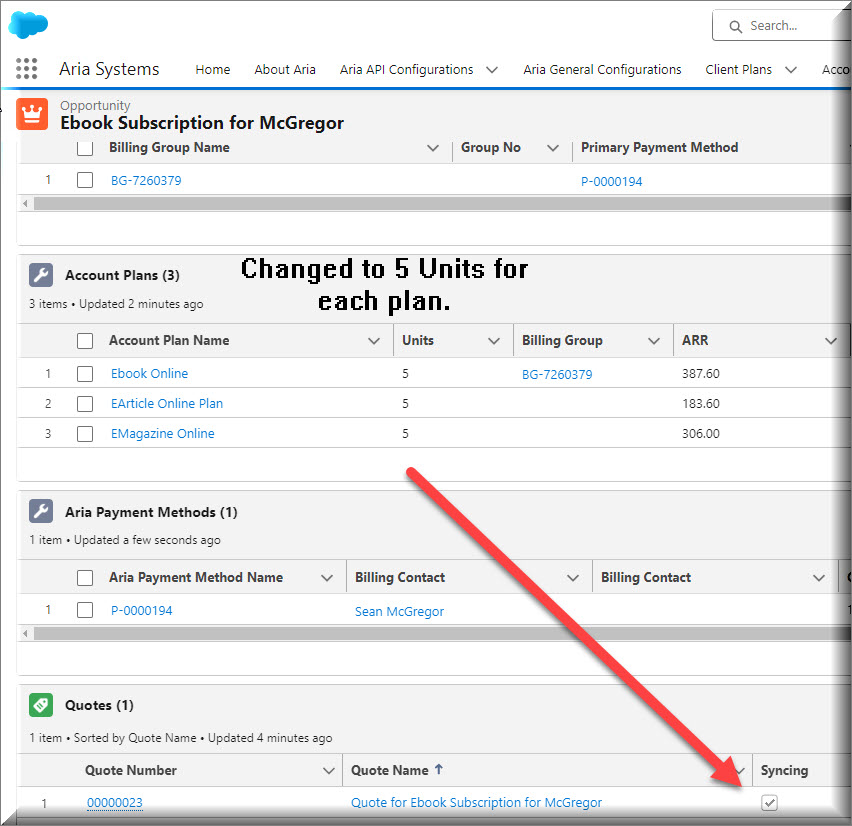
Note: Any Plan or One-Time Order change(s) made to an Opportunity via use of the Manage Plan button (in the example above, the units changed to 5) will be automatically reflected in the Quote synced to this Opportunity.

- Clicking on the Manage Quote button from the Opportunity screen will initiate the Plan Wizard to enable the setup of a new Quote including a Billing Group(s), Plan(s), One-Time-Order(s), Promotion(s), and Products.
The Account's Opportunity screen is now updated to show multiple quotes associated to the Opportunity.
Note: Only one Quote can be synced to an Opportunity at once time.
- To Un-sync/Sync a Quote to an Opportunity, click the Quote Number.

- Click Quotes' Stop or Start Sync Button to initiate the un-syncing or syncing of the Quote to the Opportunity.
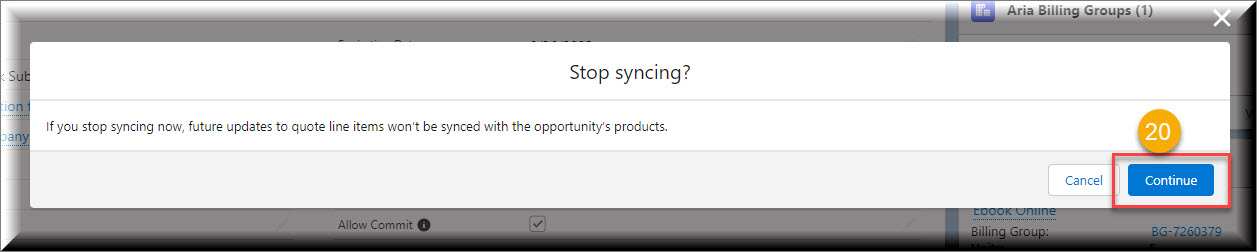
- A popup screen is displayed. Click the Continue button to confirm the un-syncing or syncing of the Quote to the Opportunity.
Committing the Quote to Create an Aria Account

- From the Quote screen, click the Manage Plans button.
- Use the Account Status drop down arrow to select an account status, and click the Save button.
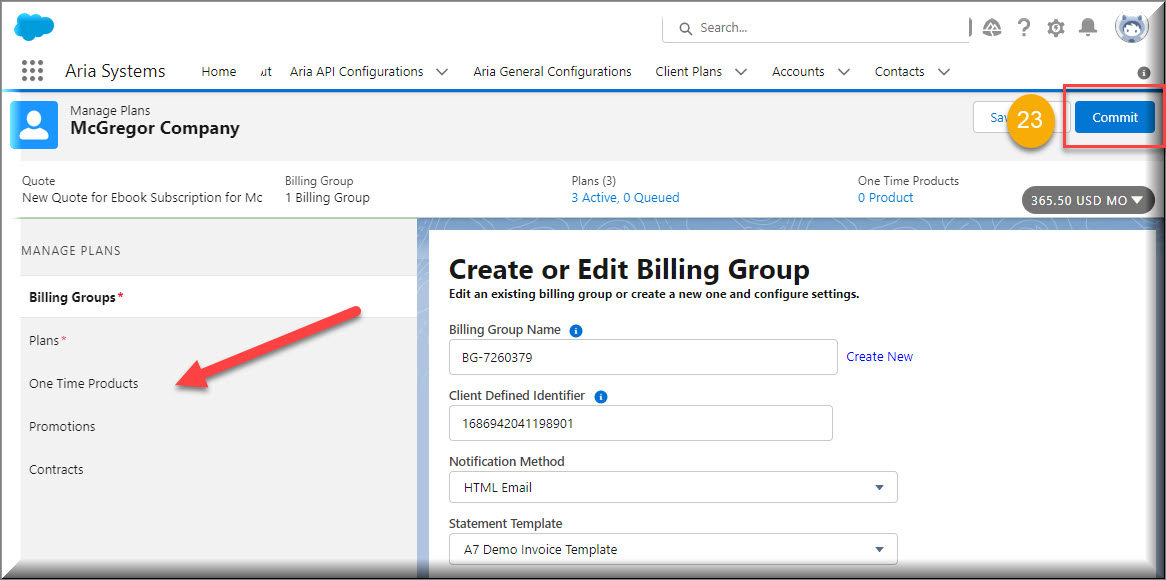
- Use the Plan Wizard to make any last changes to the Billing Group(s), Plan(s), One-Time Product(s), Promotion(s), and Contract(s) associated to the Quote and click the Commit button.
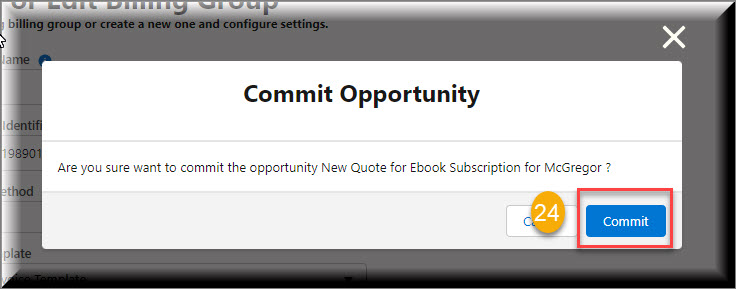
- A popup screen is displayed, click the Commit button to confirm the creation of the account in Aria.

- A popup screen is displayed, type in the appropriate payment information, and click Save.
- Click the OK button.