
Pricing Model Setup
- Create a Price Plan
- View Existing Pricing Plans
- View Details of a Specific Price Plan
- Filter Attributes For the Price Plans
- Sort Attributes For the Price Plans
- Add Rates Using Pricing Models for a Price Offer
- Set Flat Pricing Model
- Set Recurring Pricing Model
- Set Recurring Tiered Pricing Model
- Set Transaction Attribute-based Pricing Model
- Set Usage Attribute-based Pricing Model
- Set Usage Progressive Tier Pricing Model
- Set Usage Prospective Tier Pricing Model
- Set Recurring Composite Pricing Model
- Set Usage Composite Pricing Model
- Add Currency, Accumulator, Allowance
This section covers the details of how to navigate the Allegro UI to complete the price plan setup by selecting the appropriate pricing models. Please note that the shell price plans are automatically created when the Plan with Plan services and Plan rate schedules are saved in core Aria.
Create a Price Plan
Allegro UI does not allow creation of new price plans directly in Allegro.
Price plan shells are automatically created for each combination of Plan, Plan Rate Schedule and services in the rate schedule. Aria is used to defining RATES for this combination. With Allegro, the rates are defined by associating different pricing models with the price plans.
Once the price plan shells are created, users can associate the pricing models and set the rates based on the pricing models.
The following table shows the mapping of the transaction-type to the pricing models supported in Allegro.

The following table shows the combinations that are allowed with a composite pricing model for types of transactions.

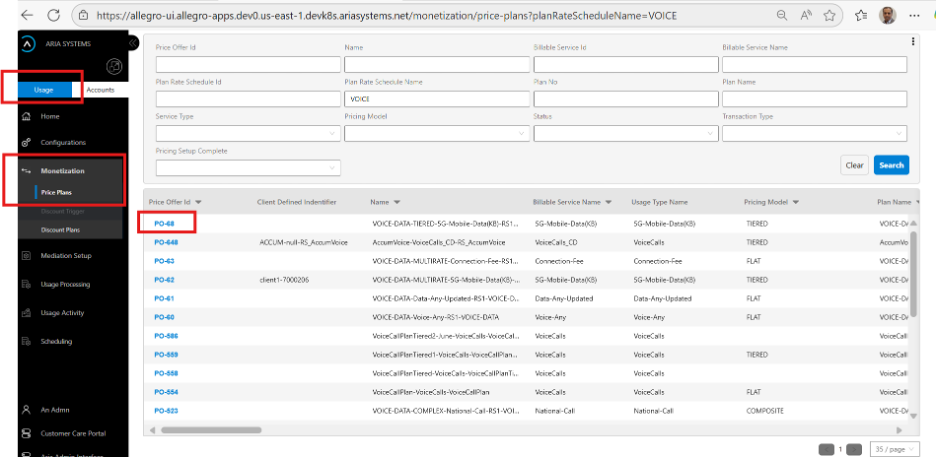
View Existing Pricing Plans
- Click on the Usage switch (Usage/Account toggle switch) in the navigation pane
- Click on the Monetization menu option in the navigation panel. This will expand the sub-menu for Monetization in the Navigation Pane.
- Click on the Price Plans menu option in the navigation pane
- This will fetch the existing set of price plans configured for the client and show a line for each price plan on the table.
This is shown in the following screenshot:
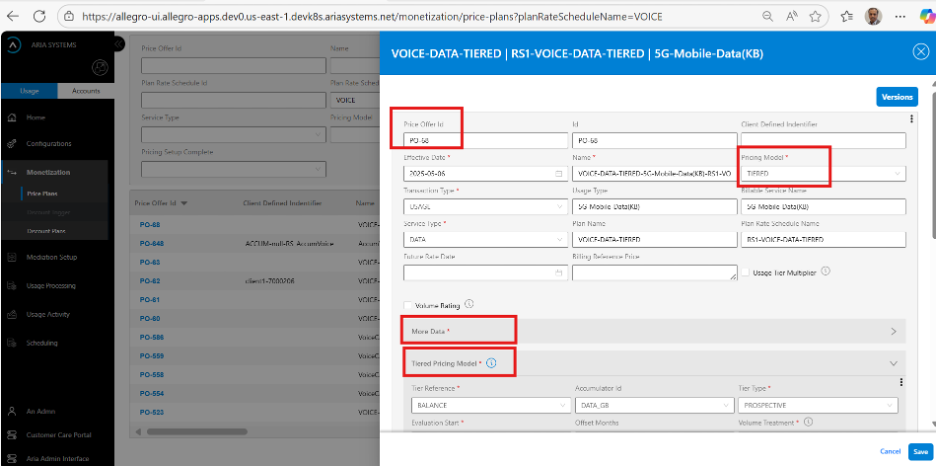
Allegro UI is dynamic. Based on the selected Pricing Model and transaction type, corresponding sections automatically appear in the drawer.
Key points to consider when viewing an existing price offer (plan):
- Key attributes appear at the top of the drawer. These include fields the user must set. The shell price offer is created automatically when Catalog components save in core Aria, minimizing user data entry. Users select the pricing model and add rates accordingly.
- Allegro captures additional attributes shown in a collapsible “More Data” section. Users can expand this to view more details.
- The last section is dynamic, based on the pricing model and transaction type. For example, a TIERED pricing model displays a section titled “Tiered Pricing Model”.
- Information notes provide context on key attributes. Users can hover or click these notes to read details.

Two attributes are added to the Price offer details:
- Billing Reference price: Shows the price set in core Aria. It supports recurring and activation services by allowing the pricing admin to reference the value and set the allowance or accumulator for the price-offer in Aria Allegro. This attribute is read-only.
- Non-Subscription Offer: Aria Allegro uses the Non subscription offering (NSO) for Minimum commitment true-up. It triggers a true-up when total usage is below the committed value, synchronized with core Aria via create_order_m API using an NSO offering. This read-only attribute is TRUE if the service type is “Order”; otherwise, FALSE.
These attributes appear in the following screenshot for "View Price Offer Details":

View Details of a Specific Price Plan
- Navigate using “To view existing price plans”
- Select and click the price plan ID link. This will open the drawer and allow you to manage the price-plan data
Filter Attributes For the Price Plans
- Price Offer Id: Filter based on the ID assigned for the price offer. Allegro automatically assigns a price-offer id, if one is not provided. This is a case-insensitive like search.
- Name: Filter based on the name assigned for the price offer. Since the price offer shells are automatically created based on the catalog data sync from core Aria, Allegro automatically assigns a name, if one is not provided. This is a case-insensitive like search.
- Billable Service Id: Search based on the Billable service id. This is the id of the service defined in Aria Catalog. This is an exact search.
- Billable Service Name: Search based on the Billable service name. This is the name of the service defined in Aria Catalog. This is a case-insensitive like search
- Plan Rate Schedule Id: Search based on the plan rate schedule id from the core Aria pricing catalog. This is an exact search.
- Plan Rate Schedule Name: Search based on the Plan Rate Schedule Name from the Aria catalog. This is a case-insensitive like search
- Plan No: Search based on the plan number assigned in the core Aria catalog. This is an exact search.
- Plan Name: Search based on the Plan Name from the Aria catalog. This is a case-insensitive like search
- Service Type: Search for the price plans based on the selected service type. Users can select the service type from the drop-down list. This is an exact search.
- Pricing Model: Search for the price plans based on the selected pricing model. Users can select the pricing model from the drop-down list. This is an exact search
- Status: Search for the price plans based on the selected pricing model. Users can select the pricing model from the drop-down list. This is an exact search.
- Transaction Type: Search for the price plans based on the selected Transaction type. Users can select the Transaction type from the drop-down list. This is an exact search. For usage, the transaction type can be “USAGE”.
- Pricing Setup complete: This is an important filter. This filter gives the user all the pending activities where the shell price offers are created but the user has to still select the pricing models to define the rates. User can select the Boolean value from the drop-down list. This is an exact search.
Sort Attributes For the Price Plans
- Price Offer Id: Sort ascending/descending using the price offer id attribute
- Name: Sort ascending/descending based on the name of the price offer
- Billable Service Id: Sort ascending/descending using the billable service id attribute.
- Billable Service Name: Sort ascending/descending using the Billable service name attribute
- Plan Rate Schedule Id: Sort ascending/descending using the Plan Rate Schedule Id attribute.
- Plan Rate Schedule Name: Sort ascending/descending using the Plan Rate Schedule name attribute.
- Plan No: Sort ascending/descending using Plan No attribute.
- Plan Name: Sort ascending/descending using the Plan Rate Schedule Id attribute.
- Service Type: Search ascending/descending based on the service type attribute.
- Pricing Model: Sort ascending/descending using the pricing model attribute.
- Status: Sort ascending/descending based on the status attribute.
- Transaction Type: Sort ascending/descending using the Transaction type attribute.
- Pricing Setup complete: Sort ascending/descending based on the pricing setup complete state of the price plan.
Add Rates Using Pricing Models for a Price Offer
As describe in the “Create a Price Plan” sub-section, creation of price-plans is not allowed in Allegro. As the plan, rate-schedule and service combination is saved in the core Aria catalog, the shell for each unique combination is automatically created in Aria Allegro. The expected user action is to define the Rates for each combination. This is done by selecting the appropriate pricing method and then setting the rates based on the pricing method. To set the pricing for one such shell, perform the following steps:
- Navigate to “To view existing pricing plans”.
- Use the appropriate filter by price plan id/name, rate-schedule id/name, billable service id/name to narrow the rate setup required.
- Alternatively, use the 'Pricing Plan Complete' filter to find out all price plans where only the shells are created automatically, and the pricing admin is still required to set up the rates.
- Click on the 'ID link' of the price plan. This will open a drawer allowing the user to set the rates and perform the following steps:
- Locate the 'Pricing Model' attribute and use the drop-down list to select the pricing model that you wish to use for the price-offer.
- Identify the 'Transaction Type' attribute and ensure that it reflects the right transaction type. This should happen automatically, if the steps are followed and the billable service is assigned with the right service type. For usage services, the transaction type should be “USAGE”
- If the activation or recurring services are marked to add “Allowance” or “Accumulator”, then identify the 'Billing reference price' attribute. This attribute shows the rates defined for the services in Aria core as a display-only reference to help set the Allowances and Accumulators for those.
- The pricing model and the transaction type attribute will dynamically set up the section for the corresponding rates to be set up.
- Next, follow the links to set up the rates for each pricing model.
- For Flat pricing model data input, refer Set Flat Pricing model.
- For Recurring pricing model data input, refer Set Recurring Pricing model.
- For Recurring tiered pricing model data input, refer Set Recurring Tiered Pricing model.
- For Customer Attribute based pricing model data input, refer Set Customer Attribute-based Pricing model (future use)
- For Transaction attribute-based pricing model data input, refer to Set Transaction attribute-based Pricing model.
- For Usage Attribute based pricing model data input, refer to Set Usage attribute-based Pricing model.
- For Usage Progressive Tier Pricing model data input, refer Set Usage Progressive Tier Pricing model.
- For Usage Prospective Tier Pricing Model data input, refer Set Usage Prospective Tier Pricing model.
- For Recurring composite model data input, refer Set Recurring Composite Pricing model.
- For Usage composite pricing model data input, refer Set Composite Pricing model.
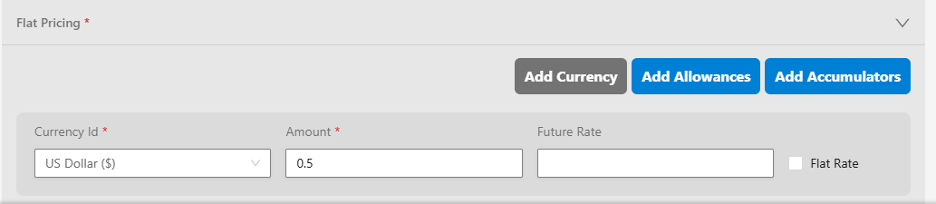
Set Flat Pricing Model
As you select the Pricing Model as “FLAT”, the Allegro UI opens a 'Flat Pricing' section in the price plan drawer. For Flat pricing model, users are given a choice to add one or more of 'Add Currency', 'Add Accumulator', 'Add Allowance'. Execute the following steps:
- See “Add Currency, Accumulator, Allowance”
- Click the Save button to save your configuration.
- Alternatively, click the Cancel button to undo the change.
Set Recurring Pricing Model
Recurring pricing models are used for Recurring services. For Recurring services in core Aria, if the service is enabled for 'Add Allowance' and/or 'Add Accumulator', then the price-plan shell for the recurring service is automatically created in Aria Allegro. To set the recurring pricing model, execute the following steps:
- Select the Pricing Model as Recurring from the drop-down list. This will add a dynamic section for Recurring Pricing Model.
- Please double check the Transaction type field. It should have FORWARD_RECURRING for forward recurring charges and ARREARS_RECURRING for arrear recurring charge.
- In the 'Recurring Pricing Model' section,
- Check that the first two fields for 'Recurring Unit' and 'Recurring Frequency' are set correctly for the duration of the recurring charge. For e.g., for monthly recurring, the unit should be MONTHS, and frequency should be 1
- Set the pro-ration settings. The pro-ration values available as drop-down list are:
- PRORATE—Prorate the recurring charge for the cycle
- FULL—Apply a full charge for the partial cycle
- NO_CHARGE—Apply no charge for the partial cycle.
- In the next field for 'Purchase pro-ration' select the pro-ration setting by selecting a value from the drop-down list. This is to handle scenarios where the product is purchased in the middle of a cycle.
- In the next field for 'Cancel pro-ration' select the pro-ration setting by selecting a value from the drop-down list. This is to handle scenarios where the product is cancelled in the middle of a cycle.
- In the next field for 'Upgrade pro-ration' select the pro-ration setting by selecting a value from the drop-down list. This is to handle scenarios where the product is upgraded in the middle of a cycle
- In the next field for 'Downgrade pro-ration' select the pro-ration setting by selecting a value from the drop-down list. This is to handle scenarios where the product is downgraded in the middle of a cycle
- If you are managing complex recurring charges that are dependent on other elements like accumulators, then you can associate a RATE_UNIT for the recurring charge. Examples of recurring services that require this setting are Minimum Spend True-up charges where it needs to know how much to true-up. In the next field, select the 'Rate Unit' from the drop-down list of pre-configured rate units. Please note that a rate unit selection for recurring charges is optional.
- In the next field, a checkbox field for 'Advanced Billing', select the checkbox to indicate if Advanced Billing applies. Advanced Billing is a configuration that allows you to apply the next cycle recurring fees a set number of days in advance. For example, a recurring charge from Nov 1st to Dec 1st can be applied in advance on 20th of October (11 days in advance).
- Refer “Add Currency, Accumulator, Allowance”
- Click the Save button to save your configuration
- Alternatively, click the Cancel button to undo the change.
Set Recurring Tiered Pricing Model
Recurring pricing models are used for Recurring services. For Recurring services in core Aria, if the service is enabled for 'Add Allowance' and/or 'Add Accumulator', then the price-plan shell for the recurring service is automatically created in Aria Allegro. To set the recurring pricing model, execute the following steps:
- Select the Pricing Model as Recurring from the drop-down list. This will add a dynamic section for Recurring Pricing Model.
- Please double check the Transaction type field. It should have FORWARD_RECURRING for forward recurring charges and ARREARS_RECURRING for arrear recurring charge.
- In the 'Recurring Pricing Model' section,
- Check that the first two fields for 'Recurring Unit' and 'Recurring Frequency' are set correctly for the duration of the recurring charge. For e.g., for monthly recurring, the unit should be MONTHS, and frequency should be 1
- Set the pro-ration settings. The pro-ration values available as drop-down list are:
- PRORATE—Prorate the recurring charge for the cycle
- FULL—Apply a full charge for the partial cycle
- NO_CHARGE—Apply no charge for the partial cycle.
- In the next field for 'Purchase pro-ration' select the pro-ration setting by selecting a value from the drop-down list. This is to handle scenarios where the product is purchased in the middle of a cycle.
- In the next field for 'Cancel pro-ration' select the pro-ration setting by selecting a value from the drop-down list. This is to handle scenarios where the product is cancelled in the middle of a cycle.
- In the next field for 'Upgrade pro-ration' select the pro-ration setting by selecting a value from the drop-down list. This is to handle scenarios where the product is upgraded in the middle of a cycle
- In the next field for 'Downgrade Pro-ration' select the pro-ration setting by selecting a value from the drop-down list. This is to handle scenarios where the product is downgraded in the middle of a cycle
- If you are managing complex recurring charges that are dependent on other elements like accumulators, then you can associate a RATE_UNIT for the recurring charge. Examples of recurring services that require this setting are Minimum Spend True-up charges where it needs to know how much to true-up. In the next field, select the 'Rate Unit' from the drop-down list of pre-configured rate units. Please note that a rate unit selection for recurring charges is optional.
- In the next field, a checkbox field for 'Advanced Billing', select the checkbox to indicate if Advanced Billing applies. Advanced Billing is a configuration that allows you to apply the next cycle recurring fees a set number of days in advance. For example, a recurring charge from Nov 1st to Dec 1st can be applied in advance on 20th of October (11 days in advance).
- For the 'Tiered' section,
- For the first field 'Tier Reference', select the value from the drop-down list. The options available are:
- BALANCE: Tiered based on the balance of an accumulator
- QUANTITY: For setting up quantity tiers
- In the next field, select the 'Accumulator Id' from the drop-down list of pre-configured accumulators. This is enabled if the Tier Rerence is BALANCE.
- In the next field, 'Tier Type', select the value from the drop-down list. The possible values are:
- PROGRESSIVE: To set up progressive tiers where more than one tier can apply.
- PROSPECTIVE: To set up prospective tiers where a fixed tier will apply.
- If the Tier Type selected is PROSPECTIVE tier, then the next set of fields are required. These are:
- For the field Evaluation Start, enter the start month. For Quarterly prospective tiers, if you set the Evaluation Start as 1, then the Prospective Tir term (fixed for all) is Jan-Mar, Apr-Jun, Jul-Sep, Oct-Dec.
- In the next field 'Offset months', enter the integer value for offset months. If prospective tiers are set up for Resellers, the Reseller might add a markup on top of the Prospective tier pricing. The reseller may need some time to set it up. To facilitate that, an offset month's value can be added. This defers the Pricing term by the offset month.
- In the next field 'Volume Treatment', select what you want to do with the aggregated value. This determines how the pricing admin wants to set up the tiers. The possible values are:
- AVERAGE—Determine the monthly average. The pricing admin will set the tier ranges based on the monthly average
- ANNUALIZE—Determine the annualized value. The pricing admin will set the tier ranges based on annualized value.
- AS-IS—Use the value of the accumulator as-is.
- In the next field 'Evaluation Term Unit', select the value from the drop-down list. For example, for Quarterly evaluation term, set the unit as 'QUARTERS'.
- In the next field 'Pricing Term Unit', select the value from the drop-down list. For example, for Quarterly pricing term, set the unit as 'QUARTERS'.
- In the next field 'Frequency', select the frequency for the Evaluation and Pricing Term. For example, for 1 quarterly prospective tier pricing, set the term unit as QUARTERS and set the frequency as 1.
- Start entering the tier data for the pricing model.
-
- Set the Minimum quantity for the tier range. For the first tier, the quantity should be 0. Note that the minimum quantity of a tier is inclusive (>=).
- Set the Maximum quantity for the tier range. For the last tier, the quantity should be empty or 0 to indicate any maximum value. The maximum value of a tier is exclusive (<)
- Refer “Add Currency, Accumulator, Allowance”
- To add more tiers, repeat steps in 4.e, until all tier data is set up.
-
- For the first field 'Tier Reference', select the value from the drop-down list. The options available are:
- Click the Save button to save your configuration
- Alternatively, click the Cancel button to undo the change.
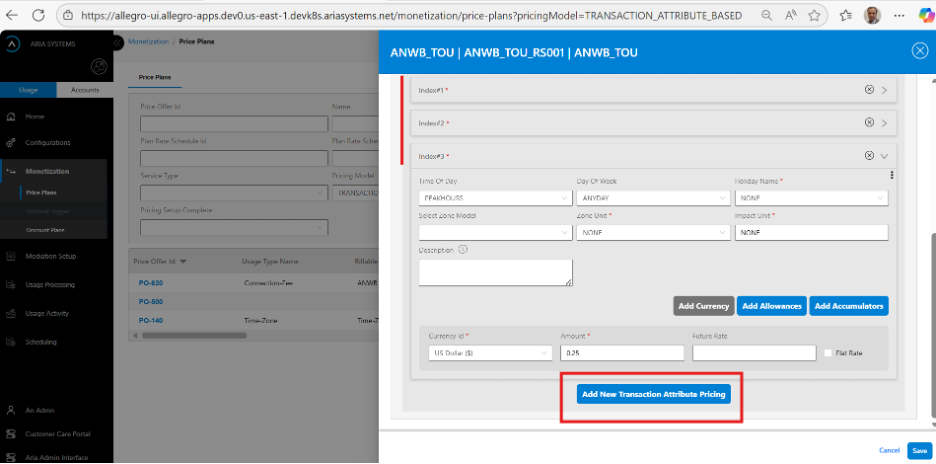
Set Transaction Attribute-based Pricing Model
Transaction attribute-based model for usage transactions relies on derived attributes for a usage record. These derived attributes are based on the model configurations. These model configurations help determine Time-Of-Day, Day-Of-Week, Holiday and Zone Model configurations.
For transaction-attribute based models, all the transaction attributes support a value that is ANY<XYZ>. It is advisable to always have a default value where the combination value for all attributes is provided as ANY<XYZ>. The engine will try to apply the best match and then try to match for the ANY value. The order of how the transaction attributes are provided is important as well. If the combination results in the same match algorithm, then the order in which it is configured applies.
To set the transaction attribute-based pricing model, execute the following steps:
- Select the Pricing Model as Transaction attribute-based on the drop-down list. This will add a dynamic section for Transaction Attribute based pricing Model.
- Please double check the Transaction type field. It should have USAGE.
- In the 'Transaction Attribute-Based Pricing Model' section,
- In the 'Time of Day' attribute, select the value from the drop-down list of pre-configured time of day configurations. To specify any value, select ANYTIME
- In the next field 'Day of Week' select the value from the drop-down list of pre-configured day of week configurations. To specify any value, select ANYDAY.
- In the next field 'Holiday Name' select the value from the drop-down list of pre-configured holidays. To specify any value, select ANYHOLIDAY.
- In the next field 'Select Zone' field select the zone from the drop-down list of configured zone model. If there is only one zone model configuration for the service type, then that zone model is automatically selected.
- In the next field 'Pricing Zone' select the pricing zone value from the drop-down list of configured zone models. Note that zone and pricing zone values are mutually exclusive; use only one. Both values are derived from the zone model configuration and analyzed by the rating engine, but only one applies in pricing. Telecom zone model configurations often include thousands of zones, while price points are limited. For example, a UGG customer from Germany may call all European countries (each a zone), but pricing may be uniform for all EU calls from Germany (Pricing Zone). This is shown in the following screenshot:

- In the next field 'Select Zone Unit', select the zone unit from the drop-down list. The drop-down list is automatically populated based on the selected zone model.
- For the transaction attributes and the combination values selected, refer “Add Currency, Accumulator, Allowance” to add currency, accumulator or allowance impacts.
- To add transaction-attribute pricing for different value combinations, repeat step 3 again until all the transaction attribute configuration is set.
- Click the Save button to save your configuration
- Alternatively, click the Cancel button to undo the change.
The following screenshot shows the Add button in a drawer for adding a new usage attribute section.
Set Usage Attribute-based Pricing Model
Usage attribute-based model for usage transactions relies on usage attributes of a usage record. A user can select any number of usage attributes for a price offer. A user would do so to provide different value combinations for the selected usage attributes and set pricing for those value combinations.
As part of the mediation setup and the file mapping exercise, all the raw attributes from all the sources are mapped to the Allegro Usage container. When defining the usage-attribute based pricing, the attributes from the Allegro Usage container are available
To set the usage attribute-based pricing model, execute the following steps:
- Select the Pricing Model as Usage attribute-based on the drop-down list. This will add a dynamic section for Usage Attribute based pricing Model.
- Please double check the Transaction type field. It should have USAGE.
- In the 'Usage Attribute-Based Pricing Model' section, click the Add new usage attribute-based Pricing button. This will add a new section to select and add usage attributes, their values and related pricing. Use the following steps:
- You have a choice to associate a billable service with each combination of the usage attribute section.
- Select the Billable Service Id from the drop-down list of billable service ids that you want to associate with the grouping.
- To add usage attributes to the section,
- In the Select Record field, select the record from the drop-down list. If the only record is the DETAIL record, then it will be auto selected. In most cases the DETAIL record should suffice as the mapping section would allow you to map custom record fields as well to the detail record.
- In the next field Select Field, select the field from the record using the drop-down list.
- The third field is a display only field automatically populated to show the selected field in the notation of <Record>. <Field>. For example, if you selected direction field from the “DETAIL.record”.
- In the next field Value select the value for the field selected. If the usage record has the value, then it will evaluate this grouping. To match any random value, select *.
- Repeat step:3-c to add more usage fields to this usage attribute-based section.
- For the usage attribute section and the combination values selected, refer “Add Currency, Accumulator, Allowance” to add currency, accumulator or allowance impacts.
- Repeat step: 3 to add one or more additional usage Attribute based sections.
- Please note:
- Aria Allegro engine looks for the best match combination for the usage attribute and their values.
- It is possible that more than one section is the best match for the usage record processing.
- In such cases, the order in which they are specified matters as the first best match will be evaluated. To explain this better, let us use the table below with 3 attributes and possible values
Usage Attribute-1 value Usage Attribute-2 value Usage Attribe-3 value Price UA1 UA2 * X1 UA1 * UA3 X2 * UA2 UA3 X3 * * * X4 - If a usage record comes with values UA1, UA2 and UA3 for the 3 attributes, the first 3-rows will provide the best match. In this case, the order in which the usage sections are configured takes precedence.
- It is also good practice to add a catch-all usage attribute section for default pricing. If it is not added and is intended, the usage record will get suspended.
- Click the Save button to save your configuration
- Alternatively, click the Cancel button to undo the change.
The following screenshot shows the Add button in a drawer for adding a new usage attribute section.

Set Usage Progressive Tier Pricing Model
Progressive tier pricing model is supported for usage transactions. Usage records in a cycle can use more than one tier pricing and hence the name progressive tiers. Progressive tiers start from 0 and reset to 0 after the tier term resets, which is usually the same as the usage billing cycle. To set the tiered pricing model for usage transaction type, execute the following steps:
- Select the Pricing Model as TIERED from the drop-down list. This will add a dynamic section for Tiered Pricing Model.
- Please double check the Transaction type field which should be of type USAGE.
- In the 'Tiered' section,
- For the first field Tier Reference, select the value from the drop-down list. The options available are:
- BALANCE: Tiered based on the balance of an accumulator
- QUANTITY: For setting up quantity tiers
- In the next field, select the Accumulator Id from the drop-down list of pre-configured accumulators. This is enabled if the Tier Reference is selected as BALANCE.
- In the next field, Tier Type, select the value from the drop-down list as PROGRESSIVE.
- If the Tier Type selected is PROGRESSIVE tier, then the next set of fields are not required and the UI disables them. These are Evaluation Start, Offset Months, Volume Treatment, Evaluation Term Unit, Pricing Term Unit and Frequency.
- Click on Add Tier button to start setting up tiers.
- Set the Minimum quantity for the tier range. For the first tier, the quantity should be 0. Note that the minimum quantity of a tier is inclusive (>=).
- Set the Maximum quantity for the tier range. For the last tier, the quantity should be empty or 0 to indicate any maximum value. The maximum value of a tier is exclusive (<)
- Refer “Add Currency, Accumulator, Allowance” to add currency, accumulator and allowance impacts as required.
- To add more tiers, repeat steps in 3.e, until all tier data is set up.
- For the first field Tier Reference, select the value from the drop-down list. The options available are:
- Click the Save button to save your configuration
- Alternatively, click the Cancel button to undo the change.
Set Usage Prospective Tier Pricing Model
Prospective tier pricing model is supported for usage transactions. Usage records in a cycle will always use a fixed tier price based on the quantity or the balance of an accumulator. Prospective tier cycle is usually the same as the usage billing cycle. However, it can be different. To set the prospective tiered pricing model for usage transaction type, execute the following steps:
- Select the Pricing Model as TIERED from the drop-down list. This will add a dynamic section for Tiered Pricing Model.
- Please double check the Transaction type field which should be of type USAGE.
- In the 'Tiered' section,
- For the first field Tier Reference, select the value from the drop-down list. The options available are:
- BALANCE: Tiered based on the balance of an accumulator
- QUANTITY: For setting up quantity tiers
- In the next field, select the Accumulator Id from the drop-down list of pre-configured accumulators. This is enabled if the Tier Reference is selected as BALANCE.
- In the next field, Tier Type, select the value from the drop-down list as PROGRESSIVE.
- If the Tier Type selected is PROGRESSIVE tier, then the next set of fields are required. These are:
- For the field Evaluation Start, enter the start month. For Quarterly prospective tiers, if you set the Evaluation Start as 1, then the Prospective Tir term (fixed for all) is Jan-Mar, Apr-Jun, Jul-Sep, Oct-Dec.
- In the next field 'Offset months', enter the integer value for offset months. If prospective tiers are set up for Resellers, the Reseller might add a markup on top of the Prospective tier pricing. The reseller may need some time to set it up. To facilitate that, an offset month's value can be added. This defers the Pricing term by the offset month.
- In the next field 'Volume Treatment', select what you want to do with the aggregated value. This determines how the pricing admin wants to set up the tiers. The possible values are:
- AVERAGE—Determine the monthly average. The pricing admin will set the tier ranges based on the monthly average
- ANNUALIZE—Determine the annualized value. The pricing admin will set the tier ranges based on annualized value.
- AS-IS—Use the value of the accumulator as-is.
- In the next field 'Evaluation Term Unit', select the value from the drop-down list. For example, for Quarterly evaluation term, set the unit as 'QUARTERS'.
- In the next field 'Pricing Term Unit', select the value from the drop-down list. For example, for Quarterly pricing term, set the unit as 'QUARTERS'.
- In the next field 'Frequency', select the frequency for the Evaluation and Pricing Term. For example, for 1 quarterly prospective tier pricing, set the term unit as QUARTERS and set the frequency as 1.
- Click on Add Tier button to start setting up tiers.
- Set the Minimum quantity for the tier range. For the first tier, the quantity should be 0. Note that the minimum quantity of a tier is inclusive (>=).
- Set the Maximum quantity for the tier range. For the last tier, the quantity should be empty or 0 to indicate any maximum value. The maximum value of a tier is exclusive (<)
- Refer “Add Currency, Accumulator, Allowance” to add currency, accumulator and allowance impacts as required.
- To add more tiers, repeat steps in 3.e, until all tier data is set up.
- For the first field Tier Reference, select the value from the drop-down list. The options available are:
- Click the Save button to save your configuration
- Alternatively, click the Cancel button to undo the change.
Set Recurring Composite Pricing Model
This will be supported in a later release when Customer Attribute based pricing model is also supported. For now, the Recurring transactions can have a FLAT or a TIERED Recurring model. Once the Customer attribute-based pricing model is supported then the composite model would allow us to select a Tiered pricing with a Customer Attribute Based model.
Set Usage Composite Pricing Model
Composite model, as the name suggests, allows you to combine one or more models already covered in the document into a single new model. This is also referred to as “Create your own model” as you can pick and choose the combinations and create your own. There are no limits to how many such combinations are created. Each combination can also use different sets of attributes in the models as required.
To set the composite pricing, execute the following steps:
- Select the Pricing Model as Composite from the drop-down list. This will open a dynamic section for Composite Model.
- Please double check the Transaction type field. It should have a value of USAGE.
- In the Composite Model section, you are provided with the choices that you want to combine to create a new model. This is shown in the screenshot below:

- If you want to add Customer Attribute-based pricing to be part of your composite model, select Add Custom Attributes. Customer attribute-based pricing comes in a future release.
- If you want to add Usage Attribute-based to be part of your composite model, select Add Usage Attributes.
- If you want to add Transaction Attribute-based to be part of your composite model, select Add Transaction Attributes.
- If you want to add Tiers to be part of your composite model, select Add Tiers.
- Composite models work with at least 2 selections from the choices available.
- Once you are done with your selections, the UI dynamically uses your selection for corresponding pricing setup. It adds an Index-1 section for your pricing setup.
- If Add Customer Attributes checkbox is selected, then a corresponding sub-section will open to add customer attributes (for future).
- If Add Usage Attributes checkbox is selected, then a corresponding subsection is available for selecting Usage Attributes.
- Refer to the “Set Usage Attribute based pricing Model” section of the document to select and add any number of usage fields, set their values and add currency, accumulator and allowance impacts as required.
- If Transaction Attribute based checkbox is selected, then a corresponding subsection is available for selecting Transaction Attributes.
- Refer to the “Set Transaction Attribute based pricing Model” section of the document to select the values for transaction attributes and add currency, accumulator and allowance impacts as required.
- If Add Tiers checkbox is selected, then a corresponding subsection is available for selecting adding Tier data and adding tiers.
- Refer to the “Set Usage Progressive Tier Pricing Model” or “Set Usage Prospective Tier Pricing Model” section of the document to set the corresponding tier data and to add currency, accumulator and allowance impacts as required
- To add more such sub-sections (Additional indexes), repeat step-4 until you are done with all the indexes and sub-sections that you want to add.
- Click the Save button to save your configuration
- Alternatively, click the Cancel button to undo the change.
Add Currency, Accumulator, Allowance
This is a common segment that will be required for any pricing model selection. This section covers the actual rates (typically currency impacts). However, Allegro allows for the use of allowance and accumulator as well when defining the rate impacts.
The following screenshot shows the buttons that allow to add resource impacts.
 ***NPM-09***
As shown in the screenshot, Pricing Admin can add
- Currency impact
- Zero, One or more allowance consumption
- Zero, one or more accumulators to accumulate.
- To add currency,
- Click the Add Currency button. This will add a row in the table for adding currency impact.
- Because the shell price plan is created for a unique combination of plan, plan rate schedule and the plan rate schedule services, the first field 'currency' should be automatically set from the rate schedule.
- In the next field 'Amount' enter the flat rate that needs to be applied.
- The next field 'Future rate' is covered under Price offer audit.
- Select the radio button to apply the rate as a 'Flat Rate' or not. For example, if the usage record is a 20-minute usage record.
- If the 'Flat Rate' checkbox is not selected, then the Flat Rate amount (say 'P') is applied to each minute of the 20-minute voice usage record, resulting in 20P rated value.
- If the 'Flat Rate' checkbox is selected, then flat Rate amount (say 'X') is applied as a flat rate for the 20-minute call resulting in P rated value.
- To add allowance,
- Click the Add Allowance button. This will add a row to add an allowance impact.
- To Add an allowance (for grant)—Allowances can be given for consumption with activation services, recurring services and in the future possibly with some specific usage scenarios as well. To add a grant of an allowance,
- In the first field 'Allowance Id', select the allowance resource from the drop-down list of allowances pre-configured.
- In the next field, 'Amount', set the amount of allowance that needs to be granted. Refer to the Billing Reference Price' to decide how much allowance needs to be given.
- In the next field, 'Allowance Impact Type', select the Allowance type as ALLOWANCE. The UI should auto-select this for the usage transaction-type.
- To add more allowances, repeat step (2) again until all required allowances are added.
- To Add an allowance (for consumption)—Allowances are consumed by usage services. To add an allowance for consumption,
- In the first field 'Allowance Id', select the allowance resource from the drop-down list of allowances pre-configured.
- The next field 'Allowance Impact Type' with a value of CONSUME will automatically be selected for Usage Transaction-type.
- Repeat steps-2.c for consuming more allowances. Please note that an allowance definition tells us whether the allowance is a quantity (e.g., Free/Included minutes) allowance or an amount (e.g., Free
- To add accumulator impact,
- Click the Add Accumulator button. This will add a row to add an accumulator impact.
- In the first field 'Accumulator Id', select the accumulator resource from the drop-down list of pre-configured accumulators.
- The next two fields are for display only fields for reference, pulled from the accumulator configuration. These two fields are 'Accumulate Quantity' flag and the Expression fields.
- To add more accumulators, repeat step (3) until all required accumulators are added.