Aria Knowledge Central

Create a Collection Group

Overview

You can create a collection group (also known as a "collection account group") by following the steps in this article.

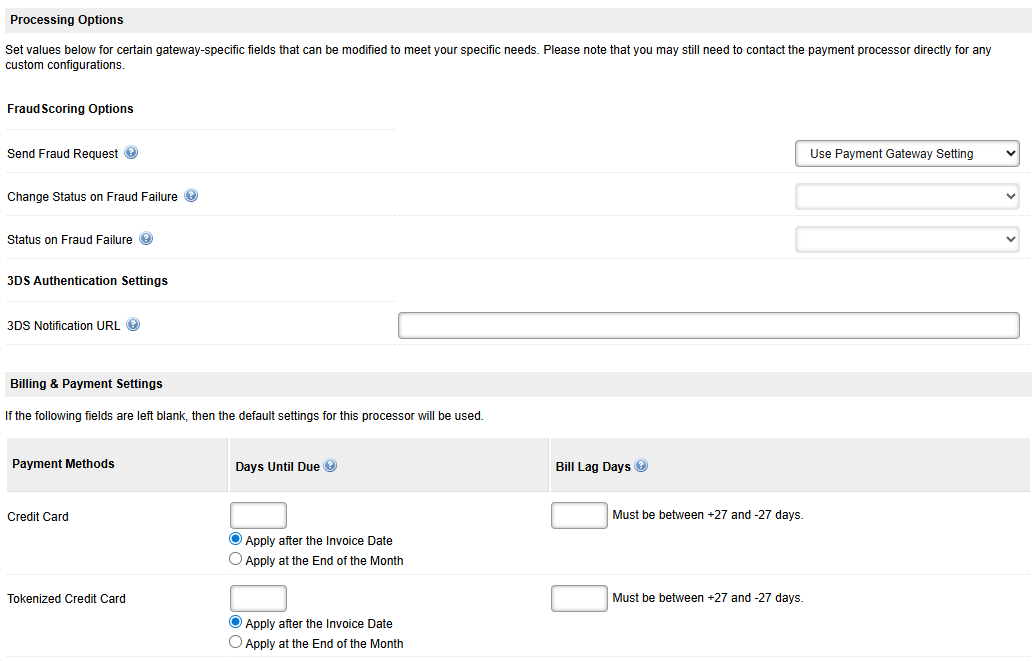
For collection group settings specific to your payment gateway, please see Payment Gateway Administration. Note that Aria offers Payment Gateway support, but you own the relationship with the Payment Gateway. When configuring a Payment-Gateway-specific Collection Group in Aria, you will likely need to obtain information from your Payment Gateway.

Creating a Collection Group

Getting Here: Click Configuration > Payments > Collection Groups.

  1. Click New.

    WL_CG_Groups_0_0211.png

  2. Enter a descriptive Group Name, such as a name that reflects the purpose of the collection group.

    For example, you may wish to enter Worldline for your customers on the east coast, Worldline—WC for transactions for your customers on the west coast, and Worldline—CAD for your customers who make payments in Canadian dollars.
     
  3. Enter a unique Client Group ID with which to identify the collection group.

    Aria assigns different, unique collection group numbers in each environment. You can assign collection group IDs in your Stage Current, Stage Future, and Production environments that remain consistent across all environments. This ensures that any functionality that you set up will work with the designated client group IDs across all of your environments.

    Using API calls or Direct Post, you can pass in a client group ID (alt_client_acct_group_id) to specify that the payment or validation you are currently submitting should be processed using the payment gateway information associated with the corresponding collection group instead of the default Aria collection account group or the collection account group to which a customer is assigned.

    In addition, using API calls you can pass a client group ID (client_acct_group_id) or an array of client group IDs (client_coll_acct_group_ids) to assign a customer to the corresponding collection group(s). Please see API Calls for Working with Client Group IDs for a list of API calls into which you can pass a client group ID.
  1. Enter the purpose of the collection group in the Description field.
     
  2. Choose the payment gateway for which you are creating the collection group from the Payment Processor/Gateway drop-down.

    WL_Group_Name_1_0211.png
Note: The remaining fields appearing on this screen may vary based on your Payment Gateway configuration. Complete the remaining fields based on the merchant account information provided to you by your payment gateway. More details on applicable fields can be found on the Knowledge Central topic for your associated Payment Gateway.
  1. Select Fraud Scoring Options and 3DS Authentication Settings (including the 3DS Notification URL) at the Processing Options section.
  2. Enter Days Until Due and Bill Lag Days (for the Credit Card and Tokenized Credit Card pay methods) at Billing & Payment Settings, if applicable. 
    • Days Until Due: The number of days after an invoice is generated that payment is due. For electronic payment methods, this will determine which day the electronic collection is attempted. The Days Until Due setting in the Collection Group screen will override the Days Until Due setting in the Payment Method screen.
    • Bill Lag Days: The number of days prior to (negative) or after (positive) an account billing date at which an invoice should be generated. The Bill Lag Days setting in the Collection Group screen will override the Bill Lag Days setting in the Payment Method screen, and the Bill Lag Days setting in the Payment Method screen will override the Bill Lag Days setting in the Billing Recurring Interval screen (Configuration > Billing > Bill Lag Days).

    WL_PO_BP_Settings_2_0211.png

  3. Enter Merchant Account Details, including the API Key ID, Secret API Key and Webhook Secret key provided by the payment gateway.

    WL_MAD_3_0212.png

  4. Enable or disable available card types for zero dollar authorizations and automatic reversals at the System Overrides section, if allowed.
    Note: Card types appearing at this screen are those supported for the designated payment gateway.

    Account Verification Zero Dollar Authorization—This setting is used to verify that a credit card account is valid and in good standing prior to offering a service to that customer. Some payment processors may not allow one or the other selectable values to be used.

    The following are allowed values from the drop-down list:

    Value Description
    System Settings—True $0 or $1 authorization will be performed to check for card validity.
    System Settings—False Authorization will be performed with a value other than $0 for all card brands
    True Same as System Settings—True for this card brand.
    False Same as System Settings—False for this card brand.

    Automatic Reverse of an Authorization—This automatically attempts to reverse an Account Verification Authorization Amount if an amount is used that is other than zero and the payment gateway/processor supports that feature.

    The following are allowed values from the drop-down list:

    Value Description
    System Settings—Null It is not necessary to automatically reverse authorization by default for all card brands.
    System Settings—True Automatic reversal of an authorization is allowed for all card brands for an amount greater than 0.
    True Automatic reversal of an authorization is allowed for this card brand for an amount greater than 0.
    False Automatic reversal of an authorization is disallowed for this card brand for an amount greater than 0.


    WL_Sys_Override_4_0211.png

  5. Use the defaults provided under CVV System Overrides or enable/disable error codes as needed.

    WL_CVV_Overrides_5_0211.png

  6. Use the defaults provided under AVS System Override or enable/disable error codes as needed.

    WL_AVS_Overrides_6_0211.png

  7. Populate special fields under Advanced Options as allowed, including soft_descriptor (transaction description on customer's credit card statement) and end_user_device_fingerprint (to identify the shopper's device).

    WL_Adv_Options_7_0211.png

  8. Click Save to retain your Collection Group.

The collections group is saved. Be sure to add all applicable accounts to the collection group during the account registration process or soon thereafter.

TOP
  • Was this article helpful?