Settings
Deploy from Runtime Manager to Cloud Hub:
- Sign into Any point Platform.
- Select Runtime Manager.
- In the Applications page, click Deploy application.

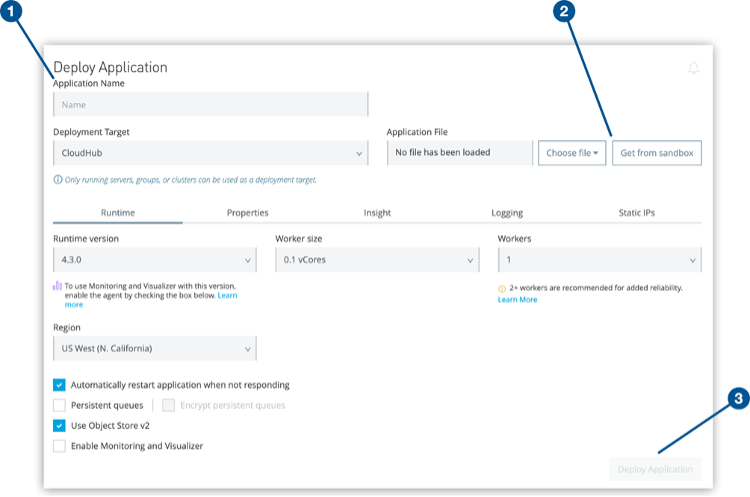
Figure 1
Figure describes
(1) Application Name field
(2) Get from sandbox button and
(3) Deploy Application button on the Deploy Application page
- Provide a name for your application.
- In the Deployment Target menu, select Cloud Hub, if it is not already selected.
- Specify the application file:
Import a file from Exchange:- Click Choose file > Import file from Exchange.
- Select Application for the type.
- Enter the name of your application in the search box.
- Select the application to deploy, select a version from the Version menu, and then click Select.
- Select Choose file > Upload file.
- Select the file to upload and then click Open.
Note: The application file size limit is 200 MB.
- Click tabs to configure application options.

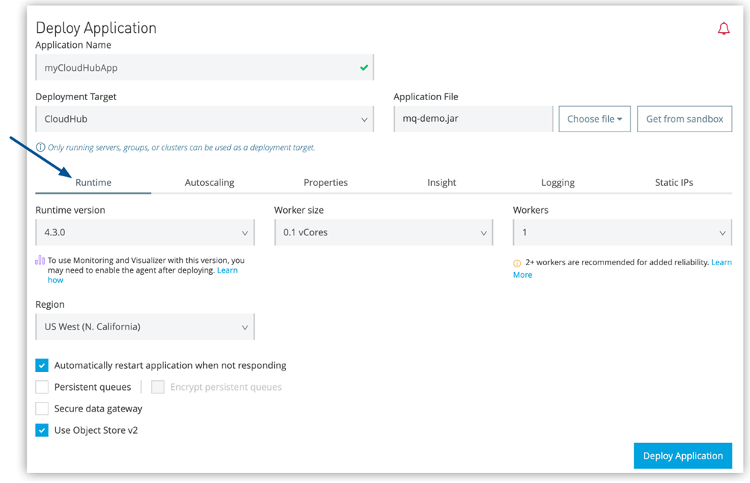
Figure 2
The Arrow shows the configuration tabs on the Deploy Application Page.
Runtime Tab Settings:
The Runtime tab includes the following settings:
Runtime version:
The runtime version must be the same Mule version used to develop your application.
After you deploy the app, Cloud Hub automatically alerts you when updates for the selected runtime version are available.
Workers:
When you deploy an application with more than one worker, CloudHub automatically balances any incoming traffic load across your allocated workers.
Region:
If you have global deployment enabled on your account, you can change the deployment region. When you change the region, the domain is automatically updated.
Automatically restart application when not responding:
Cloud Hub automatically restarts your application when the monitoring system discovers an issue.
Persistent Queues:
You can use persistent queues on your application to store data in an input queue to disk. Persistent queues protect against message loss and enable you to distribute workloads across a set of workers.
Encrypt persistent queues:
If you enable persistent queues, you can optionally encrypt the data stored in the input queue on disk.
Use Object Store v2:
Object Store v2 is enabled by default in Mule 4. In Mule 3, select this option to access Object Store v2.
Enable Monitoring and Visualizer:
Use Any point Monitoring and Visualizer for Mule applications running on supported versions of Mule.
Auto scaling Tab Settings:
Auto scaling enables you to define policies that respond to CPU or memory usage thresholds by scaling up or down the processing resources used by an application.
Properties Tab Settings:
On the Properties tab, you can specify properties (key-value pairs) that the application uses during deployment and while running.
Insight Tab Settings:
You can enable the Insight analytics feature and specify metadata options on the Insight tab. For information about using this tool
Logging Tab Settings:
You can configure the logging level (DEBUG, WARN, ERROR, or INFO) for the application on the Logging tab. Alternatively, you can configure logging by modifying the level value in the log4j2.xml file.
Static IPs Tab Settings:
- Use the Static IPs tab to allocate a static IP address to your application deployed in a specific region.
- You can also preconfigure static IP addresses for multiple regions for disaster recovery (DR) scenarios. If an application has static IP addresses allocated in multiple regions, the static IP address is assigned when the application is deployed to a new region.
- If your application is already running, applying the static IP address change restarts it using the newly applied static IP address.
- By default, the number of static IP addresses allocated to your organization is equal to twice the number of productions vCores in your subscription and appears under the Use Static IP checkbox.
- If you need to free some of your static IP allocations, you can release unused IP addresses from an application. To increase your allocation of static IP addresses, contact your Customer Success Manager. For more information about adding more static Ips.
